

As more machine learning (ML) workloads go into production, many organizations must bring ML workloads to market quickly and increase productivity in the ML model development lifecycle. However, the ML model development lifecycle is significantly different from an application development lifecycle. This is due in part to the amount of experimentation required before finalizing a version of a model. Amazon SageMaker, a fully managed ML service, enables organizations to put ML ideas into production faster and improve data scientist productivity by up to 10 times. Your team can quickly and easily train and tune models, move back and forth between steps to adjust experiments, compare results, and deploy models to production-ready environments.
Amazon SageMaker Studio offers an integrated development environment (IDE) for ML. Developers can write code, track experiments, visualize data, and perform debugging and monitoring all within a single, integrated visual interface, which significantly boosts developer productivity. Within Studio, you can also use Studio notebooks, which are collaborative notebooks (the view is an extension of the JupyterLab interface). You can launch quickly because you don’t need to set up compute instances and file storage beforehand. SageMaker Studio provides persistent storage, which enables you to view and share notebooks even if the instances that the notebooks run on are shut down. For more details, see Use Amazon SageMaker Studio Notebooks.
Many data scientists and ML researchers prefer to use a local IDE such as PyCharm or Visual Studio Code for Python code development while still using SageMaker to train the model, tune hyperparameters with SageMaker hyperparameter tuning jobs, compare experiments, and deploy models to production-ready environments. In this post, we show how you can use SageMaker to manage your training jobs and experiments on AWS, using the Amazon SageMaker Python SDK with your local IDE. For this post, we use PyCharm for our IDE, but you can use your preferred IDE with no code changes.
The code used in this post is available on GitHub.
Prerequisites
To run training jobs on a SageMaker managed environment, you need the following:
An AWS account configured with the AWS Command Line Interface (AWS CLI) to have sufficient permissions to run SageMaker training jobs
Docker configured (SageMaker local mode) and the SageMaker Python SDK installed on your local computer
(Optional) Studio set up for experiment tracking and the Amazon SageMaker Experiments Python SDK
Setup
To get started, complete the following steps:
Create a new user with programmatic access that enables an access key ID and secret access key for the AWS CLI.
Attach the permissions AmazonSageMakerFullAccess and AmazonS3FullAccess.
Limit the permissions to specific Amazon Simple Storage Service (Amazon S3) buckets if possible.
You also need an execution role for the SageMaker AmazonSageMakerFullAccess and AmazonS3FullAccess permissions. SageMaker uses this role to perform operations on your behalf on the AWS hardware that is managed by SageMaker.
Install the AWS CLI on your local computer and quick configuration with aws configure:
For more information, see Configuring the AWS CLI
Install Docker and your preferred local Python IDE. For this post, we use PyCharm.
Make sure that you have all the required Python libraries to run your code locally.
Add the SageMaker Python SDK to your local library. You can use pip install sagemaker or create a virtual environment with venv for your project then install SageMaker within the virtual environment. For more information, see Use Version 2.x of the SageMaker Python SDK.
Develop your ML algorithms on your local computer
Many data scientists use a local IDE for ML algorithm development, such as PyCharm. In this post, the algorithm Python script tf_code/tf_script.py is a simple file that uses TensorFlow Keras to create a feedforward neural network. You can run the Python script locally as you do usually.
Make your TensorFlow code SageMaker compatible
To make your code compatible for SageMaker, you must follow certain rules for reading input data and writing output model and other artifacts. The training script is very similar to a training script you might run outside of SageMaker, but you can access useful properties about the training environment through various environment variables. For more information, see SageMaker Toolkits Containers Structure.
The following code shows some important environment variables used by SageMaker for managing the infrastructure.
The following uses the input data location SM_CHANNEL_{channel_name}:
The following code uses the model output location to save the model artifact:
The following code uses the output artifact location to write non-model training artifacts (such as evaluation results):
You can pass these SageMaker environment variables as arguments so you can still run the training script outside of SageMaker:
Test your ML algorithms on a local computer with the SageMaker SDK local mode
The SageMaker Python SDK supports local mode, which allows you to create estimators and deploy them to your local environment. This is a great way to test your deep learning scripts before running them in the SageMaker managed training or hosting environments. Local mode is supported for framework images (TensorFlow, MXNet, Chainer, PyTorch, and Scikit-Learn) and images you supply yourself. See the following code for ./sm_local.py:
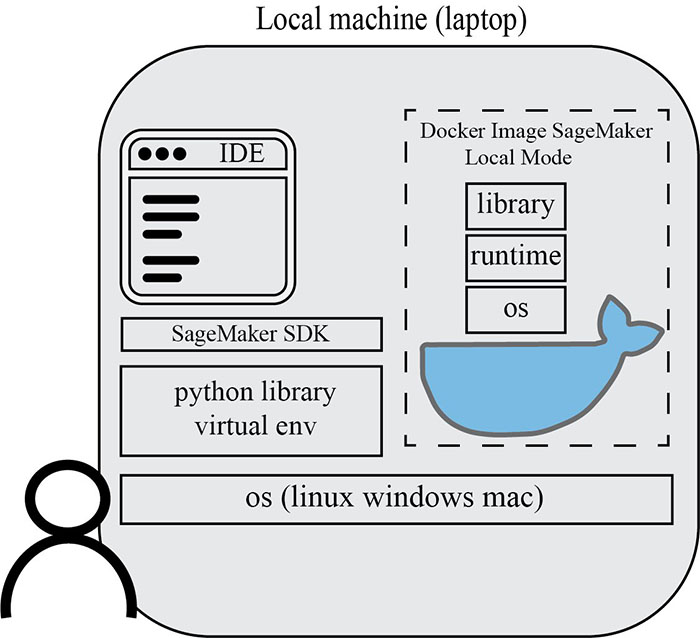
With SageMaker local mode, the managed TensorFlow image from the service account is downloaded to your local computer and shows up in Docker. This Docker image is the same as in the SageMaker managed training or hosting environments, so you can debug your code locally and faster.
The following diagram outlines how a Docker image runs in your local machine with SageMaker local mode.
The service account TensorFlow Docker image is now running in your local computer.
On the newer versions of macOS, when you debug your code with SageMaker local mode, you might need to add Docker Full Disk Access within System Preferences under Security & Privacy, otherwise PermissionError occurs.
Run your ML algorithms on an AWS managed environment with the SageMaker SDK
After you create the training job, SageMaker launches the ML compute instances and uses the training code and the training dataset to train the model. It saves the resulting model artifacts and other output in the S3 bucket you specified for that purpose.
The following diagram outlines how a Docker image runs in an AWS managed environment.
On the SageMaker console, you can see that your training job launched, together with all training job related metadata, including metrics for model accuracy, input data location, output data configuration, and hyperparameters. This helps you manage and track all your SageMaker training jobs.
Deploy your trained ML model on a SageMaker endpoint for real-time inference
For this step, we use the ./sm_deploy.py script.
When your trained model seems satisfactory, you might want to test the real-time inference against an HTTPS endpoint, or with batch prediction. With the SageMaker SDK, you can easily set up the inference environment to test your inference code and assess model performance regarding accuracy, latency, and throughput.
SageMaker provides model hosting services for model deployment, as shown in the following diagram. It provides an HTTPS endpoint where your ML model is available to perform inference.
The persistent endpoint deployed with SageMaker hosting services appears on the SageMaker console.
Organize, track, and compare your ML trainings with Amazon SageMaker Experiments
Finally, if you have lots of experiments with different preprocessing configurations, different hyperparameters, or even different ML algorithms to test, we suggest you use Amazon SageMaker Experiments to help you group and organize your ML iterations.
Experiments automatically tracks the inputs, parameters, configurations, and results of your iterations as trials. You can assign, group, and organize these trials into experiments. Experiments is integrated with Studio, providing a visual interface to browse your active and past experiments, compare trials on key performance metrics, and identify the best-performing models.
Conclusion
In this post, we showed how you can use SageMaker with your local IDE, such as PyCharm. With SageMaker, data scientists can take advantage of this fully managed service to build, train, and deploy ML models quickly, without having to worry about the underlying infrastructure needs.
To fully achieve operational excellence, your organization needs a well-architected ML workload solution, which includes versioning ML inputs and artifacts, tracking data and model lineage, automating ML deployment pipelines, continuously monitoring and measuring ML workloads, establishing a model retraining strategy, and more. For more information about SageMaker features, see the Amazon SageMaker Developer Guide.
SageMaker is generally available worldwide. For a list of the supported AWS Regions, see the AWS Region Table for all AWS global infrastructure.
About the Author
Yanwei Cui, PhD, is a Machine Learning Specialist Solutions Architect at AWS. He started machine learning research at IRISA (Research Institute of Computer Science and Random Systems), and has several years of experience building artificial intelligence powered industrial applications in computer vision, natural language processing and online user behavior prediction. At AWS, he shares the domain expertise and helps customers to unlock business potentials, and to drive actionable outcomes with machine learning at scale. Outside of work, he enjoys reading and traveling.
Read MoreAWS Machine Learning Blog