

Customers running databases in a self-managed environment face many challenges, such as scalability, performance, maintenance overhead, and reliability. To help increase resiliency, performance, and scalability, AWS has become the new norm for companies. AWS offers the widest variety of databases that are purpose-built for different types of applications so you can choose the right tool for the job to get the best cost and performance. For instance, Amazon Relational Database Service (Amazon RDS) for Oracle is a fully managed commercial database that makes it easy to set up, operate, and scale Oracle deployments in the cloud.
To help assess the performance of the target platform before migrating your critical database workloads, you can use Oracle Real Application Testing (Oracle RAT) to assess the effect of any database system changes on real-world applications in a test environment before you deploy the change in the production environment. With Oracle RAT, you can replay the workload run on a production database system on an RDS for Oracle instance to help analyze the difference between the source and target platforms. Oracle RAT, which is a separately licensed option of Oracle Enterprise edition, includes two main features to test the effect of system changes on real-world applications:
Database Replay allows you to capture workloads on a production system and replay them in your target environment while maintaining the unique characteristics of the workload. Essentially, it allows you to record your workload in real time and then play it back in another database, which can be a different version, operating system, or hardware configuration. It enables you to test a variety of system changes, such as hardware and software migration, operating system and database upgrades, patches, and other configuration changes.
SQL Performance Analyzer (SPA) enables you to assess the impact of system changes on SQL performance by identifying any difference in the SQL run plans and statistics resulting from the change.
In this post, we describe how to use Oracle RAT features with Amazon RDS for Oracle to help you determine when to migrate from a self-managed instance to a fully managed database environment. Some steps in this solution, such as the compare period report, use Oracle Automatic Workload Repository (AWR) features, which are licensed under the Tuning and Diagnostic pack.
Solution overview
To assess the performance of the target platform before migrating your Oracle database workload from a self-managed instance to Amazon RDS for Oracle, you can capture the workload from the source database system for a certain period, preprocess the captured files on a self-managed instance, and copy them to the RDS for Oracle instance, where you can replay the workload. At a high level, this process involves the following steps:
Capture the workload from a self-managed Oracle database.
Capture the SQL workload from AWR into a SQL tuning set for SPA analysis.
Preprocess the captured files.
Copy the preprocessed files and SQL tuning set to the target RDS for Oracle instance.
Import the tuning set to the target RDS for Oracle instance and run SPA.
Replay the workload on the RDS for Oracle instance.
Perform a detailed analysis of the captured and replayed workload using reports generated by database replay and SPA.
The following diagram illustrates this workflow.
The following components are involved in capturing the workload from a self-managed instance and replaying it on an RDS for Oracle instance:
Source self-managed instance – This is the source Oracle database, which runs outside AWS or in Amazon Elastic Compute Cloud (Amazon EC2) as a self-managed instance. We capture the workload for a specified period from this system.
Target RDS for Oracle instance – This is the target RDS for Oracle instance where we replay the captured workload.
Preprocessing system – This is the system we use for preprocessing the capture files. This can be on the same server that is hosting the source database. However, you must perform preprocessing using the same version as the target RDS for Oracle instance.
Replay client system – This is the system that hosts the replay client software, which is the same version as the target RDS for Oracle instance. You can use the same system for preprocessing and hosting replay clients.
Capture the workload
The first step in using Database Replay is to capture a workload, which you replay in the target RDS for Oracle instance. You need to perform this step at the source self-managed instance. When you enable the capture process in an Oracle database, it records all external client requests made to the database in binary files called capture files, which are platform independent. These capture files contain all relevant information required to replay the workload in the target RDS for Oracle instance.
It’s important that the capture period covers a representative production workload. It may be ideal to choose a peak workload period for the capture. You can start testing the capture process with short windows (10–15 minutes) to estimate the space required to hold capture files. Based on the testing, you can run your final capture for a longer period (1–2 hours) to make sure the capture covers your peak workload.
Before starting a workload capture, you should have a strategy in place to restore the source database to the RDS for Oracle instance. The success of the replay process in the target RDS for Oracle instance depends on the convergence between the source and target systems in terms of the logical state of the application data. If the source and target systems aren’t identical in terms of application data, it can cause replay transactions to fail.
Create a directory object and capture the workload
To create a directory object and capture the workload for a specific period of time, use the following code:
Refer to the Oracle documentation for further details on capturing a workload and different parameters of the dbms_workload_capture procedure. The preceding example shows how to capture a workload using API calls. Alternatively, you can use Oracle Enterprise Manager to do the same with the convenience of using a GUI-based interface.
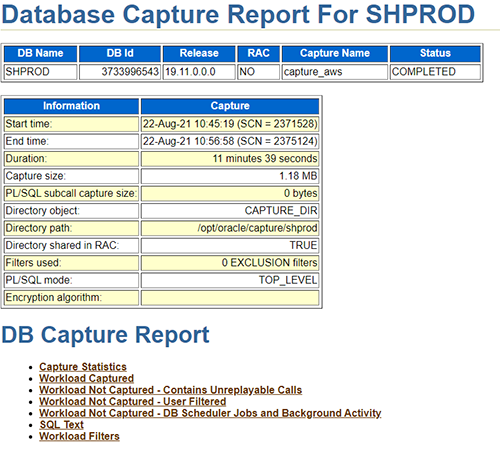
Generate the workload capture report
Workload capture reports contain captured workload statistics, information about the top session activities that were captured, and any workload filters used during the capture process. You can use the following code to generate a report using API calls:
The following is a sample workload capture report.
Create a SQL tuning set for SPA
SQL Performance Analyzer (SPA) is one of the solutions used in Oracle RAT. The steps to run SPA include creating a SQL tuning set for the workload that was captured, as explained in the previous steps. You then export the SQL tuning set from the source database server to be imported to the target RDS for Oracle instance for performance assessment.
To create a SQL tuning set for your captured workload, use the snapshot IDs in the AWR that correspond to the time the capture was run. The information on the timestamp is available in the capture report generated in the previous step. The following is the snippet of commands to run on the on-premises production database server:
Export the SQL tuning set table
In the previous step, you created the SQL tuning set table, which has all the SQLs that ran during the workload capture window. You now need to export this table from the source self-managed instance to the test RDS for Oracle instance to evaluate performance.
To export the table, use the Oracle Data Pump utility:
The preceding command creates the file sts.dmp in the capture directory.
Run the workload analyzer
Before you process the files, it’s important to run the workload analyzer, which gives details on how much percentage of the workload was captured and if there are any findings and recommendations that you can implement.
To run the workload capture analyzer, run the following command on any server that has access to the captured files and source database and has Java and Oracle binaries installed:
Preprocess the capture files
Preprocessing a captured workload creates all the necessary metadata to help you replay the workload repeatedly in the target system. Because preprocessing capture files is a resource-intensive process, we recommend running this step in a non-production system with the following restrictions:
Preprocessing must be done on the same version or patchset as the target RDS for Oracle instance.
You can’t preprocess capture files on an RDS for Oracle instance. It must be done on a self-managed instance.
Copy the contents of the directory where the capture files are created into the system that runs the preprocessing task, and make a directory object in the database to point to the directory where the capture files are stored.
You can preprocess the captured files using APIs as shown in the following code:
You can also use Enterprise Manager to preprocess capture files.
Copy processed files to the target platform
After the capture files are preprocessed, you transfer them to the target system where the workload can be replayed repeatedly. To replay the workload in the target RDS for Oracle instance, you need to make the files available to the system (a self-managed instance) where the replay client is hosted as well as to the RDS for Oracle instance.
Copy the directory containing the preprocessed files to the system hosting the replay client
You can copy the entire directory structure to the replay client system using standard tools because you have full access to the self-managed instance hosting the replay client. You can use an Amazon Simple Storage Service (Amazon S3) bucket as a staging area if your replay client system is an EC2 instance. See the following code:
Copy required files to the RDS for Oracle instance
You need to copy the following files, which are located under the preprocessed directory, to the RDS for Oracle instance to replay the workload:
cap/*.wmd
pp19.11.0.0.0/* (depending on the version, this could be pp12.1.0.2.0/ or pp12.2.0.2.0/)
sts.dmp (the SQL tuning set export taken earlier)
You can either copy these files selectively or copy all the files in the preprocessed directory. Due to the restriction in accessing subdirectories in an RDS for Oracle instance, all files (from subdirectories) must be copied to the parent directory object in the RDS for Oracle instance.
You have multiple options for copying files to an RDS for Oracle instance, such as Amazon S3 integration or DBMS_FILE_TRANSFER using database links. If you have direct connectivity between the source database instance and target RDS for Oracle instance, you can copy files using DBMS_FILE_TRANSFER.
For this post, we use the Amazon S3 integration to copy the processed files to the target RDS instance.
Create an S3 bucket to stage the files and follow the steps in the Amazon RDS User Guide to set up Amazon S3 integration for the RDS for Oracle instance:
Prepare the target RDS for Oracle instance for replay
To prepare your target instance for replay, you first copy the source database, then you take a snapshot of the instance.
Copy data from the source database to the RDS for Oracle instance
Before a workload can be replayed, the logical state of the application data on the replay system should be similar to that of the capture system when replay begins. To achieve this, you can copy the source database to the RDS for Oracle instance as of the SCN or timestamp of capture start time using tools like Oracle Data Pump, AWS Database Migration Service (AWS DMS) (see Migrating Oracle databases with near-zero downtime using AWS DMS for instructions), or Oracle GoldenGate.
Take a snapshot of the RDS instance before starting the replay
Take a snapshot of the RDS for Oracle instance after the required data has been copied from the source database; this helps you repeat replaying the same workload. At the end of a replay process, you can restore the RDS for Oracle instance to a new instance and perform repeated testing. Restoring from a snapshot backup also helps you bring the target RDS for Oracle instance into the same state after running SQL Performance Analyzer before starting replay of the captured workload.
Amazon RDS for Oracle currently provides limited ability to manage files in directory objects on the instance. One such limitation is that subdirectories created by the replay aren’t directly accessible and can’t be deleted to free up space. Replaying the workload on a snapshot copy of the original RDS for Oracle instance can help you perform a complete cleanup by deleting the instance that ran the replay.
Run SQL Performance Analyzer on the RDS for Oracle instance
It’s a good practice to run SQL Performance Analyzer (SPA) before running database replay to assess the impact on SQL performance in the target platform. However, this is optional and can be skipped if you want to assess the performance of the workload using the database replay feature alone. If you choose to run both, make sure that target RDS for Oracle instance is restored to a healthy state after running SPA before replaying the workload to ensure the state of the database is consistent with the captured workload. See the following code:
This generates the file rat_spa.html in REPLAY_DIR, which you can push to an S3 bucket using the Amazon S3 integration for Amazon RDS for Oracle.
Replay the workload in the RDS for Oracle instance
If you have already run SPA to analyze the performance of SQL workload, you can restore the RDS for Oracle instance from a snapshot prior to replaying workload to bring the instance into a healthy logical state to avoid transaction failures during the replay.
You can initiate replay on the target RDS for Oracle instance after completing the following prerequisites.
Prepare a self-managed system for hosting the replay client
The replay client is a multi-threaded program (an executable named wrc located in the $ORACLE_HOME/bin directory). You can use any system containing the Oracle client or server software installed with connectivity to the target RDS for Oracle instance as the replay client system. The version of replay client should be same as the version of the database with the preprocessed capture files and the version of the target RDS for Oracle instance.
You can use an Oracle Instant Client installation (Basic and Tools packages) on an EC2 instance as a replay client if you don’t have an existing system with the required software installed.
You need to make the preprocessed files available to the replay client, as explained in the previous section.
The optimal number of database replay clients required to replay the workload is linked to the workload you captured. Fortunately, you can know in advance how many replay clients you may need using the calibrate mode of the wrc workload replay client (detailed steps are shown in the next section).
The following are a few examples of recommendations made by wrc in calibrate mode.
Recommendation 1
Consider using at least 1 client divided among 1 CPU(s)
You will need at least 3 MB of memory per client process.
This workload needs one replay client with total 1 CPU and 3 MB memory to efficiently replay the workload.
Recommendation2
Consider using at least 3 clients divided among 1 CPU(s)
You will need at least 352 MB of memory per client process.
If your machine(s) cannot match that number, consider using more clients.
This workload needs three replay clients with total 1 CPU and 1056 MB (3×352 MB) memory to efficiently replay the workload.
Recommendation 3
Consider using at least 14 clients divided among 4 CPU(s).
You will need at least 153 MB of memory per client process. If your machine(s) cannot match that number, consider using more clients.
This workload needs 14 replay client with total 4 CPU and 2142 MB (14×153 MB) memory to efficiently replay the workload. You can split the workload clients across multiple systems to meet this resource requirements.
During the first replay attempt, you may need to monitor resource utilization on your replay client systems to adjust the resource allocations for the following replay attempts to ensure the replay activity isn’t throttled by resource crunch on the replay client systems. If you’re using an EC2 instance to host your replay clients, you can use Amazon CloudWatch to monitor your instances to make sure that you’re not exceeding the capacity of the instance or storage in terms of CPU, memory, IOPs, or throughput.
Prepare the target RDS for Oracle instance with the required processed files copied to a directory object
Prepare the target RDS for Oracle instance with a copy of the source database to make it logically consistent for replaying the workload and take a snapshot of the instance. You need to copy the required preprocessed files to a directory object, as explained in the previous section. See the following code:
Generate a workload replay report
You can assess performance by generating database replay reports, which give an insight of the database utilization, divergence level, top waits, top SQLs, and other statistical information.
To generate the workload replay report, you can run the following commands on the RDS for Oracle instance:
The following is a sample report.
Use an AWR comparison report for capture vs. replay period
Amazon RDS for Oracle doesn’t support importing AWR snapshots for the capture period into the target instance, so you can’t use compare period reports of the database replay to compare the performance of the source and target systems. However, you can export AWR snapshots from an RDS for Oracle instance, which you can import to a self-managed instance. In this section, we export AWR snapshots corresponding to a replay period from the RDS for Oracle instance, import them to the source database where the workload was captured from, and generate an AWR comparison report to compare the performance of the source and target systems. You can also choose a third self-managed instance to import AWR snapshots from both source and target for comparison. See the following code:
Input DBID, snap_ids for both source and target systems to generate a comparison report.
The following screenshot shows a few sections from an AWR compare period report.
Limitations of using Oracle RAT with Amazon RDS for Oracle
To overcome the limitations of using Oracle RAT with Amazon RDS for Oracle, consider the following:
You can replay a workload captured from a self-managed instance on an RDS for Oracle instance. You can perform preprocessing on any self-managed instance using the same Oracle database version as the target RDS for Oracle instance.
You can run the replay client (${ORACLE_HOME}/bin/wrc) on a self-managed instance with an Oracle database software client or server installation of the same version as the target RDS for Oracle instance.
We recommend replaying the workload on a test instance created from a snapshot backup, which you can delete at the end of the replay activity.
You can export the AWR snapshots from the RDS for Oracle instance for the replay period and import them to the source self-managed instance and see the capture vs. replay performance using an AWR compare period report.
Clean up
When you’re done using this solution, you can delete the capture files from the source self-managed instance and preprocessed files from the preprocessing system and replay client system. You should also stop or terminate any EC2 instances that you provisioned exclusively for hosting some of the components of the Database Replay feature, such as the replay client. If you used an S3 bucket to transfer files, you should delete the bucket if no longer needed.
You can’t delete subdirectories created by the replay process in an RDS for Oracle instance. Instead, delete the entire RDS for Oracle instance that was created from the snapshot backup.
Summary
As multiple enterprises are moving their workloads to AWS, they choose Amazon RDS for Oracle to help deploy and run Oracle database workloads. Oracle RAT can help you evaluate when to migrate from a self-managed instance to a fully managed database environment such as Amazon RDS for Oracle.
This post described the steps for using Oracle RAT on Amazon RDS for Oracle. Refer to Use Oracle Real Application Testing features with Amazon EC2 for information about using Oracle RAT for migrating database workloads to self-managed instances on Amazon EC2. If you have any comments or questions, leave them in the comments section.
About the Authors
John Lonappan is a Senior Database Specialist Consultant / Solutions Architect at Amazon Web Services (AWS) with a focus on relational databases. Prior to AWS, John has worked as Database Architect for large Data center providers across the Globe. Outside of work, he is passionate about, Long drives, EV Conversion, playing chess and traveling.
Saumya Mula is a Database Consultant with the Professional Services team at Amazon Web Services. She works as a database migration consultant to provide Amazon customers with technical guidance to migrate their on-premises databases to AWS.
Jobin Joseph is a Senior Database Specialist Solution Architect based in Dubai.
With a focus on relational database engines, he assists customers in migrating and modernizing their database workloads to AWS. He is an Oracle Certified Master with 20 years of experience with Oracle databases.
Read MoreAWS Database Blog