

Customers running on an on-premises environment often face the challenges of scalability, performance, cost, and reliability. To increase resiliency, performance, and scalability, AWS has become the new norm to help and offer companies the benefits of the AWS Cloud.
In this post, we use Oracle Real Application Testing (Oracle RAT) to help you evaluate differences between on-premises database workloads and database workloads running on Amazon Elastic Compute Cloud (Amazon EC2). Amazon EC2 offers the broadest and deepest compute platform with choice of processor, storage, networking, operating system, and purchase model. It provides you with complete control of your computing resources and lets you run on Amazon’s proven computing environment.
This post specifically deals with running Orace RAT on Amazon EC2 alone and doesn’t list the steps for analysis on Amazon Relational Database Service (Amazon RDS). For details on running Oracle RAT on Amazon RDS, see Use Oracle Real Application Testing features with Amazon RDS for Oracle.
Oracle Real Application Testing
Oracle RAT is a tool that helps you evaluate the effect of any database system changes on real-world applications in a test environment before you deploy the change in the production environment. With Oracle RAT, you can capture the workload run on your production database system and replay it on a test environment to help analyze the difference between running workloads on premises and Amazon EC2. Oracle RAT includes features such as Database Replay and SQL Performance Analyzer (SPA) to test the effect of system changes on real-world applications:
Database Replay enables you to effectively test system changes by replaying a full production workload on a test system to analyze the overall impact. These changes could include database upgrades, patches, parameter changes, or configuration changes such as server, storage, and network.
SQL Performance Analyzer enables you to access the impact of system changes on SQL performance by identifying any difference in the SQL run plans and statistics resulting from the change.
Oracle RAT has its own separate licensing requirements. Because Oracle RAT reports depend on Automatic Workload Repository (AWR) reports, it also needs Diagnostic and Tuning Pack licenses. For more details, see Oracle Database Options and Their Permitted Features.
Prerequsites for using Oracle RAT
Before performing the capture and replay of workloads using Oracle RAT, consider the following key prerequisites:
Identify capture windows – Based on historical trends of workload runs, you need to identify peak load and normal load windows on the database. It’s important to capture the workload from the source during peak utilization. You can then run this workload on the target database to analyze its performance on Amazon EC2. It’s also a good idea to capture the workload during a normal workload to see the performance of the database in its normal hours. From our personal experience, a capture window longer than 3 hours leads to issues with storage, workload analysis, and an increase in divergence. Therefore, we recommend keeping the capture windows less than 3 hours.
Analyze capture files storage – Capturing your workload using Oracle RAT needs sufficient storage to store all the files that are captured during the run. You can estimate the amount of storage required by running a mock capture run for about 30 minutes. Based on the amount of storage that is occupied during the mock run, you can determine what is sufficient storage to run a successful capture to avoid storage full errors during peak load captures.
Identify the database links – It’s importatnt to identifiy all the database links that exist in the database before running the replay. Often, we don’t have all the databases, and tests might be running only on one database. To avoid dependencies of the databases, the database links need to be fixed, especially if you’re testing the local database and not a remote database. The most common method to fix the database link is to set open_links to 0. This invalidates all database links, and any command that tries to access the database links fails with an error that is registered in the Oracle RAT report along with the divergence. We also recommend dropping the DB links that point to other remote production databases to avoid accidental data ingestion to the test database.
Identify workload dependency with system time – If the source workload has a large number of SQLs referring to SYSDATE, thereby having dependency on the system time, it’s important to reset the system clock back to the point in time of the start of the capture. The decision of whether this reset is needed or not is based on the divergence percent noticed in the Oracle RAT reports or decisions derived from application call analysis.
Convert physical standby to snapshot standby – One of the easiest ways to run Oracle RAT is to set up dataguard replication from on premises to Amaozn EC2 with a physical standby created on the EC2 instance and converting it to snapshot standby during the capture process. Converting Oracle standby to snapshot standby allows for real-world testing without compromising data protection. This feature allows you to open the database in read/write mode, and you can roll back changes to resume standby synchronization from the point when it was stopped. This allows you to make any changes in the configuration of the database and replay the workload numerous times to decrease the level of divergence seen while replaying the workload. For steps on how to run Oracle RAT with snapshot standby, see Snapshot Standby and Real Application Testing(RAT) (Doc ID 1662664.1).
Install Oracle RAT patches – You need to install a few patches before running Oracle RAT. Make sure to coordinate your downtime and apply patches before running the tests.
Create restore points – As a best practice, it’s crucial to create as many restore points as possible on the standby database. This helps return the database to a point prior to the current state of the database. Oracle RAT involves many steps, starting with running SPA on the standby database and then running database replay. For each of these tests, it’s important to start from the SCN when the capture was started. Creating restore points helps you roll back the database to run tests in multiple iterations even if there was an error in one.
Prerequisites
For this walkthrough, the following prerequisites are necessary:
An AWS account
An Oracle database instance running on an on-premises environment
An Oracle standby database instance running on Amazon EC2 using Oracle Dataguard
Oracle RAT binaries installed on both on premises and on Amazon EC2
Oracle RAT patches installed
All the prerequisites for using Oracle RAT discussed in the previous section
Solution overview
In this post, we set up database replication using Oracle Dataguard from on premises to Amazon EC2 to use Oracle RAT. The following diagram illustrates this architecture.
We recommend referring to the master note on Oracle RAT (Doc ID 1464274.1) before performing any test using Oracle RAT to run the tests and configure databases. For best practices running Oracle RAT, see Database Testing: Best Practices (Doc ID 1535885.1).
At a high level, Oracle RAT testing involves the following steps:
Capture the workload on the production database.
Capture the SQL workload from the AWR into a SQL tuning set for SPA analysis.
Copy the capture files to a test system and preprocess the files.
Import, create a baseline, and run the SQL tuning set on the test system for SPA analysis.
Replay the workload on the test system.
Perform a detailed analysis of the captured and replayed workload using reports generated by database replay and SPA.
The following diagram illustrates this workflow.
Set up analysis before start of capture
You need to prepare the on-premises database before starting the capture workload using Oracle RAT. This includes creating a database user and granting admin privileges, and creating the directory where the capture files will be stored. Run the steps in the following code on the on-premises Oracle database:
Convert physical standby to snapshot standby
To perform Oracle RAT (assuming that Oracle Dataguard is set up between the Oracle database running on premises as primary and the Oracle database running on Amazon EC2 as standby), you need to convert the standby database in Amazon EC2 to Oracle snapshot standby.
To convert the physical standby to snapshot standby, run the following commands on the standby database running on the EC2 instance:
Stop the redo apply process:
Convert the standby to snapshot standby:
Verify that the database is in snapshot standby mode:
Start capture on the on-premises database
Now that the database is ready to process the capture, run the following command on the on-premises production database server to start the capture. Make sure that the capture window includes peak loads for accurate comparison.
Let the capture run for at least 1 hour. We recommend starting smaller capture windows and extending the duration after you successfully test on a smaller window. From our experience, the ideal duration is 2 hours.
Finish capturing the workload
After the capture duration window has elapsed, you can finish the capture by running the following command on the on-premises production database:
To avoid too many idle sessions, we recommend using a timeout of 2 minutes or more while finishing the capture so that the capture waits for sessions to flush its capture buffers.
You can alternatively use Oracle Enterprise Manager to do the same steps, which provides a GUI tool for convenience.
Generate capture workload reports
Workload capture reports are important for identifying the system timestamp of when the workload was run, in case we need to reset the system clock on the test server to minimize divergence. These reports also contain information regarding the utilization of the server, SQL statistics, top waits, and much more, which we use to compare the performance on the on-premises and test servers in Amazon EC2.
To generate the capture workload report in the capture directory, run the following command on the production database server:
Export AWR data for workload capture
We need to analyze the data that was captured for its performance in terms of the database statistics, runtime, database server utilization, and so on. We can do this by exporting the AWR data for the workload capture and importing it into a test Amazon EC2 database server (discussed in upcoming steps). This is an important step to help with performance analysis.
To export the AWR data, run the following command:
Create a SQL tuning set for SPA
SQL Performance Analyzer is one of the solutions used in Oracle RAT. This includes creating a SQL tuning set for the workload, as discussed in the previous steps. The SQL tuning set is then exported from the production database server to be imported on the test server for performance comparison.
To create a SQL tuning set for the captured workload, use the snapshot IDs in the AWR that correspond to the time the capture was run. The information on the timestamp is available in the capture report generated in previous step. The following code is the snippet of commands to run on the on-premises production database server:
Export the SQL tuning set table
In the previous step, you created the SQL tuning set table, which has all the SQLs that were run during the workload capture window. We need to export this table from the production on-premises server to the test server on Amazon EC2 to help evaluate the performance.
To export the table, use the Oracle datapump utility:
The preceding command creates the file SQLSET_DUMP.dmp in the capture directory, which you need to copy with all other files to the target test server, as shown in the next step.
Preprocess the capture files
You now need to copy all the files that were created in the capture directory, like capture workload files and the dump file for the SQL tuning set, to the test server running on Amazon EC2. You can use any standard copy tool to transfer the files to the EC2 instance, such as scp or sftp. If the files are large, then scp or sftp transfer may take a long time. In this case, you can consider an alternate option of using AWS Storage Gateway to mount an Amazon Simple Storage Service (Amazon S3) bucket on an EC2 instance and on the on-premises database server pointing to the same S3 bucket to avoid transferring of data. For instructions, see Using AWS Storage Gateway to store Oracle database backups in Amazon S3.
When the files are on the test database server running on Amazon EC2, you can preprocess the files to analyze the workload before running the workload on the test database server.
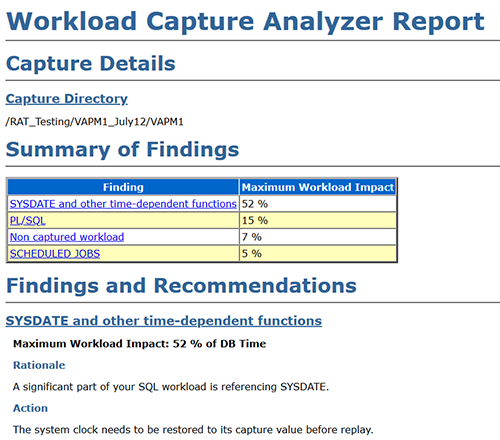
Before processing the files, it’s important to run the workload analyzer, which gives us details on what percentage of the workload was captured and if there are any findings and recommendations. The following screenshot shows a sample report.
To run the workload capture analyzer, run the following command on the test database server running on Amazon EC2. Make sure the server has Java installed on it for the command to work:
Import the SQL tuning set table
Oracle recommends running SQL Performance Analyzer in Oracle RAT before running database replay. Therefore, we first need to import the SQL tuning set table that was created in earlier steps by using the following command:
Run SQL Performance Analyzer on Amazon EC2
SQL Performance Analyzer helps show how SQLs running on premises differs from running on Amazon EC2. To run a test for analysis, complete the following steps:
Unpack the SQLs from the SQL tuning set table by running the following command:
Load run plans from the SQL tuning set onto the test database server:
Create the SQL analysis task, which we use to run the workload on the test database server. For Oracle Exadata simulation after creating the analysis task, you can set the parameter CELL_SIMULATION_ENABLED to True. For more details, see Configuring an Analysis Task for Exadata Simulation Using APIs.
Next, we create SQL plan baselines to enable the optimizer to avoid performance regressions by using run plans with known performance characteristics. If a performance regression occurs due to plan changes, you can create a SQL plan baseline to prevent the optimizer from picking a new, regressed run plan.
Create your SQL plan baseline with the following code:
We use the TEST_EXECUTE method to run the SQL tuning set on the test database running on Amazon EC2. The test runs each of the SQL statements contained in the workload to completion. While it’s running, SQL Performance Analyzer generates run plans and computes run statistics for each SQL statement in the workload. Each SQL statement in the SQL tuning set is run separately from other SQL statements, without preserving their initial order or concurrency. This is done at least twice for each SQL statement, for as many times as possible until the run times out (up to a maximum of 10 times).
To run the first trial of the SQL statements, run the following command:
Now that the baseline is created and the SQL tuning set has been run, we can collect performance data for comparison between the two using SQL Performance Analyzer.
To run the comparison, run the following command on the test database server running on Amazon EC2:
When the comparison analysis is complete, you can generate a report to identify the SQL statements that have improved, remained unchanged, or regressed due to the system change.
The following command generates the report to compare performance:
Flashback database to snapshot standby restore point
In the previous section, we completed running SPA in Oracle RAT. To proceed further with database replay testing, we need the database to be in the same SCN as when the capture was started. This requires the database to be rolled back to a point in time, therefore a flashback of the database to a restore point is necessary. To flashback the database, you can run the following command on the snapshot standby database running on Amazon EC2:
Prepare the database for replay
The database needs to be prepared to replay the workload. After the database flashback is complete, you need to create a database directory pointing to the capture files directory that was copied onto the target test database server by running the following command on the snapshot standby database:
Disable the advisor jobs so that they don’t interfere with the replay of the workload or cause any divergence. To disable the job, run the following command on the snapshot standby database:
If the workload analyzer report that was run earlier suggests that a high percentage of the workload is dependent on system time, then it’s important to reset the system clock on the database server to the point in time of capture. If you’re using a Linux database server, see How to Set Time, Timezone and Synchronize System Clock Using timedatectl Command for instructions to update the system time on the standby server running on Amazon EC2.
The capture workload files need to be processed. We can do this using the following command on the test database server. This command analyzes the workload capture found in the capture directory and creates new workload replay specific metadata files that are required to replay the given workload capture. It only creates new files and doesn’t modify any files that were originally created during the workload capture. Therefore, you can run this procedure multiple times on the same capture directory, such as when the procedure encounters unexpected errors or is canceled by the user. After you process the capture directory, you need to initialize the replay. If necessary, you may need to remap connections to a new one so that the user sessions can connect to the database as desired during workload replay, after which the database needs to be prepared to run the workload.
For more information, see DBMS_WORKLOAD_REPLAY.
Run replay clients
The replay client is an executable named wrc located in the $ORACLE_HOME/bin directory, which is a multithreaded program where each thread submits a workload from a captured session. You need to run the following command as an Oracle user in a separate session on the test database server. You can run the command in calibrate mode to get a suggestion of the number of clients to run, and then run it in processing mode.
Start database replay
You can now start the replay of the workload with the following code, and all the external replay clients (WRC) that are currently connected to the replay database are notified automatically:
These clients then begin issuing the captured workload to replay it on the test database.
Generate a workload replay report
The analysis generated from the database replay reports can help give insights regarding database utilization, divergence levels, top waits, top SQLs, and other statistical information.
To generate the workload replay report, run the following commands on the test database server:
To compare the performance of replay workload to the capture workload statistics, you need to import the AWR from the capture workload to the test database server, and then generate the AWR comparison report using the following command:
Cleaning up
When you’re done using this solution, you can delete the capture files from the source self-managed instance and preprocessed files from the preprocessing system and replay client system. You should also stop or terminate any EC2 instances that you provisioned exclusively for hosting some of the components of the Database Replay feature, such as the replay client. If you used an S3 bucket to transfer files, you should delete the bucket if no longer needed.
Conclusion
In this post, we used Oracle RAT to help analyze statistical information and gain insight into whether your on-premises Oracle workload can run successfully on Amazon EC2 without degradation in performance.
We created the SQL Performance Analyzer report in Oracle RAT, which calculates two chief impact measurements of each SQL statement:
Impact on workload – The impact of migrating to Amazon EC2 on the SQL statements in terms of cumulative run time
Impact on SQL – The impact of migrating to Amazon EC2 on the SQL statement’s response time
We performed database replay by replaying the workload on an Amazon EC2 Oracle database server with the workload that was captured in the on-premises environment. During the database replay, we observed the divergence level and differences of hardware resource utilization, which are the key metrics to consider while making the decision to migrate.
For information on how to use Oracle RAT on Amazon RDS for Oracle, refer to Use Oracle Real Application Testing features with Amazon RDS for Oracle.
If you have any comments or questions, leave them in the comments section.
About the Authors
John Lonappan is a Senior Database Specialist Consultant / Solutions Architect at Amazon Web Services (AWS) with a focus on relational databases. Prior to AWS, John has worked as a Database Architect for large Data center providers across the Globe. Outside of work, he is passionate about, Long drives, EV Conversion, playing chess and traveling.
Saumya Mula is a Database Consultant with the Professional Services team at Amazon Web Services. She works as a database migration consultant to provide Amazon customers with technical guidance to migrate their on-premises databases to AWS.
Jobin Joseph is a Senior Database Specialist Solution Architect based in Dubai.
With a focus on relational database engines, he assists customers in migrating and modernizing their database workloads to AWS. He is an Oracle Certified Master with 20 years of experience with Oracle databases.
Read MoreAWS Database Blog