

In recent years, large-scale internet of things (IoT) applications generate data at fast rates, and many IoT implementations require data to be stored sequentially, based on date-time values generated either at sensor or at ingestion levels. In use cases such as smart factories, IoT data and time series data are being produced at a large scale.
Consider a scenario at a motor water pump maintenance plant, where a motor is pumping coolant fluid for a critical process. The plant can have several sensors to capture metrics such as temperature and pressure at various points, as well as water humidity. These sensors are continuously producing a huge amount of time series data, which creates a correspondingly huge demand for time series data analysis, such as pattern searching and interpolation of data. Site engineers often manage these industrial assets based on sensor data. The smooth operation of these assets is critical to the productivity of their plants, because any equipment breakdown can lead to unexpected downtime and require expensive recovery maintenance. For example, a pump with anomalous temperature or pressure readings may indicate an issue that requires maintenance. If site engineers are alerted at the right time, they can better schedule maintenance activities.
So the question is, how to identify an anomalous device among thousands or millions of devices in a fleet? In this post, we look at how we can store our data in Amazon Timestream and trigger alarms and send notification to operational engineers.
Solution overview
Our solution is designed to send a push notification to the operator when the pump requires maintenance. This could be a scheduled maintenance required when the pump has been running for a fixed number of hours, or an unscheduled maintenance triggered by an abnormally high temperature for a defined period of time.
With Timestream, you can store data from IoT and operational applications on a fast, scalable, and serverless time series database and analyze trillions of events per day. Timestream saves you time and cost in managing the lifecycle of time series data by keeping recent data in memory and moving historical data to a cost-optimized storage tier based upon user-defined policies.
Data is collected from industrial equipment (in this example, motor pumps) through sensors. Sensor data can be transmitted from equipment and needs to be ingested into the AWS Cloud securely. You can use AWS IoT Core to ingest data; it supports data ingestion over the MQTT and MQTT over WebSocket Secure (WSS) protocols. AWS IoT Core also supports TLS-based mutual authentication using X.509 certificates to manage the security of the sensor data.
Building a cloud-based solution comprises of the following steps:
Collect and ingest data into the AWS Cloud.
Store the data in Timestream.
Identify the state of the asset by monitoring and filtering anomalous data in the database.
In this post, we compute fleet-wide aggregate metrics and identify devices that are significantly different than the fleet-wide threshold metric, using the following steps:
Setup notifications system to detect anomalous data.
Schedule a Lambda function to be executed periodically to generate triggers.
Setup Amazon Simple Notification Service(SNS) to receive alerts.
Optionally, use Grafana, which is an interactive data visualization tool with alerting capabilities that enables you to instantly query, correlate, and visualize operational metrics, logs, and traces from multiple sources.
The following diagram illustrates our solution architecture.
Prerequisites
For this walkthrough, you should have the following prerequisites:
An AWS account that provides access to Amazon EC2 and Timestream.
An AWS Identity and Access Management (IAM) user with an access key and a secret access key. You must be able to configure the AWS Command Line Interface (AWS CLI) and have permissions to create:
IAM roles and policies
Timestream databases and tables
EC2 instances
Auto Scaling groups
Stacks in AWS CloudFormation
An Amazon Virtual Private Cloud (Amazon VPC) with a public subnet.
Alternatively, you can use the CloudFormation stack to create a Timestream database with the necessary credentials.
Deploy the solution
For a quick start of this solution, you can deploy the provided CloudFormation stack. This creates all the required resources in your account (us-east-1 Region). Follow the rest of this post for a deeper dive into the resources.
The CloudFormation template creates the following:
A Timestream database
The AWS IoT Core simulated data
On the Outputs tab of the stack, you can find all the information of the resources created.
The CloudFormation template creates the following:
A Lambda function that is triggered at 5 minutes intervals in Cloudwatch Events
An SNS topic for publishing the results
A Grafana instance to read data from Timestream
Collect and ingest data into the AWS Cloud
For this solution, we assume that the data has been ingested via AWS IoT Core. After you collect the data, route the data to Timestream through AWS IoT Core rule actions.
Configure the Timestream rule action
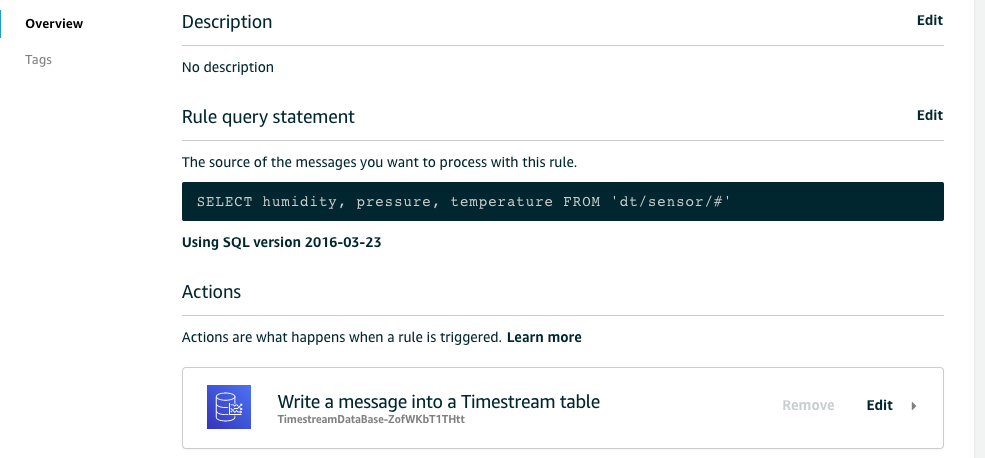
AWS IoT Core uses the Timestream rule action to stream time series data from devices connected to AWS IoT Core directly to your Timestream database, without writing a single line of code.
You can edit the rule configuration for writing data to the Timestream table by choosing Edit.
You can edit the names for the database and table, and change the record dimensions.
To help you get started with using Timestream with AWS IoT Core, we’ve created a fully functional sample application that creates the necessary artifacts in AWS IoT Core and Timestream for creating a topic rule and a sample application for publishing data to the topic.
Clone the GitHub repository for the sample application following the instructions from GitHub.
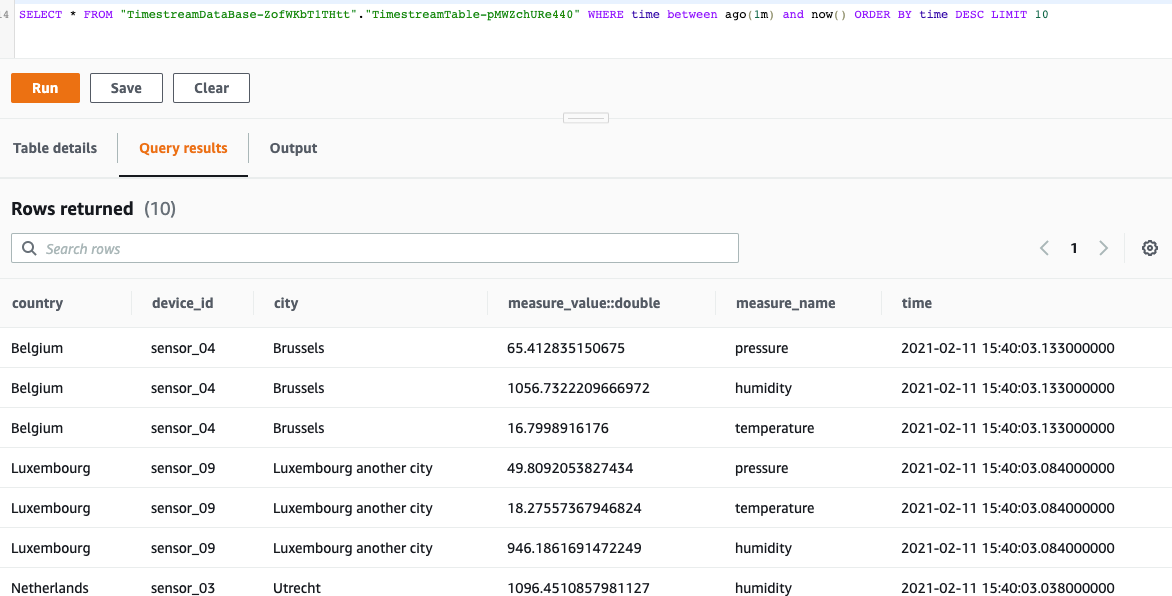
Store the data in Timestream
The following screenshot shows that the Timestream table is populated with the data coming from the AWS IoT Core sensor data script.
Identify the state of the asset by monitoring and filtering anomalous data in the database
In this section, we write a Lambda function that compares sensor readings against humidity, temperature, and pressure thresholds. We compute fleet-wide aggregate metrics, and identify devices that are significantly different than the fleet-wide threshold metric. Every time there is a threshold breach, an alarm for the respective sensor data type is triggered.
For this post, we are comparing the average temperature readings in the past 120 minutes with the predefined threshold which is 20° F in this case.
We use the following query to perform this comparison:
The detailed code is available on GitHub.
For more information about the Timestream query language, see Query.
Setup notifications system to detect anomalous data
Schedule a Lambda function to be executed periodically to generate triggers
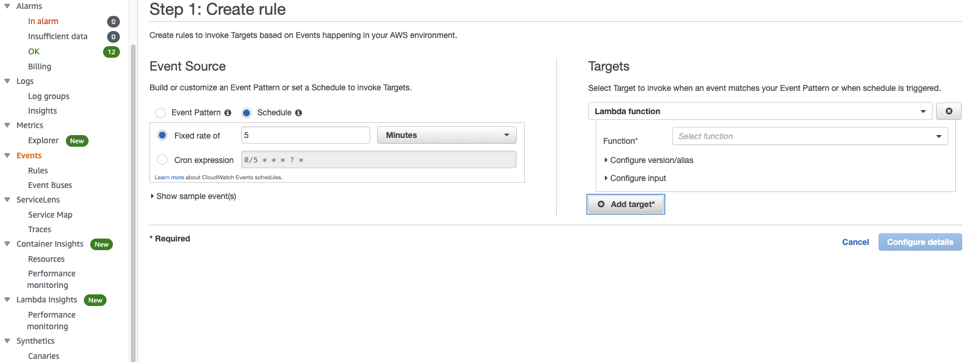
You can create a Lambda function that runs at regular intervals to run a query on Timestream and send an Amazon SNS notification based on the query results satisfying one or more given criteria.
Let’s create a Lambda function that runs every 5 minutes to check for sensor readings in the Timestream database. To schedule the Lambda function, you can create a CloudWatch Events rule and define either a fixed time interval or a cron job. Then choose your desired function as the target.
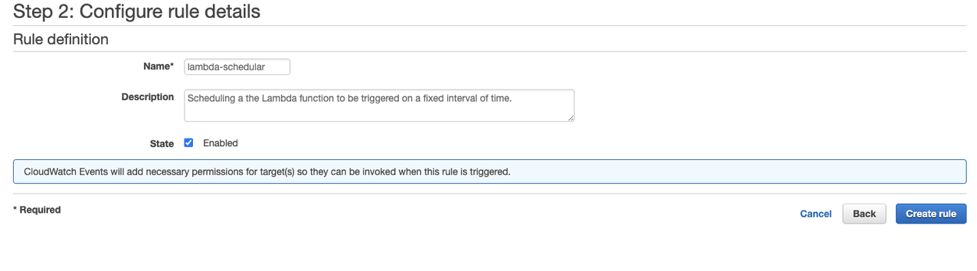
Provide a name and description for the rule before completing rule creation.
You have now scheduled your Lambda function, and it can be viewed in the Lambda console.
For more information, see Tutorial: Schedule AWS Lambda Functions Using CloudWatch Events.
After this step you can create a SNS topic and subscribe to it.
Optionally integrate Grafana
You can use Grafana to query and visualize your time series data and create alerts. Grafana provides an easy-to-use tool to display time series data in near-real time and quickly zoom in and out of the data along the time axis. You can use Amazon Managed Service for Grafana (Preview) or install Grafana on an EC2 instance, in Amazon Elastic Container Service (Amazon ECS), on your laptop, or on an on-premises computer.
Grafana supports data sources that are storage backends for time series data. To access your data from Timestream, you need to install the Timestream plugin for Grafana.
For detailed instructions on using Timestream with Grafana, see Getting Started with Amazon Timestream and Grafana.
Clean up
To avoid incurring future charges, delete the resources created during this walkthrough. To do this, on the AWS CloudFormation console, select the CloudFormation stack and choose Delete.
Conclusion
In this post, you saw how to configure a Lambda function to read data from Timestream and configure custom notifications to get alarms or alerts when an event occurs. As a next step, we recommend trying our Timestream quick starts to understand how Timestream fits your application needs, and getting some hands-on experience with the Timestream tools and samples. We also recommend following the best practices guide to optimize the scale and performance of your workload.
About the Authors
Ankita Gavali, AWS Solutions Architect, Amazon Web Services. As Solutions Architect at AWS, Ankita works with customers across Benelux to help them achieve their business objectives. Her passion is to accelerate digital transformation for customers and build highly scalable and cost-effective solutions in the cloud.
Sounavo Dey, AWS Solutions Architect, Amazon Web Services. Sounavo works with customers across Benelux. He is passionate about working backwards from the customer ask and helping them solve real business problems with the power of the AWS platform.
Read MoreAWS Database Blog