

In our constantly evolving digital world, the companies that come out on top are those that can access the data they need, when they need it. Accessing data in real time enables your company to analyze, plan and improve continuously, so you can make better strategic decisions and reduce your overall risk. Whether the goal is to adjust demand forecasts, solve customer queries, or deliver analytics to end-users before they know they need them, the first step to securing the insights you need is gaining visibility into the relevant data as fast as possible.
But any system can move only as fast as its slowest bottleneck. When data resides in many areas of an organization and within a variety of platforms, often-antiquated relational databases can create significant congestion. But companies still can — and must — unlock a tremendous amount of business insight from data stored in these relational data stores and from the applications that continually write to them. The question is how to make it happen.
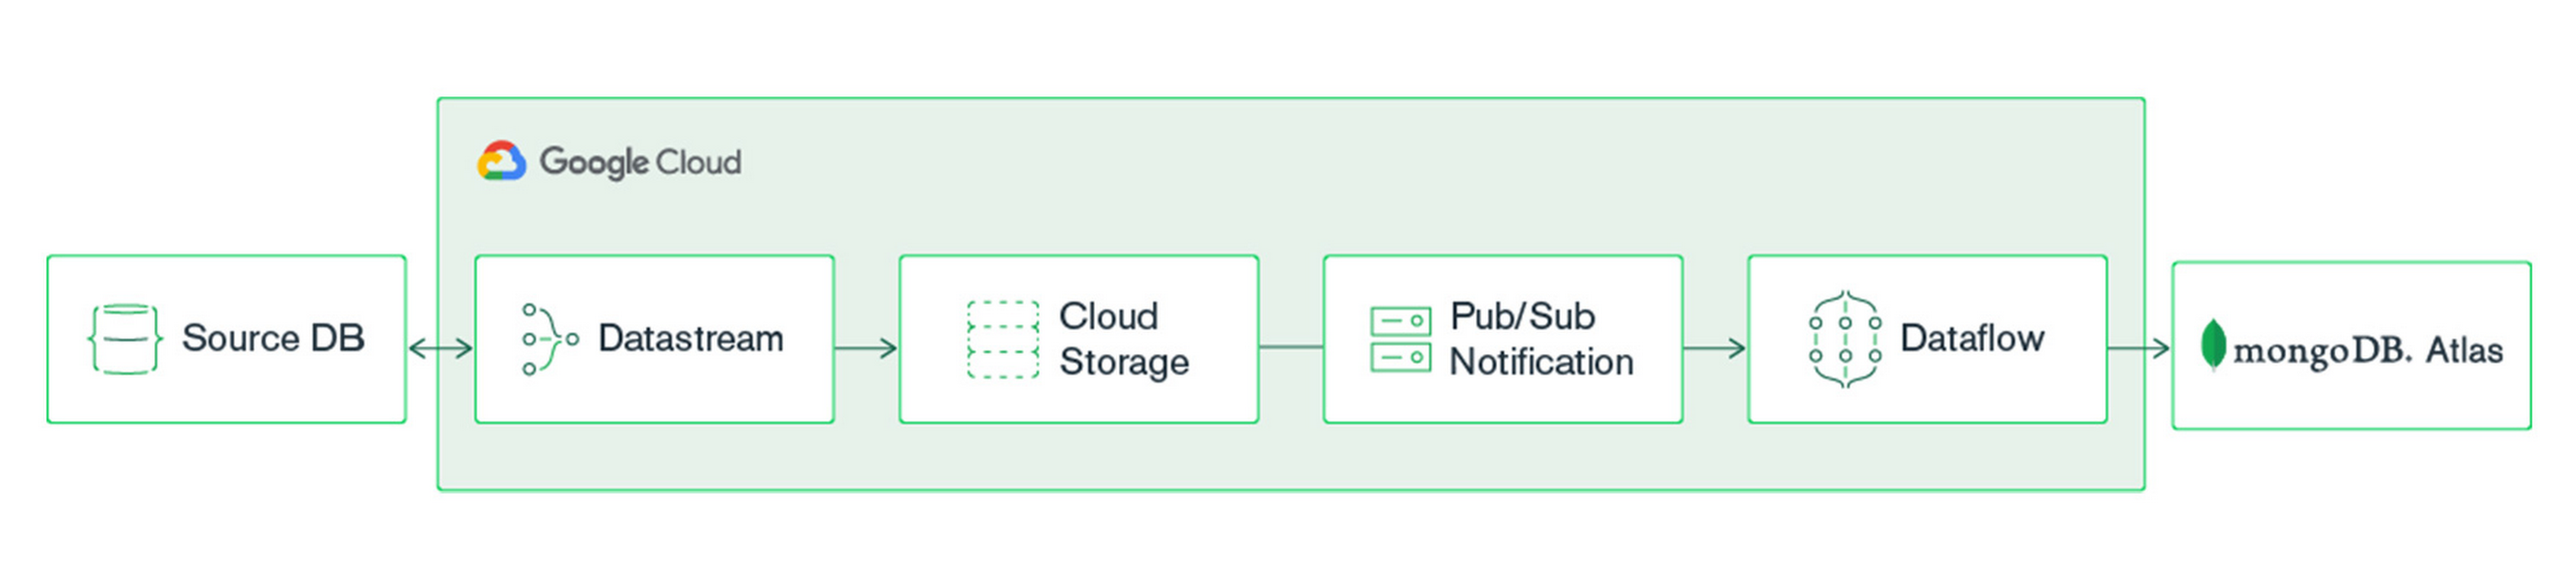
With Google Cloud’s Datastream, a serverless change data capture and replication service, and MongoDB Atlas, you can set up a real-time analytics pipeline that continually streams data from legacy relational data stores (like Oracle and MySQL) into MongoDB Atlas. There, your application can take advantage of the power of MongoDB to improve business decision-making.
MongoDB Atlas is a global cloud database service available on Google Cloud. Atlas deploys a fully managed MongoDB cluster with seamless automation and proven practices that ensures up to 99.995% * availability, scalability, and compliance with the most demanding data security and privacy standards. MongoDB Atlas includes features such as Atlas Search to integrate full-text search capabilities into your applications and Atlas Charts to create insightful visualizations without the need for extra tools.
Getting Started
Prerequisites
MongoDB Atlas account (create your free-tier)
Relational data source
Google Cloud Account
Creating a MongoDB Atlas cluster
For a detailed guide on creating your own MongoDB Atlas cluster, see the Getting Started with Atlas tutorial. For the purposes of this blog post, we’ve created an M10 MongoDB Atlas cluster using Google Cloud. We recommend selecting the nearest GCP region when setting up your cluster.
Once your cluster is created, you will need to configure two settings to make a connection: network access and database access.
Network Access
By default, a new MongoDB Atlas cluster does not accept any network connections. You have two options for allowing secure network access from Dataflow to MongoDB Atlas: You can use Google VPC network peering, or you can secure the connection by allowing only specific IP connections from Google Cloud to your Atlas cluster. In this blog, we’ll set up Atlas to allow connection from any IP (0.0.0.0). In a production environment, it’s recommended to use either VPC network peering or specify the allow list IPs. For information on MongoDB Atlas security check out Security Features and Setup.
To accept external connections in MongoDB Atlas, launch the “IP Access List” entry dialog under the Network Access menu and choose, “Allow access from anywhere.”
Once you’ve configured network access, you can configure the user account that will be used to connect from Google Cloud to MongoDB Atlas. Configure user authentication in the Database Access menu.
Database Access
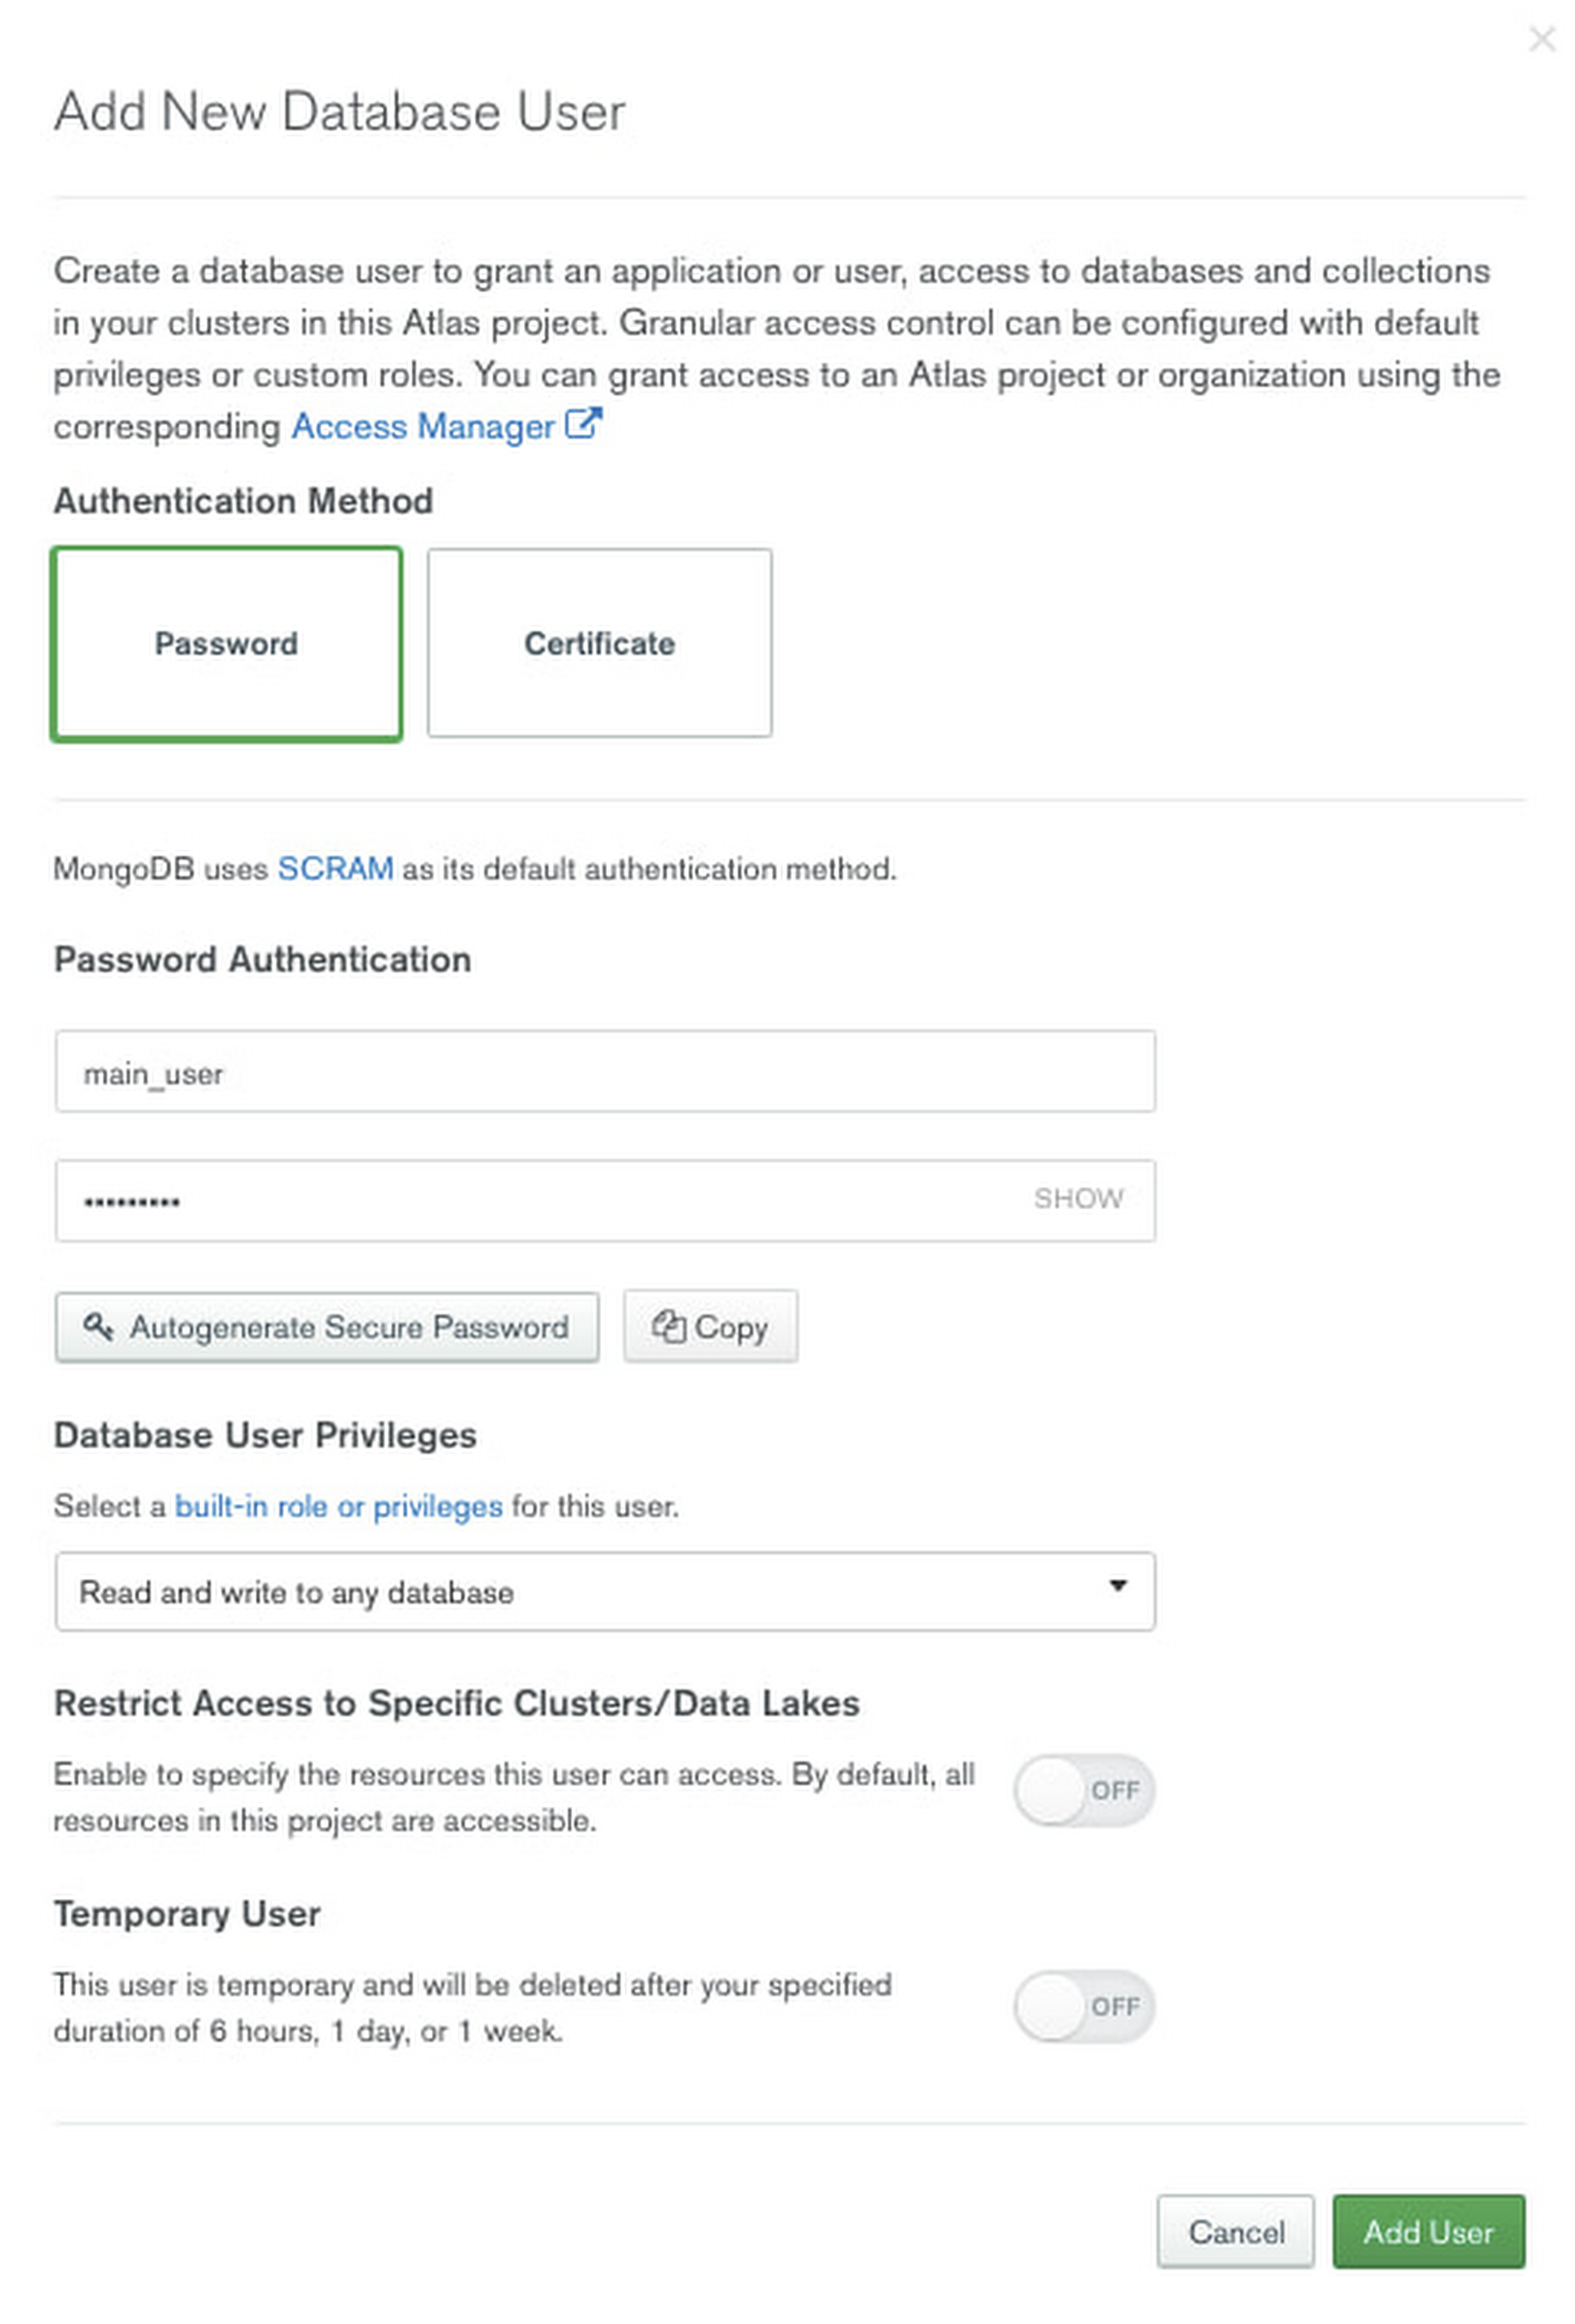
You can authenticate to MongoDB Atlas using username/password, certificates, or identity and access management (IAM) authentication methods. To create a username and password that will be used for connection from Google Cloud, select the “+ Add new Database User” option from the Database Access menu.
Provide a username and password, and make note of both. You will need these credentials for the Dataflow Flex template later in this post.
Configure the source relational database
Datastream supports a variety of databases, including MySQL and Oracle, as well as various secure connectivity methods. Before you begin, you will need toconfigure these databases for change data capture (CDC). Here, we’ll use MySQL as the data source, and we’ve enabled CDC per the online documentation.
Configure Datastream connection profiles
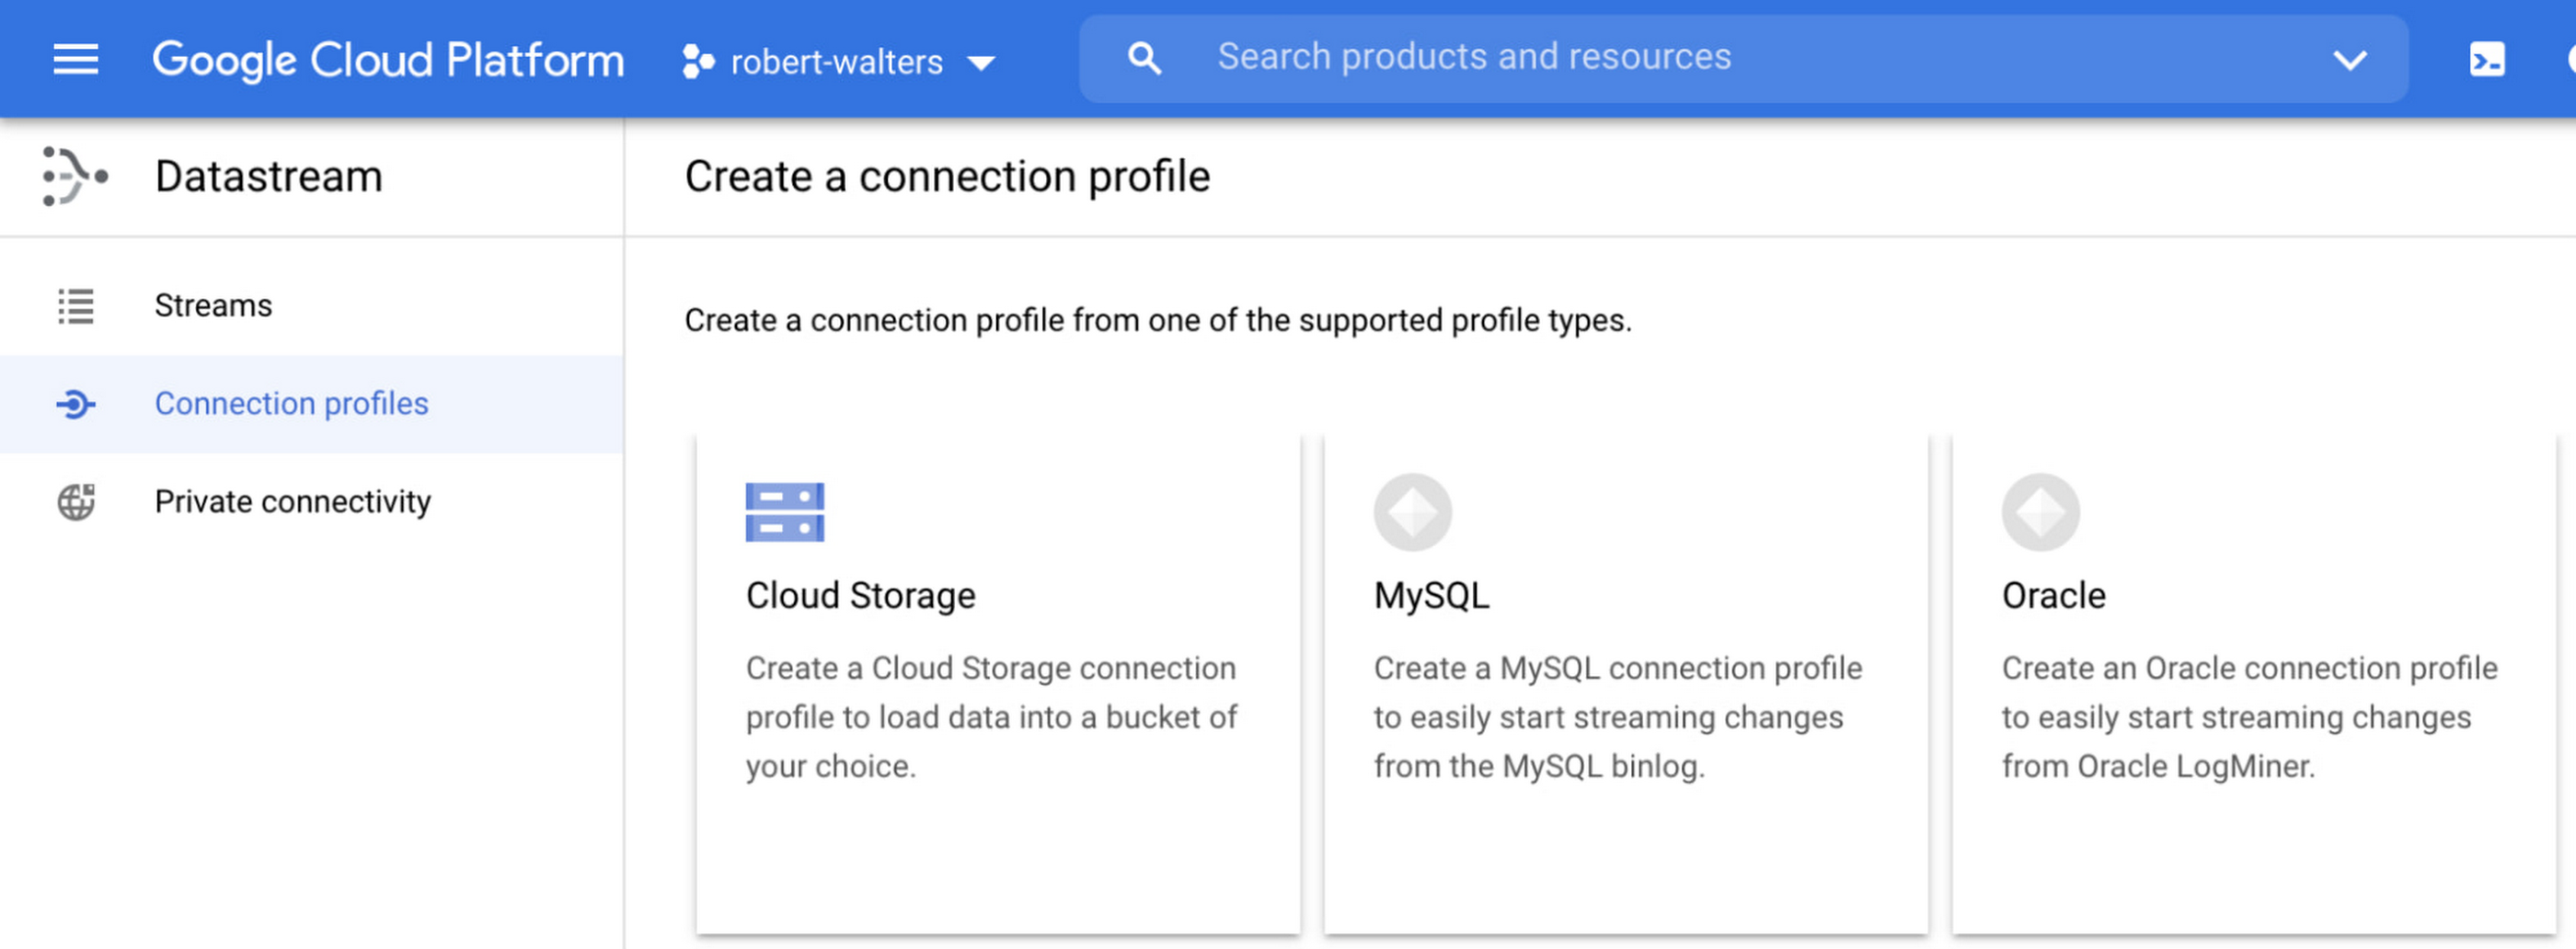
After your database is set up for change data capture, you can configure the Datastream MySQL source and Cloud Storage destination connection profiles. In our example, they’re called “source_mysql” and “dest_cloudstorage”.
To configure the Datastream connection profiles, click on “Create Profile” on the Datastream connection profiles UI and select the relevant type for source or destination.
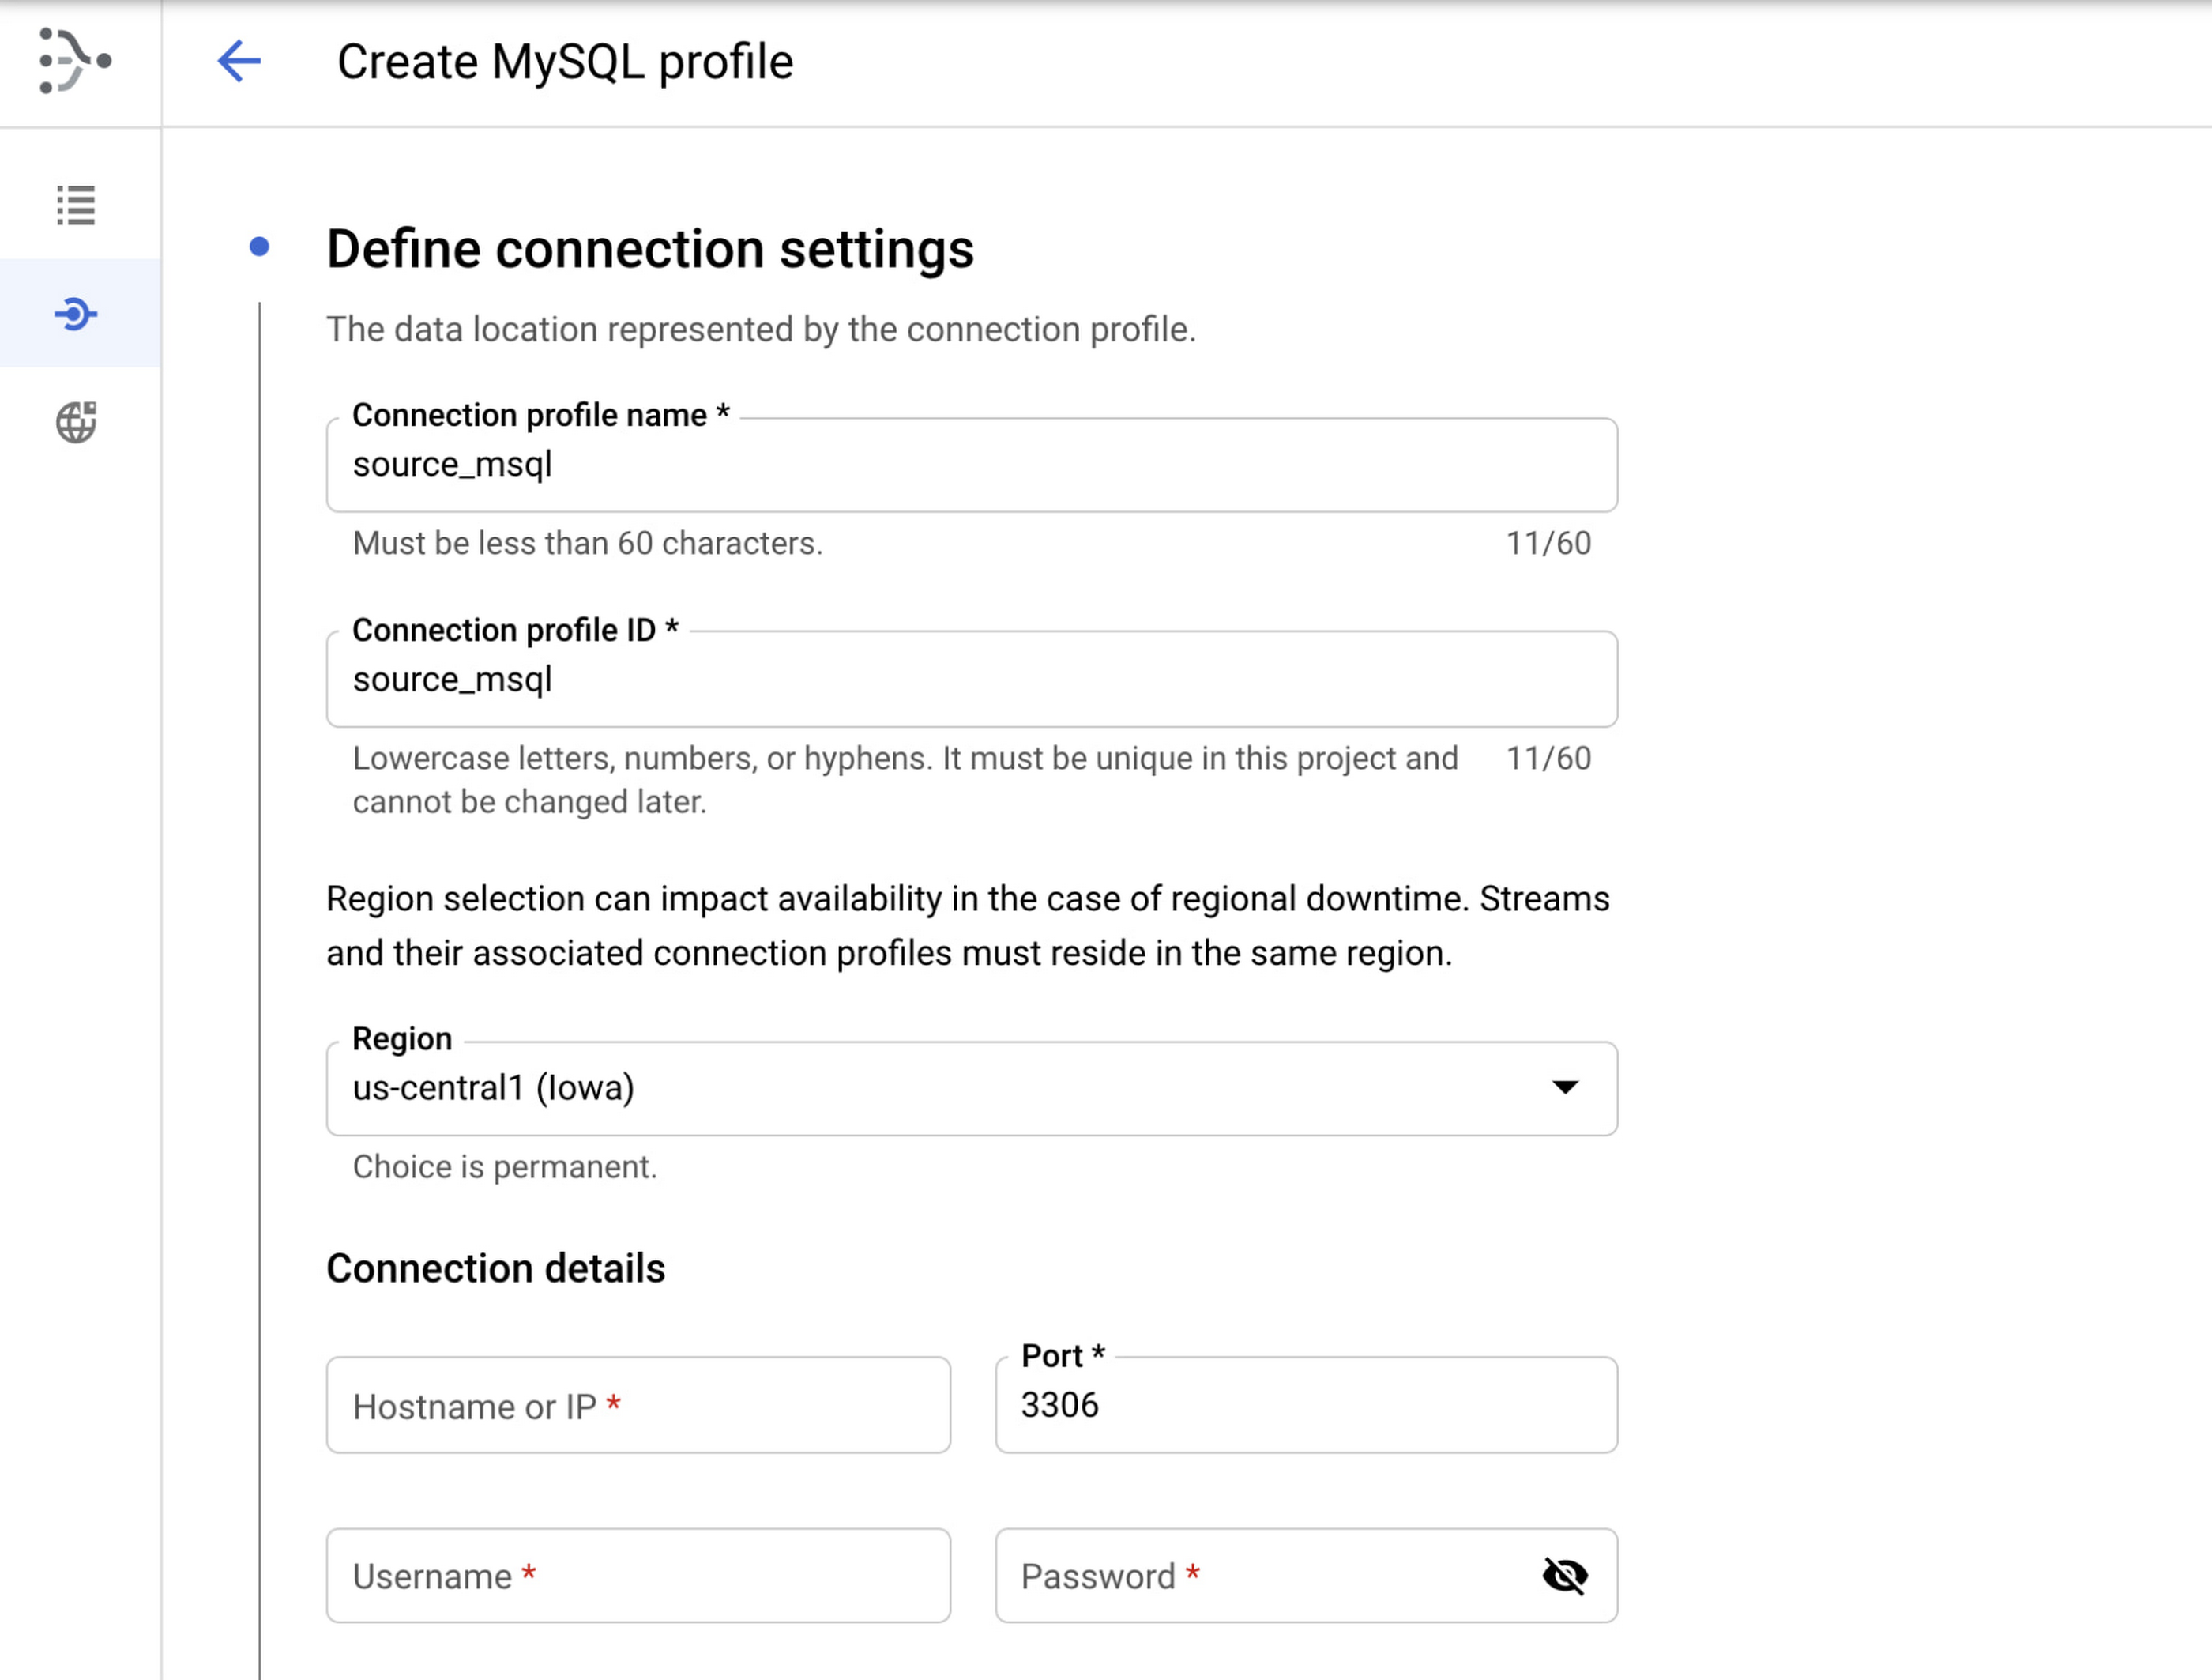
MySQL connection profile configuration
Name your connection profile, choose the region where it will reside, and MySQL connection details.
Cloud Storage connection profile configuration
Name your connection profile, choose the region where it will reside, and the bucket location. The region needs to be in the same region and the source connection profile and the stream where it will be used.
Note: For security purposes, you will need to set IAM permissions for Compute Service Account or the desired Dataflow worker Service Account. Make sure you perform the following steps:
Grant Datastream Admin role to the service account in IAM (Owner will also grant req privileges)
Grant objectReader IAM permissions to the Datastream bucket
Once the two connection profiles have been created, you can view them on the connection profiles list.
Configure a stream
Create a stream from source to destination by clicking on “Create Stream” from the Streams menu.
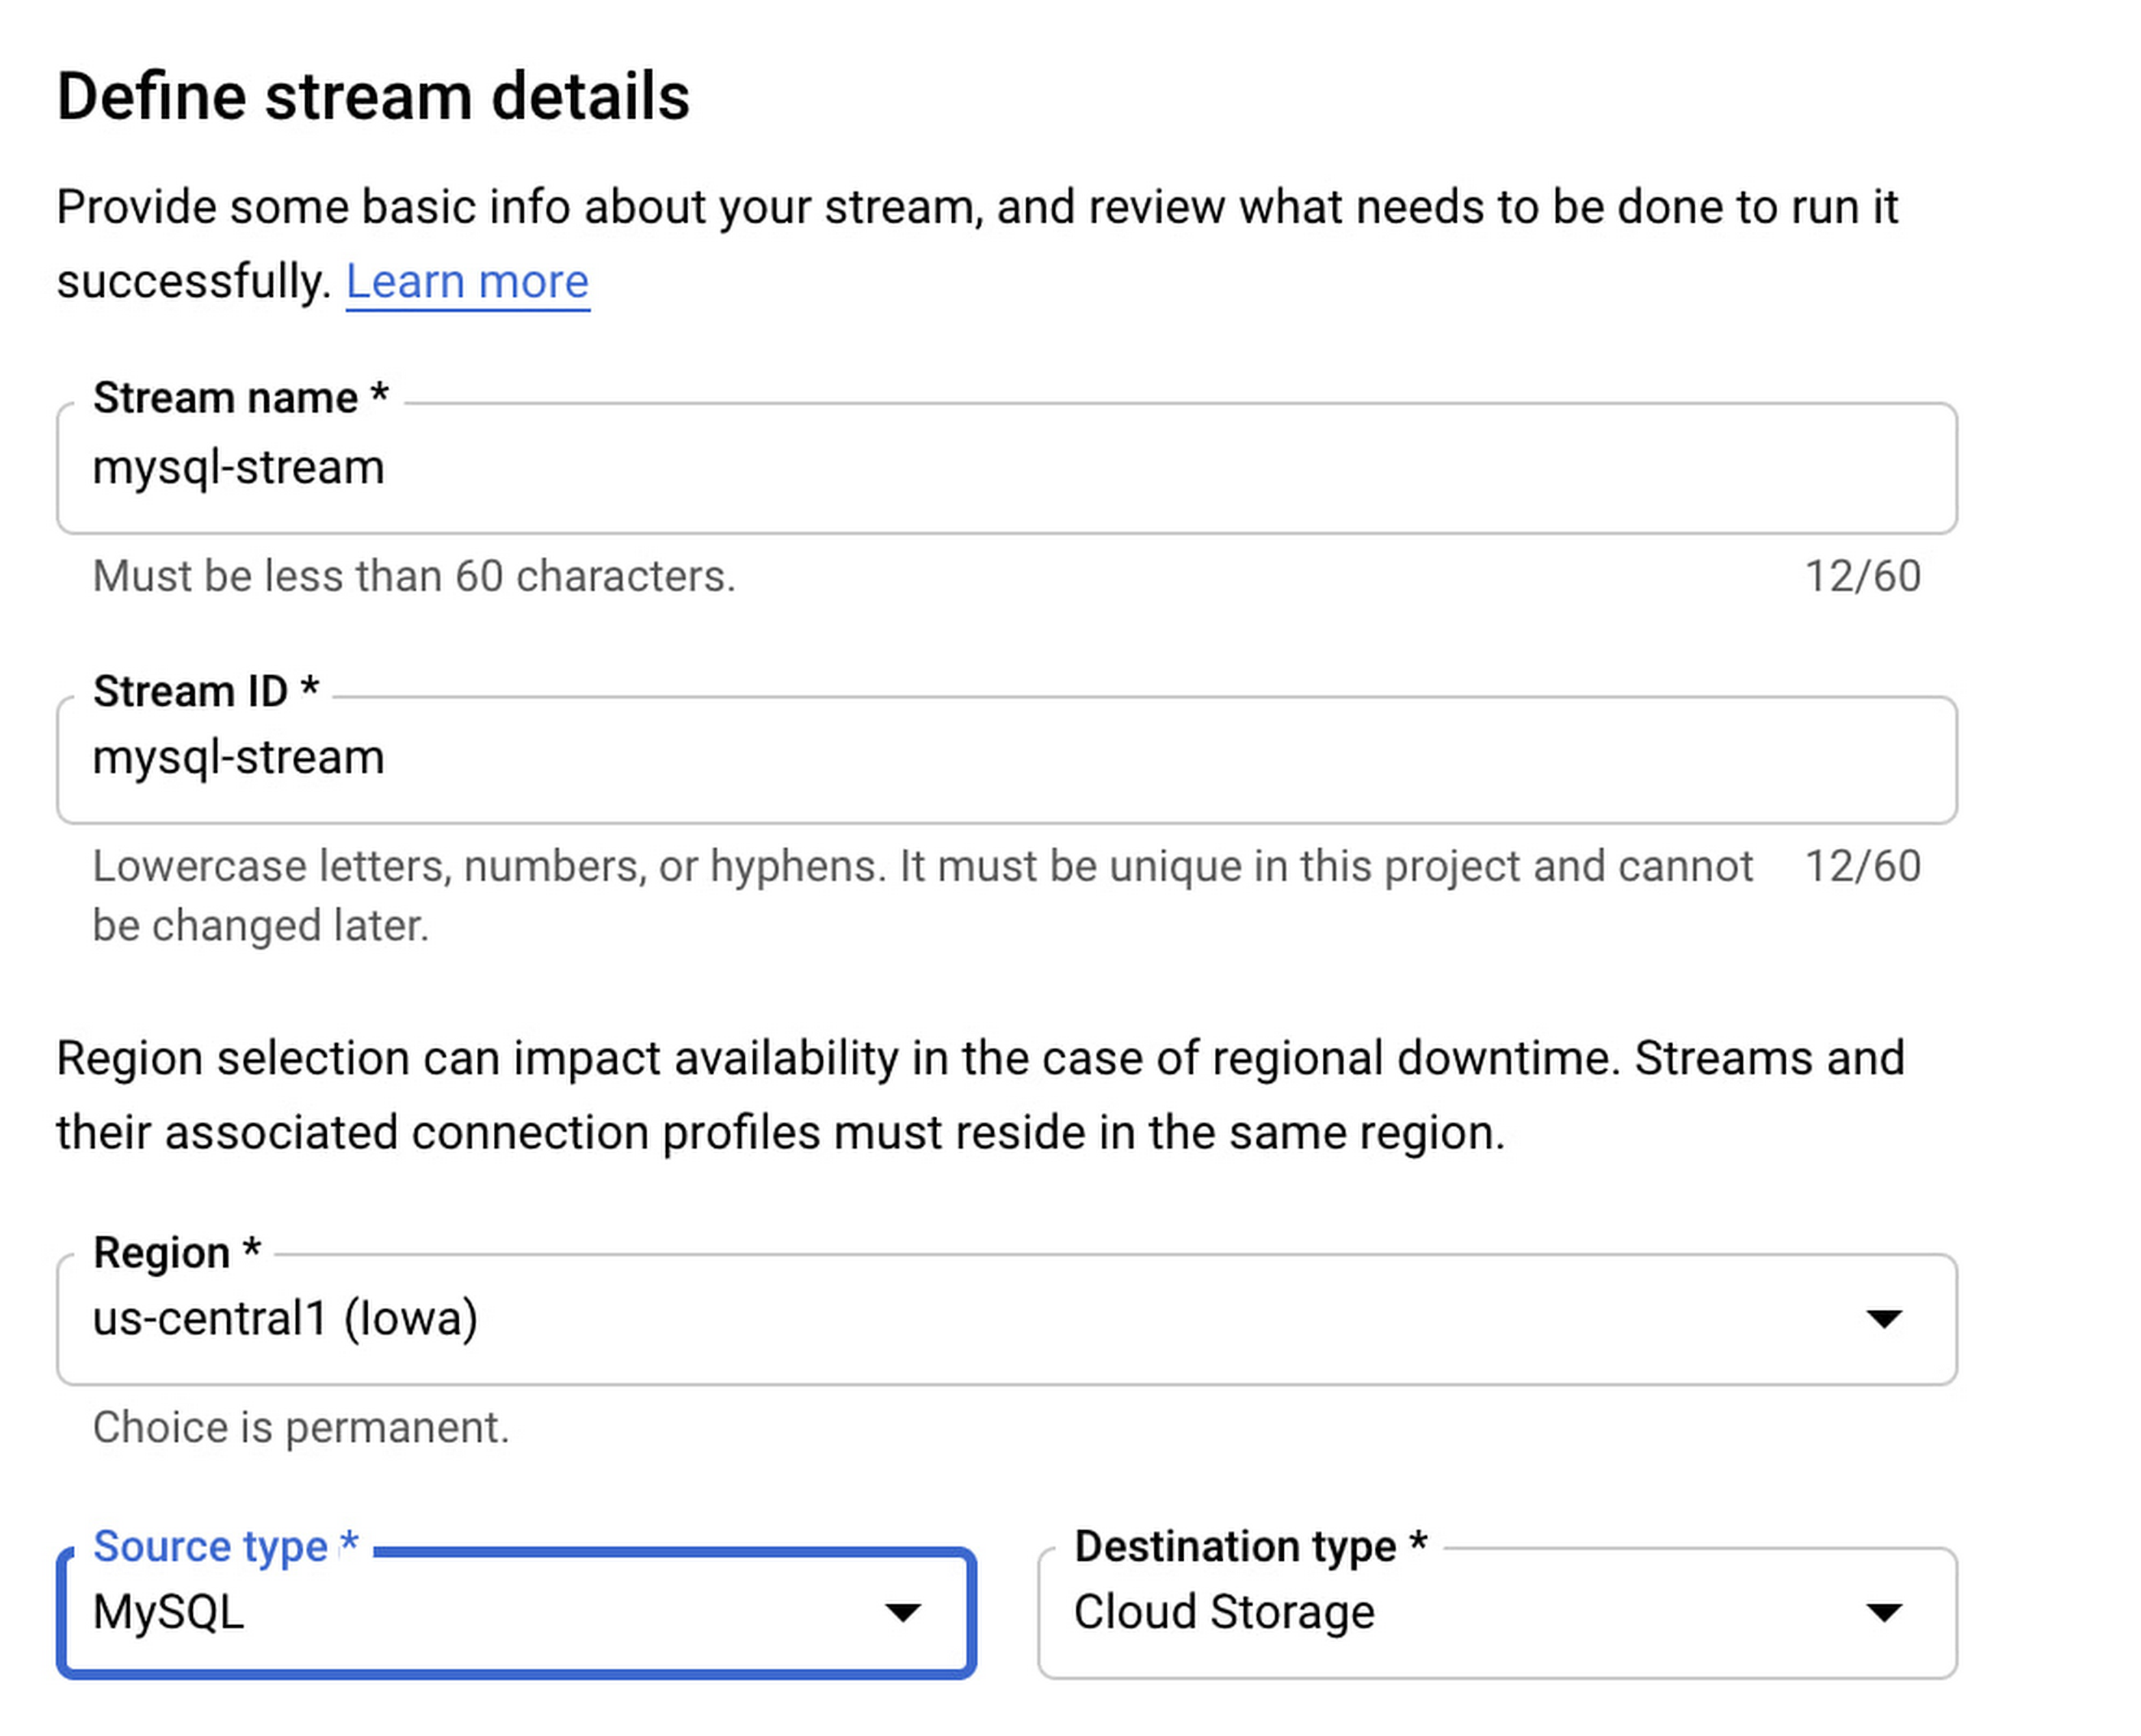
Provide a stream name and ID. “Source type” will be your relational database source, in our example this is MySQL. Follow the wizard’s prompts and select the MySQL and Cloud Storage profiles we created earlier. Once configured properly, Datastream will pull data changes as they happen from MySQL and write them into the Cloud Storage bucket.
At this point, we’re ready to configure the Dataflow MongoDB template. But, since we have files stored in Cloud Storage, it’s best to use Pub/Sub notifications for Cloud Storage. This feature makes Dataflow more efficient by alerting on the existence of new files as they become available instead of relying on Dataflow to continuously scan Cloud Storage for new files across the entire bucket.
Create a Pub/Sub notification
To create a Pub/Sub notification, you need to use the gcloud and gsutil command line tools, since there is no UI available in the Google Cloud console. Let’s enable notifications by creating a Pub/Sub topic and subscription, and creating a notification on the Cloud Storage bucket. The following is an example configuration script:
Note: Later you will supply this config in the —parameters section of the gcloud dataflow deploy command..
gcsPubSubSubscription=”projects/${PROJECT_ID}/subscriptions/${PUBSUB_SUBSCRIPTION}”
Notifications should be set up before Datastream is running. If Datastream is already running, you can create a copy of the files in Cloud Storage instead of recreating the stream. This will trigger the notification mechanism. You can delete the copy after Dataflow processes all the files.
Create the Dataflow template
At this point, we’ve created and configured Datastream and Cloud Storage, and now we’re ready to configure Dataflow. If you have not already done so, be sure to enable Dataflow via gcloud services enable dataflow.googleapis.com.
Dataflow makes use of templates, which make it easier to define the source and target, as well as transformations and other logic that should be applied to the data. You can also plug in your own custom JavaScript function to perform custom transformations.
To leverage the Dataflow MongoDB template, go to the Github repository and follow the instructions in the README file. These will guide you through building a Dataflow flex template image and placing it in the Google Container registry. Next, it will tell you how to run this flex template with required parameters. Note that there are several parameters that should be considered in the script.
After you work through the README instructions and execute the template, you can see a job created in the Dataflow jobs UI. Note that once you deploy the Dataflow MongoDB template, the job starts running.
If you select a job, you can see more details — such as a detailed job graph, metrics and execution details.
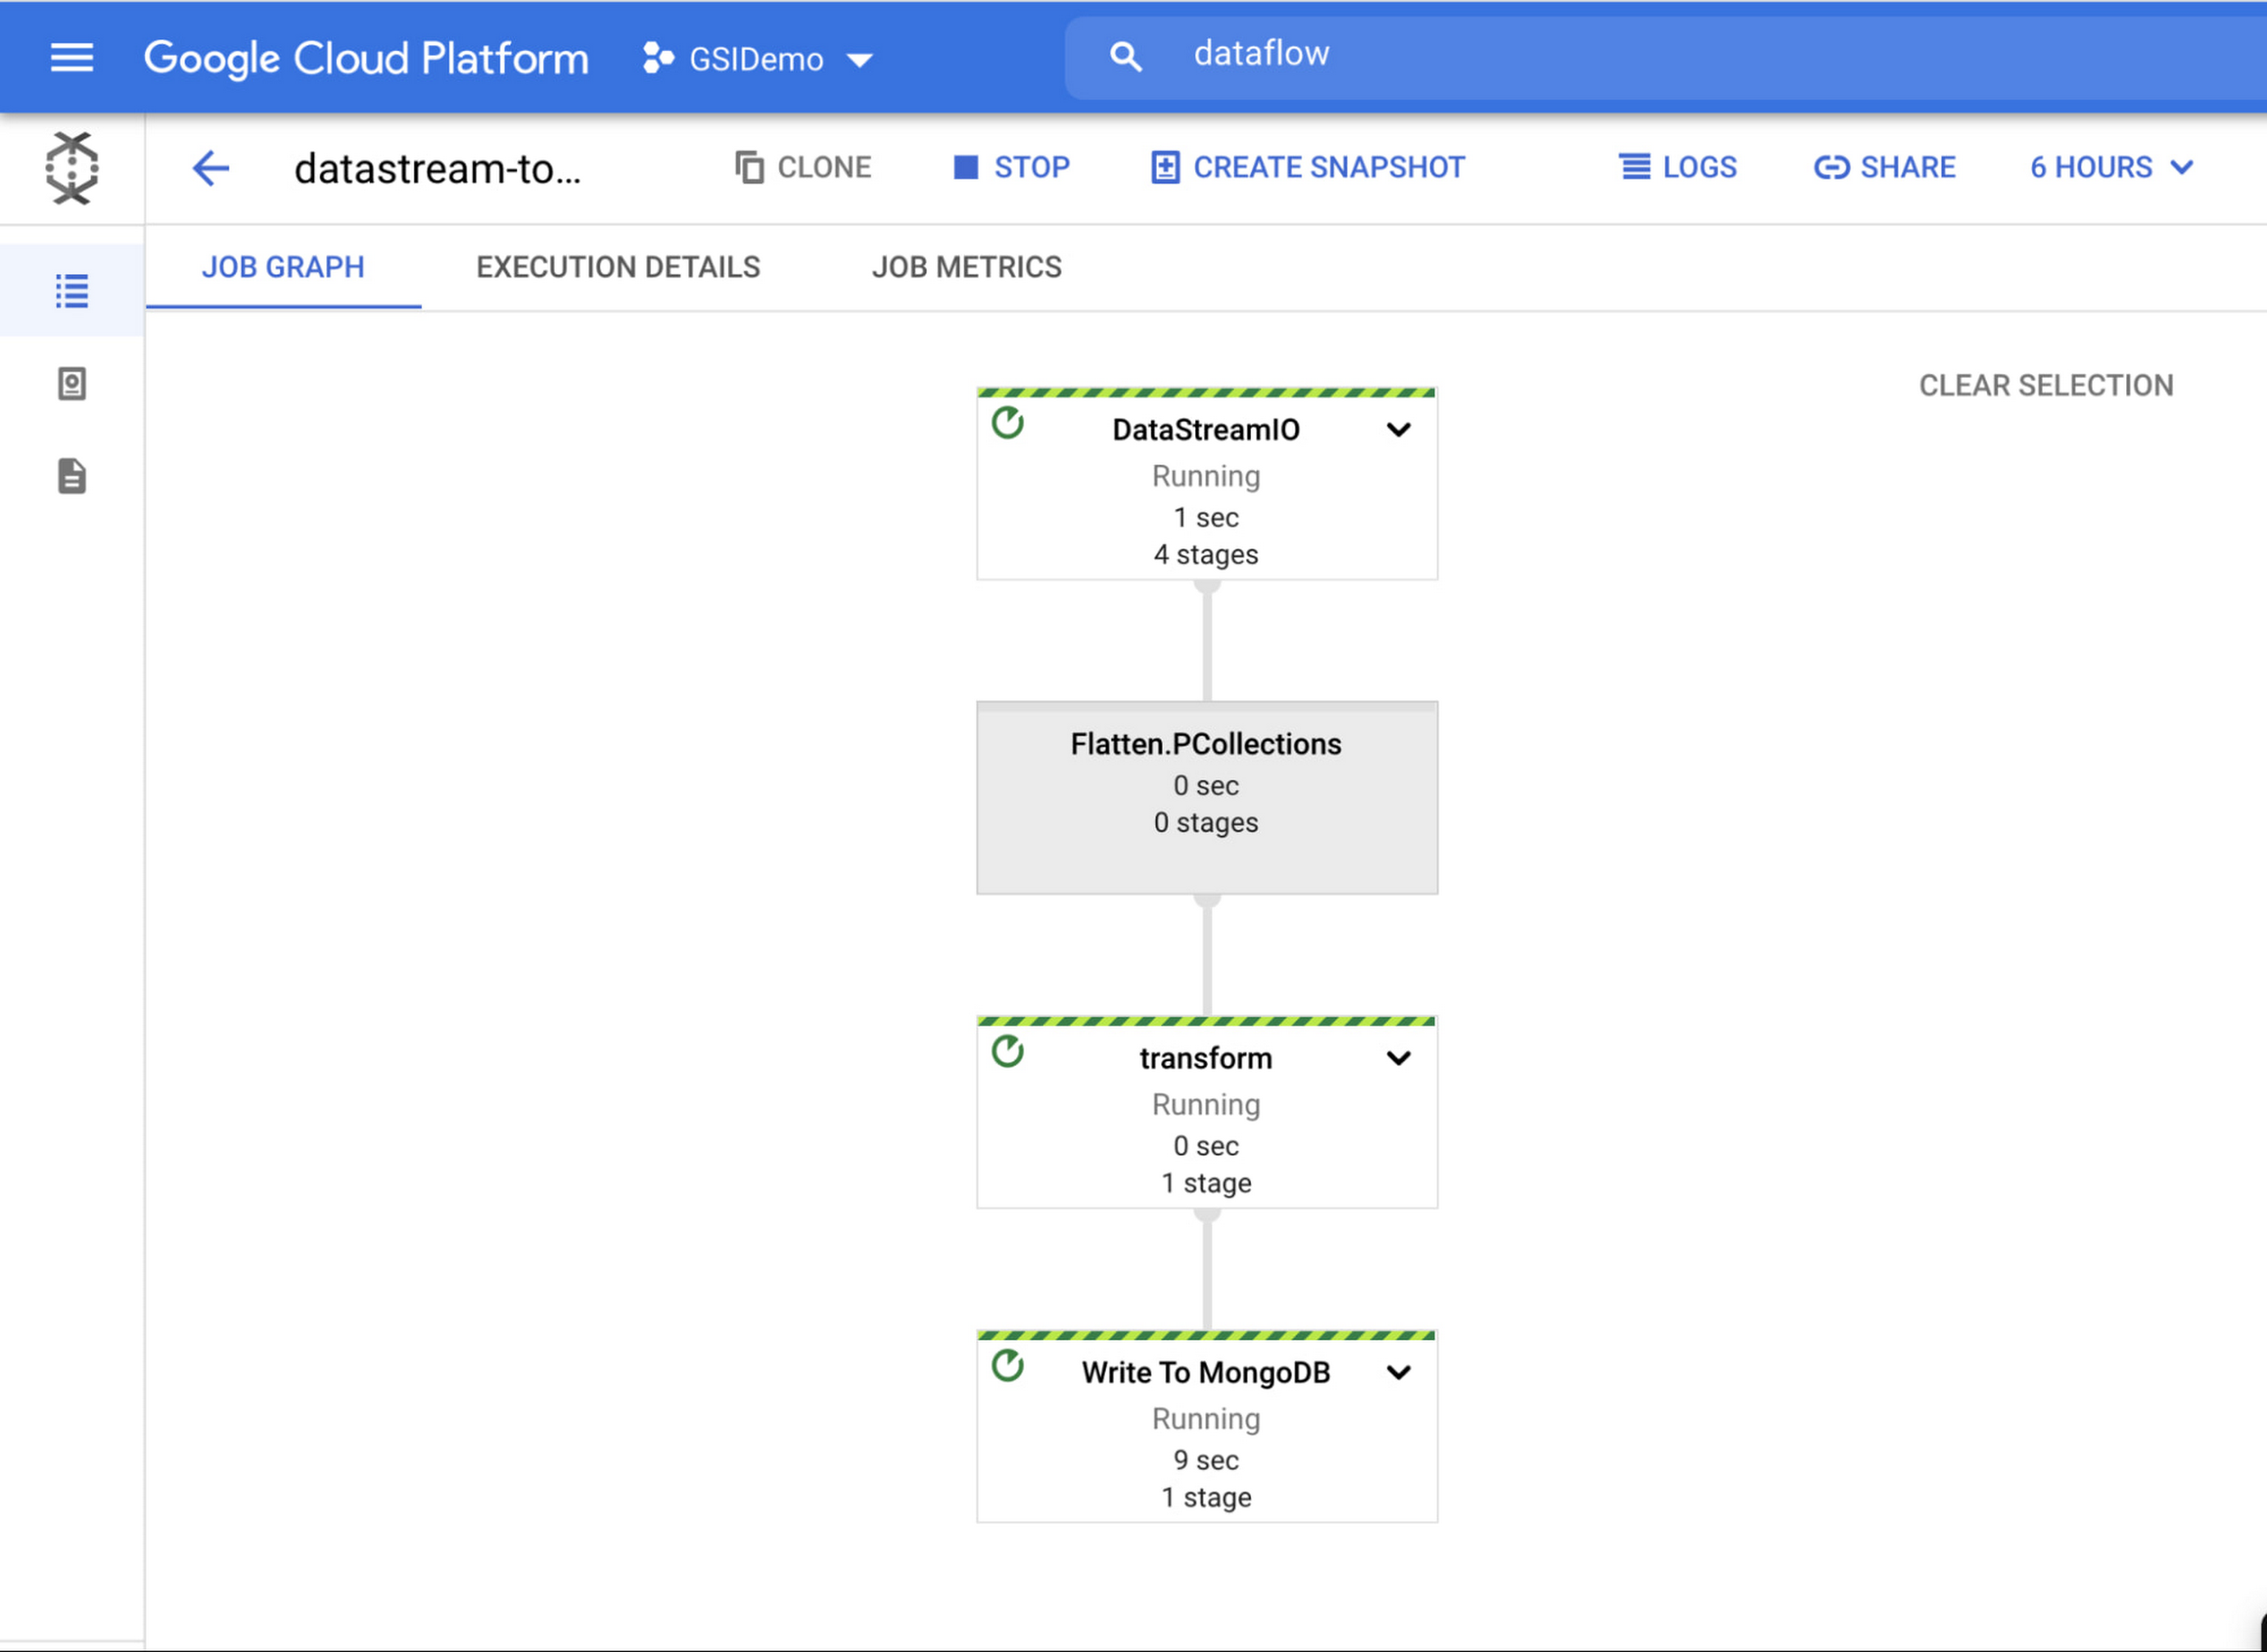
To see the flow in action, simply add some rows to your relational database and watch them show up in MongoDB Atlas!
Better business decisions happen in real time
In this post, we explored how to set up and configure components in Google Cloud and MongoDB Atlas so that you can stream data from MySQL into MongoDB. By streamlining your real-time data movement, you can gather business insights faster and make smarter, more strategic decisions. No matter your industry, MongoDB Atlas and Google Cloud can help you lead it.
Learn more about how you can deploy, manage, and grow MongoDB on Google Cloud on our partner page.
Cloud BlogRead More