

A common trend in modern application development and data processing is the use of Apache Kafka as a standard delivery mechanism for your data pipeline and fan-out approach. Amazon Managed Streaming for Apache Kafka (Amazon MSK) is a fully managed, highly available, and secure service that makes it simple for developers and DevOps managers to run applications on Apache Kafka in AWS without needing Apache Kafka infrastructure management expertise.
Document databases like Amazon DocumentDB (with MongoDB compatibility) are increasing in usage as developers and application owners use JSON-based datasets with their modern applications. Amazon DocumentDB is a scalable, durable, and fully managed database service for operating mission-critical MongoDB workloads. Increasingly, customers are using Amazon MSK with Amazon DocumentDB for various use cases.
In this post, we discuss how to run and configure the MongoDB Kafka connector to move data between Amazon DocumentDB and Amazon MSK for sink and source use cases.
Solution overview
Amazon DocumentDB can act as both the data source and data sink to Amazon MSK. The MongoDB Kafka connector can act in either use case to transfer data between Amazon DocumentDB and Amazon MSK.
Kafka Connect is an open-source component of Apache Kafka that solves the problem of connecting Apache Kafka to data stores. It provides a framework for deploying connectors such as the MongoDB Kafka connector for connecting with external systems such as databases, key-value stores, search indexes, and file systems.
Kafka Connect currently supports two modes:
Standalone –Work is performed in a single process
Distributed – Multiple workers, automatic balancing, and dynamic scaling of tasks
The balancing and scaling of the distributed mode offer fault tolerance for active tasks, configuration, and offset commit data, which isn’t provided in standalone mode. In this post, we configure and run the connector in distributed mode. In distributed mode, Kafka Connect also exposes the REST API interface to manage the connectors that we use in this post.
The following are example use cases in which you can use Amazon DocumentDB as a data store behind Amazon MSK:
In a large video streaming or flash sale event, the data generated relating to viewers, reactions, or a buyer’s clickstream can be fed to Amazon MSK as raw data. You can further stream this data to Amazon DocumentDB for downstream processing and aggregation.
For streaming of telemetry data from IoT devices, website hit data, or meteorological data, the data can be streamed into Amazon DocumentDB using the connector and then processed (such as aggregation or min/max calculation).
For any record replay or application recovery in the Amazon DocumentDB cluster, rather than restoring the whole backup, the application can replay specific item-level changes from Amazon MSK to the Amazon DocumentDB collection.
The following are example use cases in which you can send Amazon DocumentDB change streams to Amazon MSK:
In case of selective replication of collections from one Amazon DocumentDB cluster to another cluster or other data stores, you can use Amazon MSK as an intermediate layer.
Amazon DocumentDB offers a rich aggregation framework, but for advanced analytics and machine learning, you can create a data pipeline from Amazon DocumentDB to various other data stores. You can use Amazon MSK as an intermediate layer to modify and filter change events before loading them to the target data store.
In both use cases, you can use the Kafka connector to move the change streams from Amazon DocumentDB to Amazon MSK.
We divided this post into two main sections:
Amazon DocumentDB as a sink – In the first half of this post, we discuss data delivery to Amazon DocumentDB via Amazon MSK using the connector.
Amazon DocumentDB as a source – In the second half of this post, we cover pulling data from Amazon DocumentDB using the same connector and publishing it to a Kafka topic for a downstream Kafka consumer.
We also discuss automatic balancing and fault tolerance for active connector tasks, which distributed mode offers.
The following diagram illustrates the architecture and data flow.
Prerequisites
To follow along with this post, you need the following resources:
An Amazon DocumentDB cluster – You can use an existing cluster or create a new cluster. If creating a new cluster, verify that your instances are deployed to multiple Availability Zones through subnet group settings.
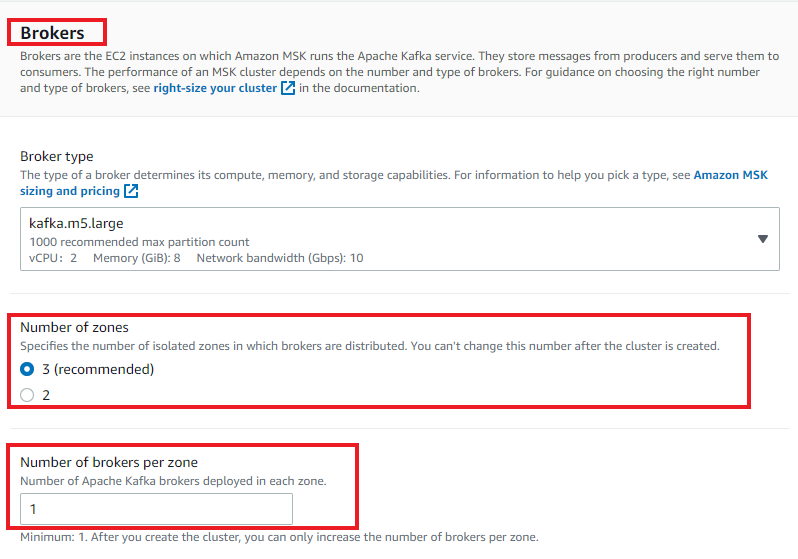
An Amazon MSK cluster – You can use an existing cluster or create a new one with the custom create method. The Amazon MSK cluster type should be provisioned. The cluster should be deployed to the same VPC as your Amazon DocumentDB cluster and configured with the same security group used for Amazon DocumentDB. Your cluster should also have the following configurations:
Create a custom configuration with auto.create.topics.enable=true. The following screenshot shows an example of a custom configuration called production-config.
Create three brokers (minimum) while configuring your Amazon MSK cluster, as shown in the following screenshot.
Use the custom config during your Amazon MSK cluster configuration.
Configure AWS Identity Access and Management (IAM) role-based authentication (with SSL). With IAM role-based authentication, TLS automatically gets enabled.
An Amazon EC2 instance – You can choose an Amazon Elastic Compute Cloud (Amazon EC2) instance or configure a new one. We use this EC2 instance for running containers and testing purposes. As a production best practice, you can deploy containers on Amazon Elastic Container Service (Amazon ECS), Amazon Elastic Kubernetes Service (Amazon EKS), or AWS Fargate for effectively managing the containers. Your instance should have the following configurations:
Instance class minimum t3.large.
Instance storage at least 10 GB.
Deployed in the same VPC of your Amazon DocumentDB cluster and Amazon MSK cluster with the same security group.
The instance security group should be configured to connect to and from the Amazon MSK cluster (port 9098) and Amazon DocumentDB cluster (port 27017).
A customer managed policy – Create a customer managed policy using the following document for the Amazon MSK cluster. You need to update your Region and account id in the policy. The Region should be same as where you provisioned your Amazon DocumentDB cluster, Amazon MSK cluster, and EC2 instance.
An IAM role – Create an IAM role with the preceding policy and assign that to the EC2 instance.
Mongo shell to connect to the Amazon DocumentDB cluster – You can install the mongo shell on the EC2 instance. For instructions, refer to Install the mongo shell.
Packages to run Docker containers – Log in to the EC2 instance and run the following commands to install the Java, Docker, and docker-compose packages that you need to run Docker containers:
A trust store for JVM –The Amazon DocumentDB cluster is by default SSL/TLS enabled and the Kafka connector runs with Java Virtual Machine (JVM), so you need to create a trust store with a password. For instructions, refer to Connecting Programmatically to Amazon DocumentDB. Create a local directory and copy your trust store file (called rds-truststore.jks). If you followed the steps to create the trust store correctly, the file is located in /tmp/certs .
You will incur costs in your account related to the Amazon DocumentDB, Amazon MSK, and Amazon EC2 resources. You can use the AWS Pricing Calculator to estimate the cost.
Amazon DocumentDB as a sink
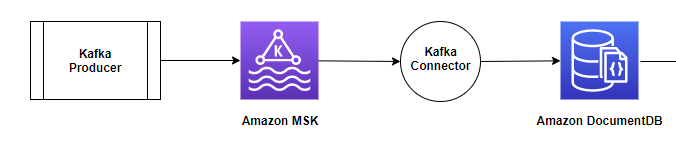
In this part of the post, we focus on the sink use case, as shown in the following diagram. We discuss how to create and run the connector (using Docker containers) and use Amazon DocumentDB as a sink database to move data from the Amazon MSK Kafka topic, which is generated by a Kafka producer.
Build and run the connector Docker container
To build and run our connector Docker container, complete the following steps:
On the Amazon MSK console, choose Clusters in the navigation pane.
Open your cluster.
Choose View client information.
Copy the private endpoint of the Amazon MSK bootstrap servers.
In your EC2 instance, create a new Dockerfile with the following contents using the vi editor. Update the Amazon MSK bootstrap servers and trust store password.
In the Dockerfile, you build the connector from scratch (installing Java, installing Kafka Connect with the connector JAR, configuring IAM authentication, and so on).
We’re running the connector in distributed mode to provide fault tolerance. In distributed mode, you can start multiple worker processes using the same group.id config, and they automatically coordinate to schedule running the connectors and tasks across the available workers. In the preceding Dockerfile, group.id is defined as docdb-kafka-connect-cluster1.
Create a Docker image:
For this post, we’re running containers with Docker Compose, a container orchestration framework that enables you to define and run the multiple containers. It runs the containers on a single host machine.
Create the Docker Compose file docker-compose.yaml with the following content:
Run two containers of the docdbkafkaconnect image using Docker Compose:
We get the following output:
These two containers run the connector worker in distributed mode. You can verify the containers’ running status using the following command:
We get the following output:
Get the IP address of these two running containers using the docker inspect command. You can get the container name from the previous step’s output.
We get the following output:
Define two environment variables CONTAINER_IP1 and CONTAINER_IP2 to store the IP addresses of these running containers:
Use the REST API to check the health of the connectors. Kafka Connect supports a REST API interface for managing connectors. By default, this service runs on port 8083. You can use any container IP address as follows:
This GET API call provides basic information about the Kafka Connect cluster, such as the version of the Kafka Connect worker that serves the REST request (including the git commit ID of the source code) and the Kafka cluster ID that it’s connected to. If you get error 404, it means the connector is still starting. You should wait until it returns the required information.
Because there is no connector configuration, the following REST API call to the connectors returns null:
Configure the Amazon DocumentDB sink connector
Now you need to configure the connector to read the data from the Amazon MSK topic and sync that to the target Amazon DocumentDB database.
Connector configurations are key-value mappings. In distributed mode, these are included in the JSON payload for the request that creates and configures the connector. You need to update the Amazon DocumentDB login name, password, cluster endpoint, and port of your cluster. You can get these values on the Connectivity & security tab on the Amazon DocumentDB console.
You can use any connector IP address for the REST API call. See the following code:
The preceding data payload contains the following connector configuration details in JSON format:
name – The unique name for the connector. The connector name is documentdb-sink for this configuration.
connector.class – The Java class for the connector. It’s the class responsible for moving data from Kafka.
tasks.max – The maximum number of tasks that should be created for this connector.
topics – The list of Kafka topics that this sink connector watches. The topic name is documentdb_topic.
key.converter – The converter class that instructs the connector how to translate the key from Kafka serialized format. We use the string class converter.
value.converter – The converter class that instructs the connector how to translate the value from Kafka serialized format. We have JSON data in our Kafka topic, so we configure Kafka Connect to use the JSON converter.
value.converter.schemas.enable – By default, the JSON converter is going to expect a JSON schema, but we set it as false because there isn’t any schema.
connection-uri – Defines the endpoint to connect to the Amazon DocumentDB cluster. We use an endpoint with the SSL option.
database – The target Amazon DocumentDB database. We use the database name sinkdatabase.
collection – The collection name in the database to push the changes. The collection name is sinkcollection.
For complete details of the configurations, refer to All Sink Connector Configuration Properties.
Now you can check for the configured connector details using the REST API call, which returns the connector name documentdb-sink:
You can also see the documentdb-sink connector status using the REST API call as follows (the jq command helps to show the output prettier).
We get the following output; the state shows as Running:
In this output, the sink connector is running on a container with IP address 172.XX.XX.2.
To check the config for a running documentdb-sink connector, use the following code:
We get the following output:
Test the MongoDB Kafka connector with Amazon DocumentDB as sink
To test the connector, start a Kafka producer to push the changes to the Kafka topic documentdb_topic. The Kafka connector reads the details from this topic and puts the details in Amazon DocumentDB based on the configuration.
To run the local Kafka producer, you need to download the binary distribution of Apache Kafka and extract the archive in the local_kafka directory on the EC2 instance:
To use IAM to authenticate with the MSK cluster, download the Amazon MSK Library for IAM and copy to the local Kafka library directory as shown in the following code. For complete instructions, refer to Configure clients for IAM access control.
We use the latest version of Kafka as of the publishing of this post, 3.2.3.
In the ~/local_kafka/kafka/config/ directory, create a client-config.properties file to configure a Kafka client to use IAM authentication for the Kafka console producer and consumers:
Define the BOOTSTRAP_SERVERS environment variable to store the bootstrap servers of the Amazon MSK cluster and locally install Kafka in the path environment variable:
Run the Kafka console producer to write into the Amazon MSK topic documentdb_topic and submit the valid JSON documents {“name”:”DocumentDB NoSQL”} and {“test”:”DocumentDB Sink Connector”}:
Open a second terminal and connect to the Amazon DocumentDB cluster using the mongo shell. The preceding two JSON documents should be part of the sinkcollection collection in sinkdatabase:
We get the following output:
You should see the JSON document that we pushed using the console producer.
Amazon DocumentDB as the source
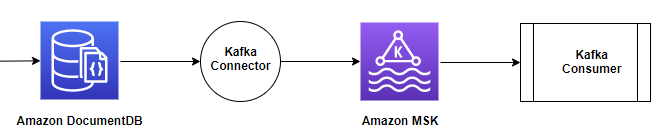
In this section, we discuss how to create and run the connector (using Docker containers) with the Kafka Connect framework, and use Amazon DocumentDB as the source database to move the collection changes to the Amazon MSK Kafka topic.
The following diagram illustrates this data flow.
We use the connector containers that we set up earlier.
Configure Amazon DocumentDB for a change stream
The connector reads changes from the source collection through a change stream cursor. The change streams feature in Amazon DocumentDB provides a time-ordered sequence of change events that occur within your collections.
For this post, we use the collection sourcecollection in the sourcedatabase database in our Amazon DocumentDB cluster.
Connect to the Amazon DocumentDB cluster and enable the change stream for collection sourcecollection:
Configure the connector as an Amazon DocumentDB source connector
Now we need to configure the source connector to read the changes in the Amazon DocumentDB collection and store those changes in the Amazon MSK topic. The connector reads these changes from the Amazon DocumentDB change stream that we configured.
The connector configurations are key-value mappings. In distributed mode, these are included in the JSON payload for the request that creates and configures the connector. You need to update the Amazon DocumentDB login name, password, cluster endpoint, and port of your cluster. You can use any container IP address for the following REST API call.
Note that connection.uri is different than the previous sink use case. Don’t include the read preference setting as secondary in connection.uri, because Amazon DocumentDB only supports a change stream on the primary instance.
You can open a new terminal, or you can stop one of the earlier created terminals to run the following command:
The preceding data payload contains the connector type and its properties:
name – The unique name for the connector. The connector name is documentdb-soutrce for this configuration.
connector.class – The Java class for the connector. It’s the class responsible for moving data from the Amazon DocumentDB collection to the Amazon MSK topic.
tasks.max – The maximum number of tasks that should be created for this connector.
connection-uri – The Amazon DocumentDB endpoint to connect to the Amazon DocumentDB cluster. We use an endpoint with the SSL option.
database – The source database. In this case, the database name is sourcedatabase.
collection – The collection in the database to watch the changes. The collection name is sourcecollection.
pipeline – The aggregation pipeline to add new fields in the document. With this config, we’re adding a field in the document, but it isn’t mandatory.
For complete details of the configurations, refer to All Source Connector Configuration Properties.
Check the configured connector details using the REST API call; it returns all the configured connectors including this new one. You can use any container IP address for the REST API call:
You will see a connector with the name documentdb-source apart from documentdb-sink.
You can also see the documentdb-sink connector status using the REST API call as follows:
We get the following output; the state shows as Running:
As already mentioned, the sink connector is running on a container with IP address 172.XX.XX.2. Now the source connector is on a different container with IP 172.XX.XX.3. In distributed mode, Kafka Connect automatically load balances tasks across different available containers (connector workers). In case of failures with the container, it automatically moves running tasks to another available container.
To check the config for a running documentdb-source connector, use the following code:
We get the following output:
Test the connector with Amazon DocumentDB as source
To test the connector, we insert data in the Amazon DocumentDB collection. The Kafka connector reads the inserted data using the collection change stream and writes that to the Kafka topic.
Open a new terminal or use an existing one and run the Kafka console consumer to read the details from the sourcecollection.sourcedatabase Kafka topic. If you run it on a new terminal, make sure to create the BOOTSTRAP_SERVERS environment variable.
You get the following warning because the console consumer command creates a new topic called sourcedatabase.sourcecollection:
In a second terminal, add the record in sourcedatabase.sourceCollection of your Amazon DocumentDB cluster:
Return to the first terminal, where the console consumer is reading from the Amazon MSK topic:
We can observe the insert operation made on the Amazon DocumentDB collection is available on the console consumer. Additionally, a new field has been added, with newfield as the key and Testing DocumentDB Kafka Source Connecter as the value.
We’re now able to capture changes in Amazon DocumentDB as the source database using the MongoDB Kafka connector by running connectors with Docker containers.
Cleanup
To clean up the resources you used in your account, delete them in the following order:
EC2 instance
IAM role and customer managed policy
Amazon MSK Kafka cluster
Amazon DocumentDB cluster
Conclusion
In this post, we discussed how to run and configure the MongoDB Kafka connector to move data between Amazon DocumentDB and Amazon MSK for different sink and source use cases. You can use this solution for a variety of use cases, such as creating pipelines for large video streaming or flash sale events, streaming telemetry data from IoT devices, collecting website hit data, replicating collections from Amazon DocumentDB to other data stores, and moving data for advanced analytics and machine learning.
We first showed you how to use the connector to stream data from Amazon MSK to Amazon DocumentDB, where Amazon DocumentDB acts as a sink. We also showed how to build and configure a connector Docker image, and run the connector containers in distributed mode. In the second half of this post, we showed you how to stream data from Amazon DocumentDB to Amazon MSK where Amazon DocumentDB acts as the source. By querying the connector status, we showed how in distributed mode, connectors provide automatic balancing and fault tolerance. We also discussed various configurations available with both use cases that you can adjust for your specific use case or workload requirement.
Do you have follow-up questions or feedback? Leave a comment. We’d love to hear your thoughts and suggestions.
About the Author
Anshu Vajpayee is a Senior DocumentDB Specialist Solutions Architect at Amazon Web Services(AWS). He has been helping customers to adopt NoSQL databases and modernize applications leveraging Amazon DocumentDB. Before joining AWS, he worked extensively with relational and NoSQL databases.
Read MoreAWS Database Blog