

This is the second post of a two-part series that covers how to store off-chain data using Amazon Managed Blockchain and Amazon Simple Storage Service (Amazon S3). This post builds on the solution setup outlined in Part 1.
In Part 1, we presented a solution that implements off-chain storage for non-transactional data using Amazon S3, and Managed Blockchain for Hyperledger Fabric for on-chain storage. One of the advantages offered by blockchain technology is that it’s tamper-proof. You can cryptographically verify the integrity of the data that has been stored on the ledger, known as on-chain data. However, there are also cases when off-chain data is needed to store any non-transactional data that is too large to store on-chain efficiently. We should also make sure that off-chain data has not been tampered with.
In this post, we show you how to fetch both on-chain and off-chain data in a single request, while verifying the integrity of the off-chain data.
Solution overview
The following diagram illustrates the high-level architecture of the end-to-end solution.
In Part 1, we updated the “create new donor API” of the non-profit blockchain workshop to upload the donor image to Amazon S3, and we stored the hash of it on the blockchain, along with the user name and email.
In this post, we update the “get donor API” to fetch the donor details from the blockchain ledger and the image from Amazon S3 in a single API call. While fetching the image, we also verify the integrity of the file by comparing the hash value stored on the blockchain with the calculated hash value of the image stored in Amazon S3. We use AWS Step Functions to orchestrate the steps to read data from the blockchain ledger, fetch images from Amazon S3, and verify them.
The walkthrough includes the following steps:
Create an AWS Lambda function to read the image from Amazon S3.
Create a workflow using Step Functions.
Update the API to invoke the Step Functions workflow.
Test the API in Amazon API Gateway
Prerequisites
Before starting the walkthrough, you should complete the prerequisites and steps described in Part 1.
Create a Lambda function to read the image from Amazon S3
We first create a Lambda function to read the donor image from the S3 bucket and verify it. Then we configure an environment variable (S3_BUCKET) to pass the S3 bucket name to the function at runtime. The function reads the image from the S3 bucket, calculates the hash of it, and compares it with the hash value stored on the blockchain Ledger.
If both hash values are the same, it means the donor image hasn’t been tampered with. In this case, the Lambda function returns the image of the donor. If the hash values are different, the function returns the error message Donor Image is tampered.
The following snippet of code provides sample Node.js code you can use to create the Lambda function:
Make sure the function role is updated to grant the necessary permissions to read objects from the S3 bucket.
Create a workflow using Step Functions
Because we stored donor data in two different systems, we have to make separate calls to these systems. Also, while fetching the donor image from Amazon S3, we need to ensure that its integrity is preserved. We use Step Functions to orchestrate multiple API calls into a single workflow. In this step, we create a workflow using Step Functions to fetch data from the on-chain and off-chain storage.
Create a state machine in Step Functions by selecting the Express workflow type and using the following definition. Make sure you replace the required values in the JSON before using it.
At this stage, the state machine should look like in the following screenshot:
Next, update the role of the state machine to provide necessary permissions to invoke the Lambda functions.
The first function invokes the chaincode returning the donor user name, email, image key, and image hash. This information is passed to another function, which fetches the image from the S3 bucket using the key, calculates its hash, and compares the hash with the hash of the image received from the blockchain ledger.
Update the API to invoke the Step Functions workflow
In Part 1, you created an API in API Gateway. The resources in your API should look like the following screenshot.
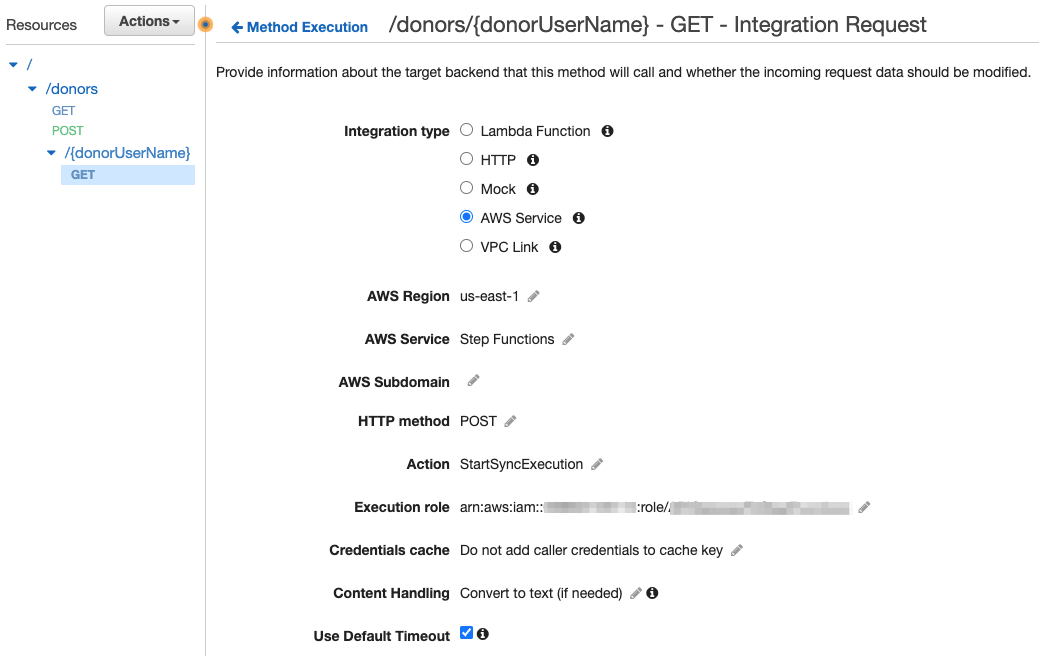
You also changed the integration for the POST method under the /{donors} resource to point to the Step Functions workflow. You now change the integration for the GET method under the /{donorUserName} resource to point to the Step Functions workflow created in the previous step. The updated integration settings should look like the following screenshot.
Expand the Mapping Templates section and update the template using the following JSON:
The GET method should look like the following screenshot after the update.
Choose the Integration Response link, expand the Mapping Templates section, and update the template using following script:
Test the API in API Gateway
To test the API before it’s deployed, choose Test on the API Gateway console.
Enter the donor user name in the {donorUserName} field and choose Test.
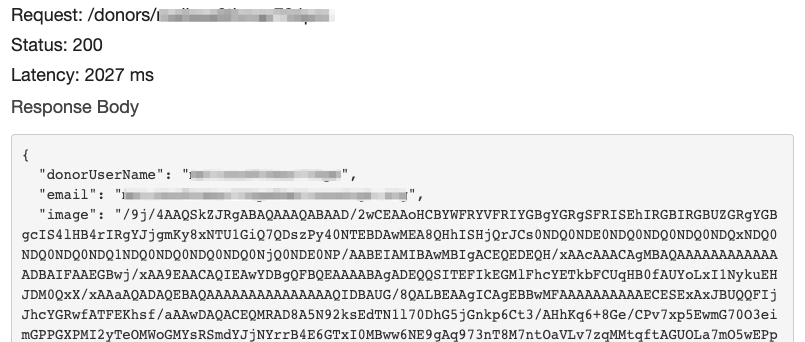
If the donor image hasn’t been tampered with, the returned response should be the donor information along with a path to the image.
If the donor image has been tampered with, an error message is returned in the response.
Conclusion
This series of posts demonstrated how to implement off-chain storage using Managed Blockchain and Amazon S3.
In Part 1, you implemented off-chain storage using Amazon S3 and created a workflow using Step Functions to store off-chain data to Amazon S3 and on-chain data on the blockchain in a single request.
In Part 2, you created a workflow using Step Functions to read data from both the on-chain and off-chain storage using a single request. While reading the data from the off-chain storage, you also validated its integrity.
Let us know in the comments what you think about this series of posts.
About the Authors
Surya Jitendra Kumar Nallamalli is a Solutions Architect at AWS. Surya is a SME in blockchain, data analytics, and cloud native development. In his free time, he enjoys spending time with his two daughters and watching web series.
Bianca Buzea was a Solutions Architect at AWS. Bianca enjoys working with customers and teaching them how to create innovative architectures using AWS services. She is passionate about blockchain technology and financial education. Outside of work, you can find her creating content for her personal blog and newsletter on these topics, or playing with sounds in Ableton.
Meghan Gentry is a Solutions Architect and blockchain specialist. She joined AWS 3 years ago as a member of the Military Apprentice Program after serving for 7 years in the United States Air Force. Meghan enjoys educating customers about all things cloud and helping them realize the art of the possible every day. She is excited to evangelize blockchain technology and distributed systems, especially as it pertains to decentralized finance (DeFi), improving state and federal government operations, and aiding in the progression of democracy all over the globe. When she isn’t working, Meghan is enjoying time with her husband, two young sons, two dogs, a cat, and several fish outside of Seattle.
Read MoreAWS Database Blog