

Caching is an integral part of today’s modern architecture. A cache is designed to store your most frequently used data to improve your application’s performance, and reduce burden on your primary data store. You can use a cache layer in a multitude of use cases, including web caching, session management, database caching, and more. As your application grows, you must keep up with provisioning your cache clusters to serve the needs of your business. Because under-provisioned clusters are detrimental to their applications, organizations typically choose to over-provision their clusters to handle peak loads, leading to unnecessary costs.
We recently announced support for auto scaling your Amazon ElastiCache for Redis clusters via Application Auto Scaling. You can scale your clusters horizontally by setting up scaling policies that fit your use case. In this post, we discuss how you can set up scaling policies with a demonstration of scaling in action.
Auto scaling policies, dimensions, metrics, and target values
Before we dive into the solution, let’s briefly discuss the types of scaling policies and the available dimensions. An auto scaling policy allows you to use Amazon CloudWatch metric, and a target value of that metric to scale out your instances when the defined criteria is met. A metric provides data regarding your system’s performance. You can use the AWS Management Console to apply a scaling policy based on a predefined metric. A predefined metric is defined in an enumeration so that you can specify it by name in code or use it in the AWS Management Console. The two supported predefined metrics are memory and engine CPU utilization. Custom metrics are not available for selection using the AWS Management Console. Alternatively, you can use either the AWS CLI or the Application Auto Scaling API to apply a scaling policy based on a predefined or custom metric. A target specifies the value that you wish for the scaling operation to achieve for a given metric and dimension.
The supported dimensions for ElastiCache for Redis are shards and replicas. The shards dimension is used to automatically add or remove shards in the cluster in response to the defined metric and target value. The replica dimension is used to automatically add or remove read-only replica nodes across all shards in the cluster in response to the defined metric and target value.
ElastiCache for Redis supports the following types of auto scaling policies:
Target tracking scaling policies – Increase or decrease the number of shards or replicas that your service runs based on a target value for a specific metric. This is similar to the way that your thermostat maintains the temperature of your home. You select a temperature and the thermostat does the rest.
Scheduled scaling – Increase or decrease the number of shards or replicas that your service runs based on the date and time. This allows you to set your own scaling schedule if your workloads have a predictable load. For example, if you expect higher traffic during weekends, you can configure a scheduled scaling policy to increase capacity on weekends, and decrease capacity at the beginning of the week.
Our demonstration covers the target tracking auto scaling policy, with a CPU utilization of 35% for the shard primary nodes in the cluster.
Prerequisites
To follow along with this walkthrough, you must have the following prerequisites:
An AWS account with a role that has sufficient access to provision the required infrastructure
The AWS CLI set up and ready to run commands to interact with your AWS resources
Credentials that enables you to interact with your AWS account
Because simulating a scaling action takes up significant amount of resources, make sure that you follow the cleanup instructions as soon as you’re done with the demo so you don’t incur any unnecessary costs. The end-to-end walkthrough should take you less than an hour and cost less than $2.
Solution overview
We provision an ElastiCache for Redis cluster with a replication group consisting of three shards. Once provisioned, you can run the provided cluster_autoscale.py script to simulate a busy application, performing lots of writes to the cache. After a few minutes, you can observe the CPU utilization of your clusters spike to over the 35% target. This triggers auto scaling to provision additional capacity per shard and rebalance the slots.
Create a service linked role
The following AWS CLI command creates the service linked role for Application Auto Scaling to perform scaling actions on your behalf:
You should get output similar to the following:
If you get an output similar to the following, the service linked role is already created and you may continue to the next step:
Clone the repo and set up resources
To set up your resources, complete the following steps:
With the following code, clone the GitHub repository that contains the AWS CloudFormation template and the script that triggers auto scaling. You also create an Amazon Simple Storage Service (Amazon S3) bucket in your own account and copy the Python script we use for testing the auto scaling.
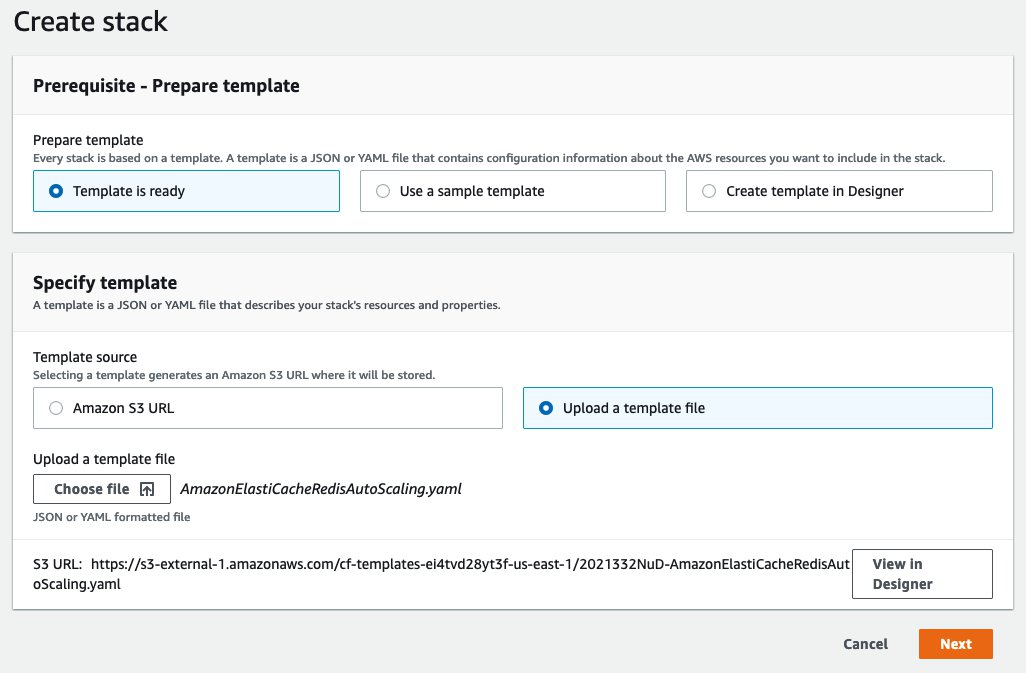
On the AWS CloudFormation console, choose Create stack.
Upload the AmazonElastiCacheRedisAutoScaling.yaml template file from the directory you cloned from the repository, and choose Next.
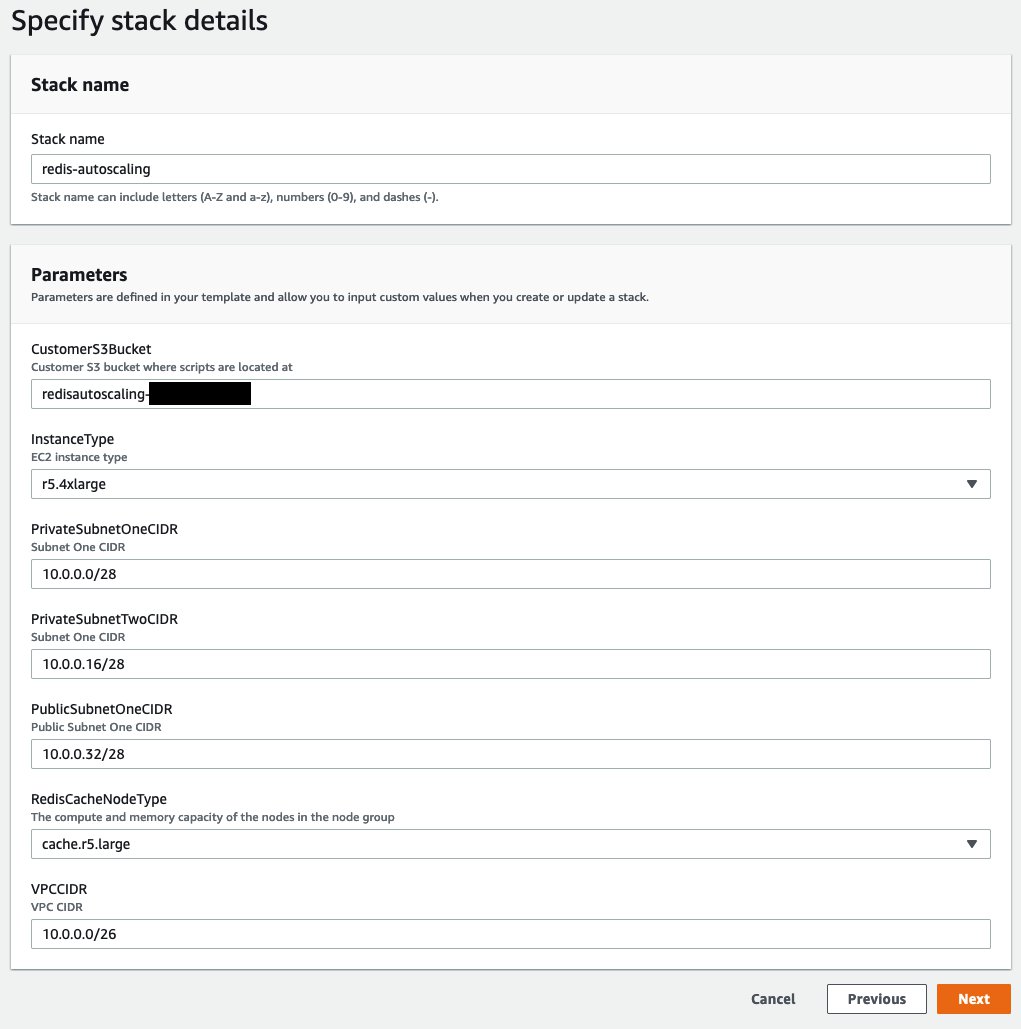
Provide the stack details as shown in the following screenshot.
For CustomerS3Bucket, provide the name of the bucket that you created via the AWS CLI.
Choose Next.
On the review page, select I acknowledge that AWS CloudFormation might create IAM resources and choose Create stack.
Alternatively, you can use the following AWS CLI command to deploy the CloudFormation stack:
Provisioning takes approximately 15–20 minutes to complete. When the stack status shows Create Complete, you can choose the Outputs tab to review the results.
Log in to the Amazon EC2 instance via Session Manager
In this step, you log in to the management Amazon Elastic Compute Cloud (Amazon EC2) instance via AWS Systems Manager Session Manager.
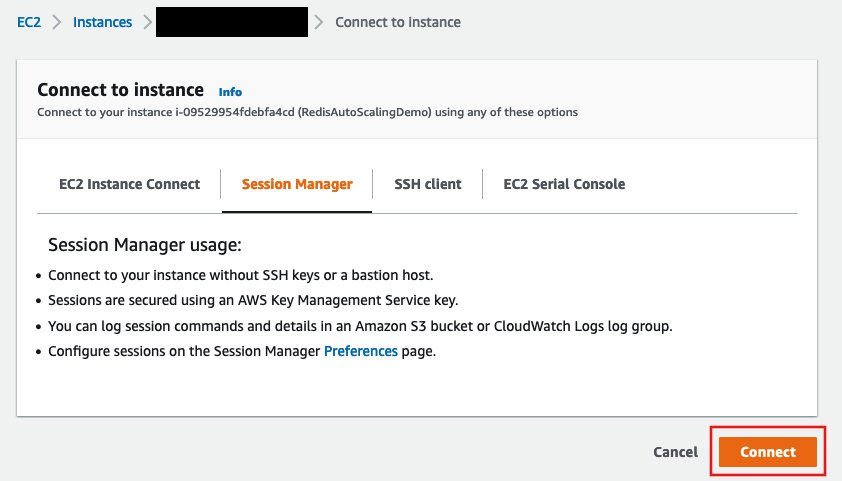
On the Amazon EC2 console, on the Instances page, select the instance RedisAutoScalingDemo and choose Connect.
On the Session Manager tab, choose Connect.
An in-browser terminal launches in a new window or tab.
Run the script to increase the CPU utilization
Copy the cluster_autoscale.py script from the S3 bucket and run it using the following commands. Replace the placeholders with appropriate values (account number and host name or endpoint):
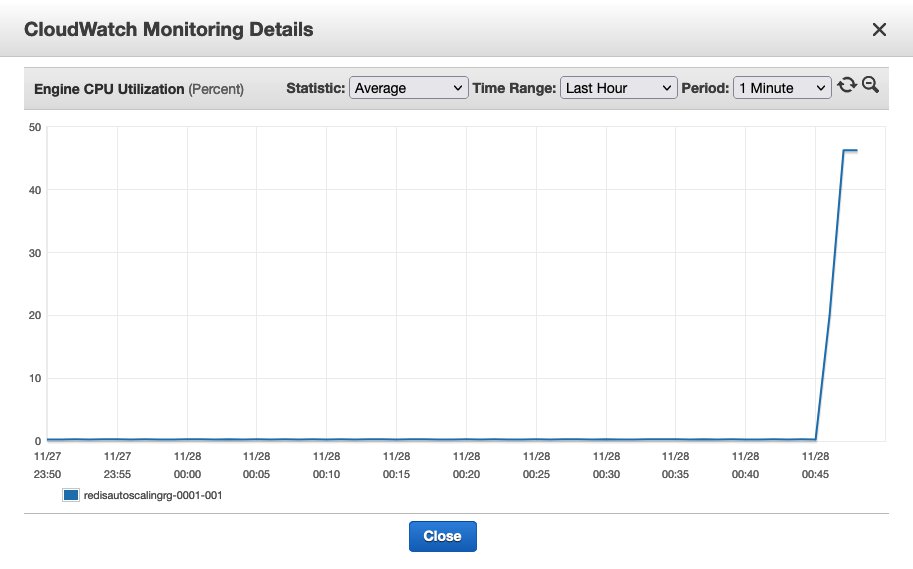
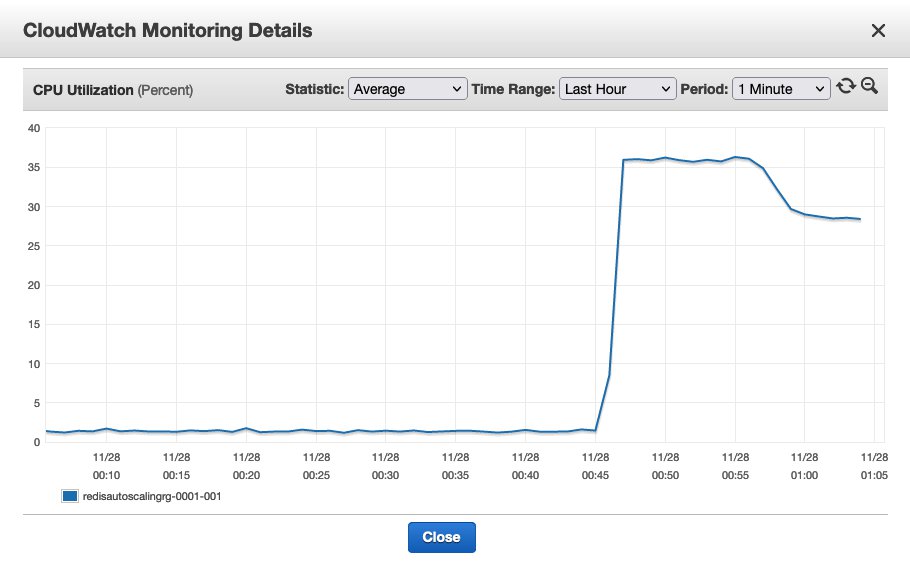
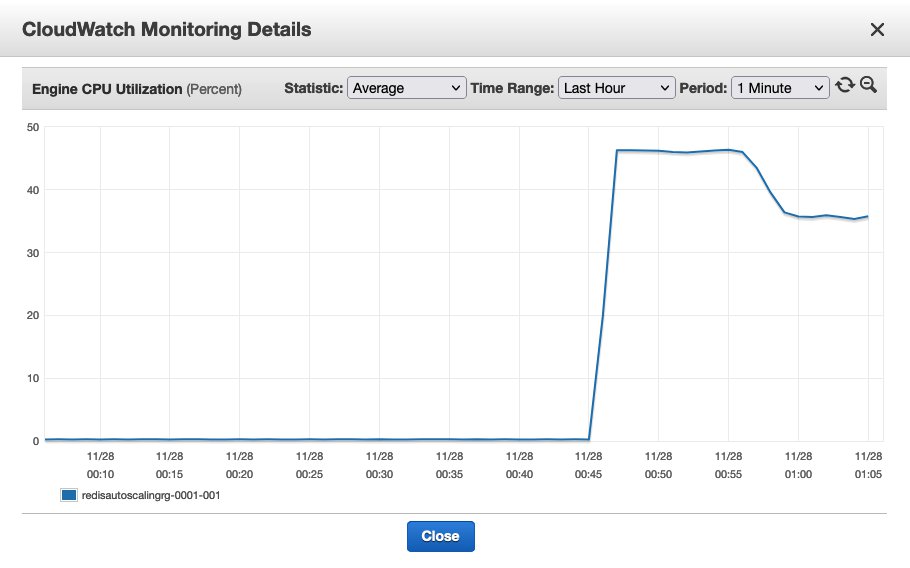
The script spawns 40 processes and iterates over a loop to insert random keys, so the shard slots are evenly utilized. On the ElastiCache console, choose Redis. Choose one of the shards in the redisautoscalingrg cluster and observe the CPU utilization metrics. Within a few minutes after the program runs, you can observe a spike in CPU utilization of the cluster and the shards (the Engine CPU Utilization metric). Give it several minutes until it reaches the configured target of 35% CPU utilization.
Auto scaling in action
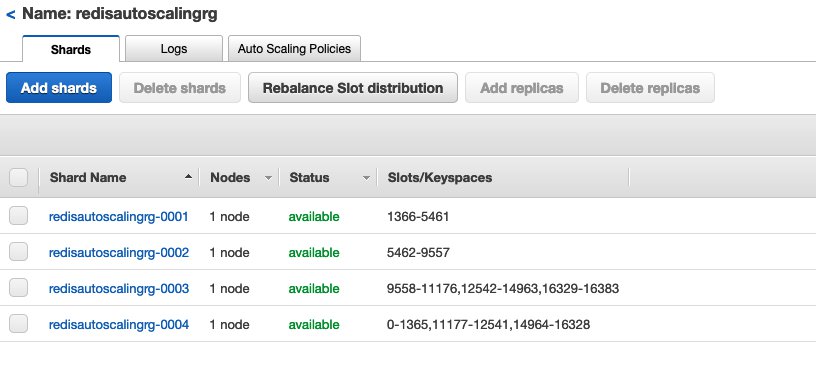
Within a few minutes after reaching the 35% threshold, the ElastiCache for Redis cluster starts adding an additional shard. You can also observe that the status of all the shards show as modifying. At this point, the cluster is rebalancing the key slots, and distributing part of the slots from each shard into the new shard. The cluster is serving the requests during this time. You may initially notice a small spike in the CPU utilization due to the overhead of the rebalancing activity. As you see the slots being moved to the new shard, you can observe the CPU utilization go down.
When the rebalancing activity is complete, the cluster is in the available status and now serving the requests across the four shards. The scale-out and rebalancing activity may continue until the target utilization gets to below your configured value, up to the maximum number of shards that you configure (10 in our case).
Choose one of the shards and observe the CPU utilization. Did it drop to below the configured CPU utilization of 35%?
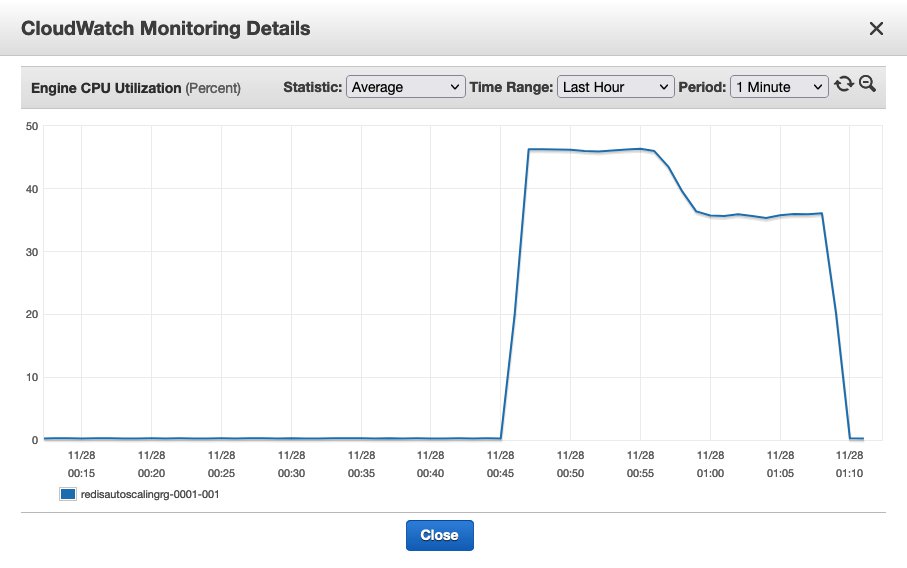
Navigate to the in-browser shell and stop the cluster_autoscale.py program by using the key combination Ctrl+C. A few minutes after the program is stopped, you can observe the CPU utilization go down significantly. Note that the scale-in process is not immediate and takes several minutes to hours for ElastiCache for Redis to bring the shards back to the configured minimum.
Try it yourself
You can manually increase the size of your EC2 instance to the next bigger option (r5.8xlarge), pass argument to cluster_autoscaling.py to increase the number of processes from 40 to 80, and see if it increases the CPU utilization significantly more than previously noted. Does it increase the number of shards by more than one? Did you need to increase the size of your ElastiCache for Redis node to a larger type?
Clean up
Run the following command in your terminal window to delete the resources to avoid incurring further charges:
Run the following commands to empty and delete the S3 bucket we initially created:
Conclusion
In this post, we showed how you could scale your clusters horizontally by setting up auto scaling policies. We demonstrated the ElastiCache for Redis new auto scaling feature using a Python script to simulate a high load on our cluster where the cluster must scale up using our configured auto scaling policy to meet the demand. We also gave you a foundation to test your customized auto scaling policies that fit your specific requirements.
Try this solution out and let us know your thoughts in the comments section.
About the Authors
Kishore Dhamodaran is a Senior Cloud Consultant with Amazon Web Services Professional Services. Kishore helps customers with their cloud enterprise strategy and migration journey, leveraging his years of industry and cloud experience.
Jared Keating is a Senior Cloud Consultant with Amazon Web Services Professional Services. Jared assists customers with their cloud infrastructure, compliance, and automation requirements drawing from his over 20 years of experience in IT.
Read MoreAWS Database Blog