

In December 2020, AWS announced the general availability of Amazon SageMaker JumpStart, a capability of Amazon SageMaker that helps you quickly and easily get started with machine learning (ML). JumpStart provides one-click fine-tuning and deployment of a wide variety of pre-trained models across popular ML tasks, as well as a selection of end-to-end solutions that solve common business problems. These features remove the heavy lifting from each step of the ML process, making it easier to develop high-quality models and reducing time to deployment.
This post is the third in a series on using JumpStart for specific ML tasks. In the first post, we showed how you can run image classification use cases on JumpStart. In the second post, we showed how you can run text classification use cases on JumpStart. In this post, we provide a step-by-step walkthrough on how to fine-tune and deploy an image segmentation model, using trained models from MXNet. We explore two ways of obtaining the same result: via JumpStart’s graphical interface on Amazon SageMaker Studio, and programmatically through JumpStart APIs.
If you want to jump straight into the JumpStart API code we explain in this post, you can refer to the following sample Jupyter notebooks:
Introduction to JumpStart – Instance Segmentation
Introduction to JumpStart – Semantic Segmentation
JumpStart overview
JumpStart helps you get started with ML models for a variety of tasks without writing a single line of code. At the time of writing, JumpStart enables you to do the following:
Deploy pre-trained models for common ML tasks – JumpStart enables you to address common ML tasks with no development effort by providing easy deployment of models pre-trained on large, publicly available datasets. The ML research community has put a large amount of effort into making a majority of recently developed models publicly available for use. JumpStart hosts a collection of over 300 models, spanning the 15 most popular ML tasks such as object detection, text classification, and text generation, making it easy for beginners to use them. These models are drawn from popular model hubs such as TensorFlow, PyTorch, Hugging Face, and MXNet.
Fine-tune pre-trained models – JumpStart allows you to fine-tune pre-trained models with no need to write your own training algorithm. In ML, the ability to transfer the knowledge learned in one domain to another domain is called transfer learning. You can use transfer learning to produce accurate models on your smaller datasets, with much lower training costs than the ones involved in training the original model. JumpStart also includes popular training algorithms based on LightGBM, CatBoost, XGBoost, and Scikit-learn, which you can train from scratch for tabular regression and classification.
Use pre-built solutions – JumpStart provides a set of 17 solutions for common ML use cases, such as demand forecasting and industrial and financial applications, which you can deploy with just a few clicks. Solutions are end-to-end ML applications that string together various AWS services to solve a particular business use case. They use AWS CloudFormation templates and reference architectures for quick deployment, which means they’re fully customizable.
Refer to notebook examples for SageMaker algorithms – SageMaker provides a suite of built-in algorithms to help data scientists and ML practitioners get started with training and deploying ML models quickly. JumpStart provides sample notebooks that you can use to quickly use these algorithms.
Review training videos and blogs – JumpStart also provides numerous blog posts and videos that teach you how to use different functionalities within SageMaker.
JumpStart accepts custom VPC settings and AWS Key Management Service (AWS KMS) encryption keys, so you can use the available models and solutions securely within your enterprise environment. You can pass your security settings to JumpStart within Studio or through the SageMaker Python SDK.
Semantic segmentation
Semantic segmentation delineates each class of objects appearing in an input image. It tags (classifies) each pixel of the input image with a class label from a predefined set of classes. Multiple objects of the same class are mapped to the same mask.
The model available for fine-tuning builds a fully convolutional network (FCN) “head” on top of the base network. The fine-tuning step fine-tunes the FCNHead while keeping the parameters of the rest of the model frozen, and returns the fine-tuned model. The objective is to minimize per-pixel softmax cross entropy loss to train the FCN. The model returned by fine-tuning can be further deployed for inference.
The input directory should look like the following code if the training data contains two images. The names of the .png files can be anything.
The mask files should have class label information for each pixel.
Instance segmentation
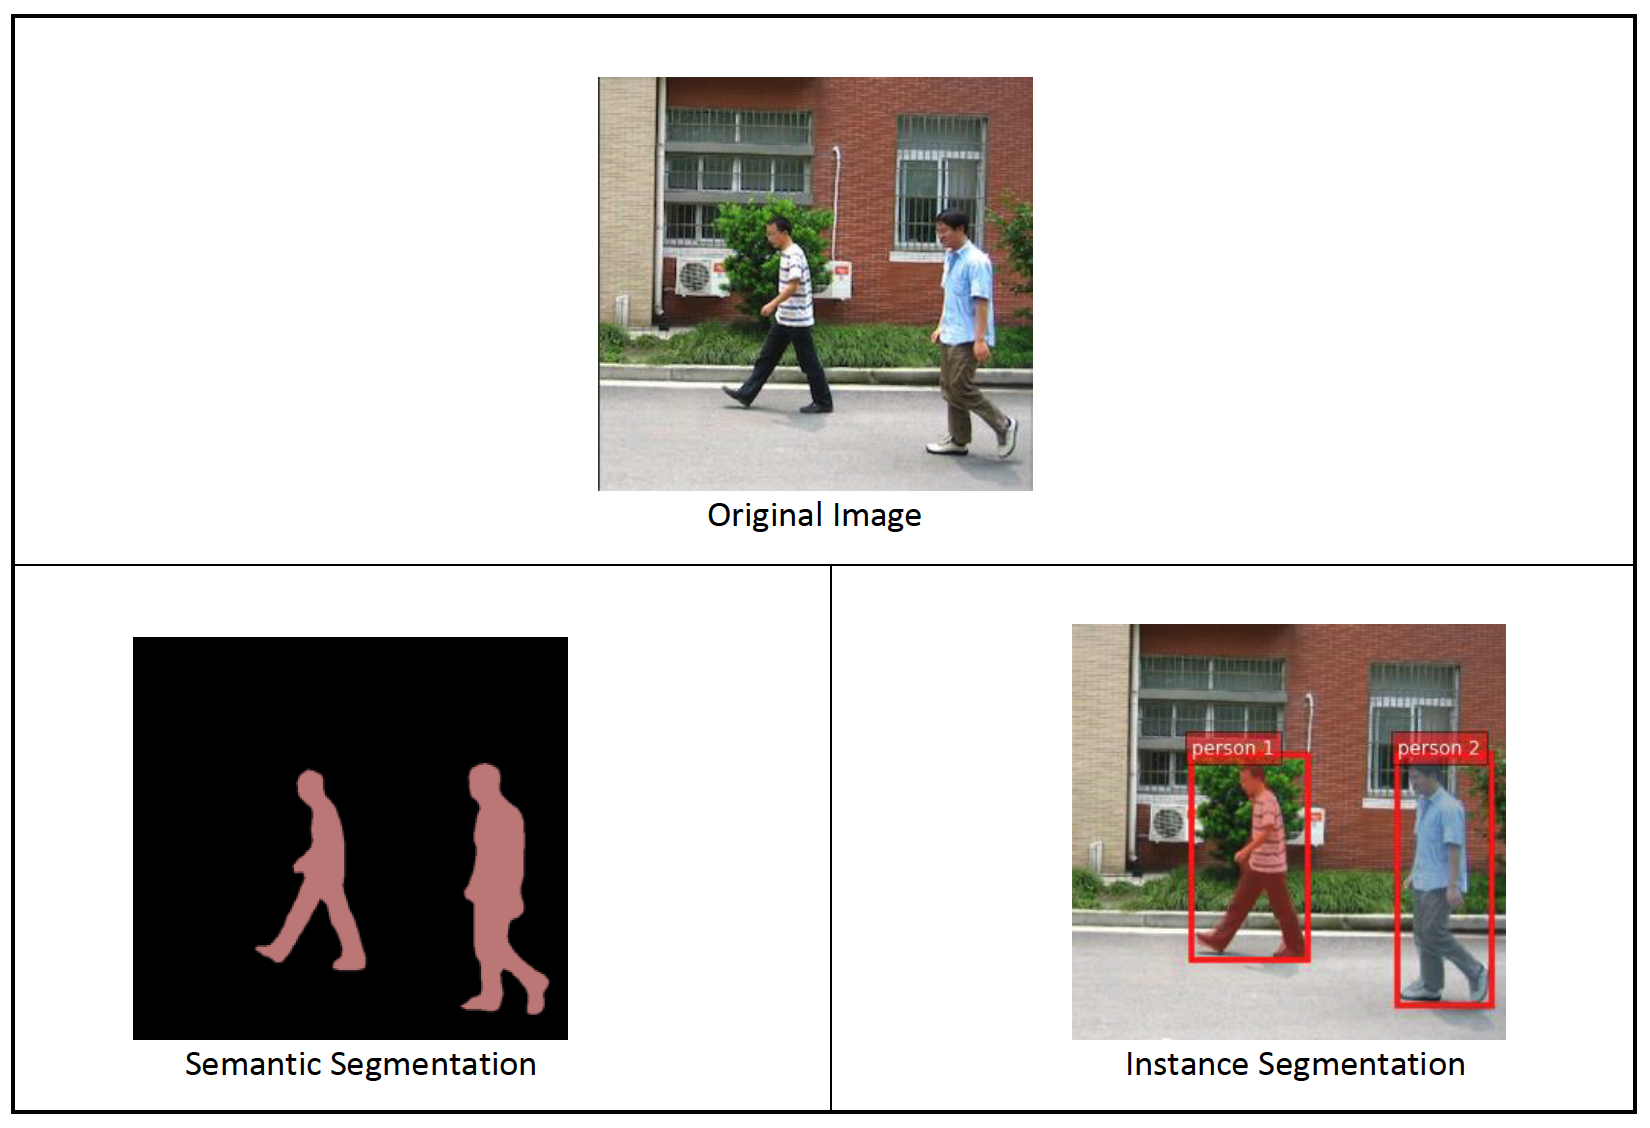
Instance segmentation detects and delineates each distinct object of interest appearing in an image. It tags every pixel with an instance label. Whereas semantic segmentation assigns the same tag to pixels of multiple objects of the same class, instance segmentation further labels pixels corresponding to each occurrence of an object on the image with a separate tag.
Currently, JumpStart offers inference-only models for instance segmentation and doesn’t support fine-tuning.
The following images illustrate the difference between the inference in semantic segmentation and instance segmentation. The original image has two people in the image. Semantic segmentation treats multiple people in the image as one entity: Person. However, instance segmentation identifies individual people within the Person category.
Solution overview
The following sections provide a step-by-step demo to perform semantic segmentation with JumpStart, both via the Studio UI and via JumpStart APIs.
We walk through the following steps:
Access JumpStart through the Studio UI:
Run inference on the pre-trained model.
Fine-tune the pre-trained model.
Use JumpStart programmatically with the SageMaker Python SDK:
Run inference on the pre-trained model.
Fine-tune the pre-trained model.
We also discuss additional advanced features of JumpStart.
Access JumpStart through the Studio UI
In this section, we demonstrate how to train and deploy JumpStart models through the Studio UI.
Run inference on the pre-trained model
The following video shows you how to find a pre-trained semantic segmentation model on JumpStart and deploy it. The model page contains valuable information about the model, how to use it, expected data format, and some fine-tuning details. You can deploy any of the pre-trained models available in JumpStart. For inference, we pick the ml.g4dn.xlarge instance type. It provides the GPU acceleration needed for low inference latency, but at a lower price point. After you configure the SageMaker hosting instance, choose Deploy. It may take 5–10 minutes until your persistent endpoint is up and running.
After a few minutes, your endpoint is operational and ready to respond to inference requests.
Similarly, you can deploy a pre-trained instance segmentation model by following the same steps in the preceding video while searching for instance segmentation instead of semantic segmentation in the JumpStart search bar.
Fine-tune the pre-trained model
The following video shows how to find and fine-tune a semantic segmentation model in JumpStart. In the video, we fine-tune the model using the PennFudanPed dataset, provided by default in JumpStart, which you can download under the Apache 2.0 License.
Fine-tuning on your own dataset involves taking the correct formatting of data (as explained on the model page), uploading it to Amazon Simple Storage Service (Amazon S3), and specifying its location in the data source configuration. We use the same hyperparameter values set by default (number of epochs, learning rate, and batch size). We also use a GPU-backed ml.p3.2xlarge as our SageMaker training instance.
You can monitor your training job running directly on the Studio console, and are notified upon its completion. After training is complete, you can deploy the fine-tuned model from the same page that holds the training job details. The deployment workflow is the same as deploying a pre-trained model.
Use JumpStart programmatically with the SageMaker SDK
In the preceding sections, we showed how you can use the JumpStart UI to deploy a pre-trained model and fine-tune it interactively, in a matter of a few clicks. However, you can also use JumpStart’s models and easy fine-tuning programmatically by using APIs that are integrated into the SageMaker SDK. We now go over a quick example of how you can replicate the preceding process. All the steps in this demo are available in the accompanying notebooks Introduction to JumpStart – Instance Segmentation and Introduction to JumpStart – Semantic Segmentation.
Run inference on the pre-trained model
In this section, we choose an appropriate pre-trained model in JumpStart, deploy this model to a SageMaker endpoint, and run inference on the deployed endpoint.
SageMaker is a platform based on Docker containers. JumpStart uses the available framework-specific SageMaker Deep Learning Containers (DLCs). We fetch any additional packages, as well as scripts to handle training and inference for the selected task. Finally, the pre-trained model artifacts are separately fetched with model_uris, which provides flexibility to the platform. You can use any number of models pre-trained for the same task with a single training or inference script. See the following code:
For instance segmentation, we can set model_id to mxnet-semseg-fcn-resnet50-ade. The is in the identifier corresponds to instance segmentation.
Next, we feed the resources into a SageMaker model instance and deploy an endpoint:
After a few minutes, our model is deployed and we can get predictions from it in real time!
The following code snippet gives you a glimpse of what semantic segmentation looks like. The predicted mask for each pixel is visualized. To get inferences from a deployed model, an input image needs to be supplied in binary format. The response of the endpoint is a predicted label for each pixel in the image. We use the query_endpoint and parse_response helper functions, which are defined in the accompanying notebook:
Fine-tune the pre-trained model
To fine-tune a selected model, we need to get that model’s URI, as well as that of the training script and the container image used for training. Thankfully, these three inputs depend solely on the model name, version (for a list of the available models, see JumpStart Available Model Table), and the type of instance you want to train on. This is demonstrated in the following code snippet:
We retrieve the model_id corresponding to the same model we used previously. You can now fine-tune this JumpStart model on your own custom dataset using the SageMaker SDK. We use a dataset that is publicly hosted on Amazon S3, conveniently focused on semantic segmentation. The dataset should be structured for fine-tuning as explained in the previous section. See the following example code:
We obtain the same default hyperparameters for our selected model as the ones we saw in the previous section, using sagemaker.hyperparameters.retrieve_default(). We then instantiate a SageMaker estimator and call the .fit method to start fine-tuning our model, passing it the Amazon S3 URI for our training data. The entry_point script provided is named transfer_learning.py (the same for other tasks and models), and the input data channel passed to .fit must be named training.
While the algorithm trains, you can monitor its progress either in the SageMaker notebook where you’re running the code itself, or on Amazon CloudWatch. When training is complete, the fine-tuned model artifacts are uploaded to the Amazon S3 output location specified in the training configuration. You can now deploy the model in the same manner as the pre-trained model.
Advanced features
In addition to fine-tuning and deploying pre-trained models, JumpStart offers many advanced features.
The first is automatic model tuning. This allows you to automatically tune your ML models to find the hyperparameter values with the highest accuracy within the range provided through the SageMaker API.
The second is incremental training. This allows you to train a model you have already fine-tuned using an expanded dataset that contains an underlying pattern not accounted for in previous fine-tuning runs, which resulted in poor model performance. Incremental training saves both time and resources because you don’t need to retrain the model from scratch.
Conclusion
In this post, we showed how to fine-tune and deploy a pre-trained semantic segmentation model, and how to adapt it for instance segmentation using JumpStart. You can accomplish this without needing to write code. Try out the solution on your own and send us your comments.
To learn more about JumpStart and how you can use open-source pre-trained models for a variety of other ML tasks, check out the following AWS re:Invent 2020 video.
About the Authors
Dr. Vivek Madan is an Applied Scientist with the Amazon SageMaker JumpStart team. He got his PhD from University of Illinois at Urbana-Champaign and was a Post Doctoral Researcher at Georgia Tech. He is an active researcher in machine learning and algorithm design and has published papers in EMNLP, ICLR, COLT, FOCS, and SODA conferences.
Santosh Kulkarni is an Enterprise Solutions Architect at Amazon Web Services who works with sports customers in Australia. He is passionate about building large-scale distributed applications to solve business problems using his knowledge in AI/ML, big data, and software development.
Leonardo Bachega is a senior scientist and manager in the Amazon SageMaker JumpStart team. He’s passionate about building AI services for computer vision.
Read MoreAWS Machine Learning Blog