Organizations are adopting the cloud as a standard and actively evaluating their database needs. Amazon Relational Database Service (Amazon RDS) for Oracle is a managed service that makes it easy to quickly create Oracle database instances, enabling you to migrate existing on-premises workloads to the cloud. Migration from on-premises Oracle Database to Amazon RDS for Oracle is quick because it doesn’t involve code conversion.
Oracle Enterprise Edition (Oracle EE) has become the standard adopted by many organizations. However, if you do a more in-depth database assessment, you may find that not every application needs all the features of Oracle EE, and you may be overpaying.
You can significantly reduce your Oracle commercial license usage by switching to Oracle Database Standard Edition (Oracle SE), which is even easier with the Amazon RDS for Oracle License Included (LI) option. Applications with no or minimum Oracle EE features usage are excellent candidates for migrating to Oracle SE.
Oracle table partitioning is a commonly used feature to manage large tables and improve query performance. The Oracle partitioning option is an extra cost option only available in the Enterprise Edition.
This post is a continuation Implementing table partitioning in Oracle Standard Edition: Part 1, which explains how to configure partitioning in Oracle SE. In this post, we demonstrate techniques of automating date range partition management in Oracle SE. The code and use cases related to this post are available in the “automate-table-partitioning-in-oracle-standard-edition” GitHub repository.
Solution Overview
The following architecture diagram details the solution. It explains the relationship between the PARTITION_META_DATA, PARTITION_TABLE_DATA, and PARTITION_LOG metadata tables and provides details about the MAIN_PROCESS package and its sub-components MANAGE_PARTITON and SETUP_PARTITON.
The solution uses three metadata control tables to manage table partitioning. In the following sections, we explain the purpose of each table and column.
PARTITION_META_DATA table
The PARTITION_META_DATA table contains information about the main partition table, view, partitioning type (daily, weekly, monthly, and yearly) along with flags to archive the table and log. The following table describes each column.
Column Name
Description
META_DATA_ID
Auto-generated unique identifier and primary key of the table.
TABLE_OWNER
Schema owner where the partition main table exists and partitioned tables are created.
TABLE_NAME
Name of the main partition table.
TABLE_ ALIAS
Shorted name of the main partition table. This short name should be used in all constraints and indexes created on the main partition table.
VIEW_NAME
Name of the view created to create logical partitioning.
PARTITION_COLUMN_NAME
Column that we use for partitioning in the partition table, for example, REGISTRATION_DATE.
PRIMARYKEY_COLUMN_NAME
Primary key of the partition table.
PARTITION_TYPE
Type of partition: Y = yearly, M = monthly, W = weekly, D = daily.
NUM_PRECREATE_PARTITIONS
How many future partition tables to create (default three).
NUM_RETAIN_PARTITIONS
How many old partition tables to retain (default three)
AUTO_MANAGE_PARTITIONS
Flag to run automation if N automation doesn’t process this record (default Y).
DROP_OLD_PARTITIONS
Flag indicates whether to drop old partitions that are older than partitions to be retained. The default is N. If Y, the old partition tables are dropped; if N, the tables are removed from the view.
ENABLE_LOGGING
Flag indicates to log all steps of automation process into PARTITION_LOG. The default is Y; if N, only errors are logged.
PARTITION_TABLE_DATA table
The PARTITION_TABLE_DATA table stores the information of all partition tables managed by the automation process. The following table describes each column.
Column Name
Description
META_DATA_ID
Partition table identifier
PARTITION_TABLE_NAME
Name of the partition table
PARTITION_DATE_VALUE
Date corresponding to partition table
CRT_DT
Date when the partition table is created (running partition automation)
STATUS
Indicates the state of partition table (A = active partition, D = deleted partition)
PARTITION_LOG table
The PARTITION_LOG table is for logging errors. If a flag is enabled in the metadata table, all activities are logged into this table, which is required for debugging in case of any issues. The following table summarizes the column details.
Column Name
Description
LOG_ID
Auto-generated unique identifier
LOG_TYPE
DEBUG indicates debug log type; ERROR indicates error log type
META_DATA_ID
Partition table identifier
OBJECT_NAME
Name of the object (such as partition table name or view name)
LOG_MESSAGE
Log detail information
LOG_DATE
Date when log entry is created
MANAGE_PARTITION package
Along with metadata tables, you need to use the MANAGE_PARTITON package, which includes the SETUP_PARTITIONS and MAIN_PROCESS procedures to automate the partition management.
The SETUP_PARTITIONS procedure performs the initial setup activities required for automating the partitioning. This should be called only once for a partition table. The procedure performs the following tasks:
Check if a given table is already part of partition management. If yes, it raises the error.
Create an entry in the partition metadata table.
Create a default table <main_table>_DEFAULT. This table is used as an overflow table to store records that don’t fit into any partitions.
Create partition tables from the given start date (parameter p_start_date)
Create a view with the given name (parameter p_view_name) based on all required partition tables.
Create INSERT, UPDATE, and DELETE triggers.
Grant all privileges similar to the main partition table.
The MAIN_PROCESS procedure is for managing partitions, namely to create future partitions and delete older partitions. This procedure must be run through a scheduled or on-demand job during a maintenance window or low-activity time. However, to maintain full control, you can run the procedure manually during the maintenance window or low-activity time. The following activities are performed:
Get information of all partition tables for which the AUTO_MANAGE_PARTITIONS flag is set to Y.
For each of these partitions, get the recent partition table date.
Based on the partition type (Y, M, W, or D) and NUM_PRECREATE_PARTITIONS, identify new partition tables to be created.
Get all the privileges on the partition main table.
Create new partition tables.
Disable old partitions that are older than partitions to be retained.
Recreate the view with new partition tables.
Drop old partition tables if DROP_OLD_PARTITIONS is set to Y.
The MANAGE_PARTITION package also includes the following private procedures:
WRITE_TO_LOG – Logs errors during the process. Also logs the events during the process as debug if ENABLE_LOGGING is set to Y.
DISABLE_OLD_PARTITIONS – Updates the status to D to all old partition tables that are older than partitions to be retained.
DROP_OLD_PARTITIONS – Drops old partition tables with status D and DROP_OLD_PARTITIONS flag is set to Y. The status is updated with D by the function DISABLE_OLD_PARTITIONS for partitions that are older than partitions to be retained.
RECREATE_VIEW – Recreates the view to include new partition tables and exclude old partition tables. It performs the following tasks:
Get all privileges on the view.
Get synonyms on the view.
Recreate the view to include new partition tables and exclude old partition tables.
Grant all privileges on the view.
Recreate INSERT, UPDATE, and DELETE triggers on the view.
Recreate synonyms on the view.
CREATE_INS_TRG – Creates INSTEAD OF INSERT trigger on the view.
CREATE_UPD_TRG – Creates INSTEAD OF UPDATE trigger on the view.
CREATE_DEL_TRG – Creates INSTEAD OF DELETE trigger on the view.
GRANT_OBJECT_PRIVILEGES – Grants all the privileges to the given object.
CREATE_SYNONYMS – Recreates all the synonyms using the data in the p_object_synonyms collection.
The MANAGE_PARTITION package also includes the following functions:
GET_SYNONYMS – Retrieves all the synonyms on the given object and returns the same as the collection.
GET_OBJECT_PRIVILEGES – Retrieves all the privileges on the given object and returns the same as the collection.
Prerequisites
This post assumes that:
You have an AWS account to test the use case.
You have Amazon RDS for Oracle Standard Edition Two provisioned in your AWS account.
You have Oracle client with SQL*Plus installed and have connectivity between client and RDS instance.
You have hands-on experience with SQL and PL/SQL programming language.
Partition implementation steps
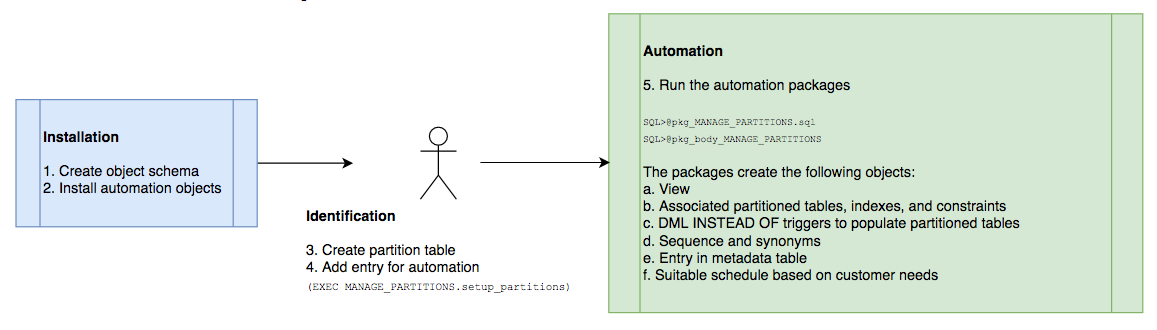
The following diagram shows the flow of the events to implement automation of table partitioning:
The flow includes the following steps:
Create the partition table object schema.
Install the partition management automation objects.
Create the partition table.
Add an entry for automation.
Run the automation packages, which create the view, partition tables, indexes, and constraints. It uses DML INSTEAD OF triggers to update the metadata information. We must also schedule the automation to ensure we keep adding new partitions as needed.
Create the partition service account user
To demonstrate the end-to-end capability of the partition automation, we create a user with the required permissions. We use PARTSRVC (partition service account) as the schema in which we create a main table called STUDENT_YEAR and its dependent objects; metadata tables PARTITION_META_DATA, PARTITION_TABLE_DATA and PARTITION_LOG; triggers to manage the DML transactions; and maintenance code packages.
Log in to the database as the admin account and use the following code to create the PARTSRVC user and grant the required permissions:
sqlplus oraadmin/********@orclserds
CREATE USER PARTSRVC IDENTIFIED BY <PASSWORD>;
GRANT CONNECT, RESOURCE TO PARTSRVC;
GRANT UNLIMITED TABLESPACE TO PARTSRVC;
GRANT CREATE SESSION, CREATE ANY TABLE, CREATE ANY VIEW TO PARTSRVC;
GRANT DROP ANY TABLE TO PARTSRVC;
GRANT CREATE ANY SYNONYM TO PARTSRVC;
GRANT CREATE PUBLIC SYNONYM TO PARTSRVC;
GRANT CREATE ANY TRIGGER TO PARTSRVC;
Create the main partition table, primary key, and index
Next, we create the table to partition. This table is referred as the main partition table, and doesn’t contain any data. We use it as reference to create the partition tables. This table should have all the necessary constraints, indexes, and privileges that are replicated to all partition tables, and also the view that is created for managing the partitions.
Log in as the PARTSRVC user and use following code to create the STUDENT_YEAR main partition table, which we use to simulate the solution by creating yearly partitions:
conn partsrvc/*****@orclserds
CREATE TABLE STUDENT_YEAR
(STUDENT_ID NUMBER(8,0) NOT NULL
,SALUTATION VARCHAR2(5)
,FIRST_NAME VARCHAR2(25)
,LAST_NAME VARCHAR2(25) NOT NULL
,STREET_ADDRESS VARCHAR2(50)
,ZIP VARCHAR2(5) NOT NULL
,PHONE VARCHAR2(15)
,EMPLOYER VARCHAR2(50)
,REGISTRATION_DATE DATE NOT NULL
,CREATED_BY VARCHAR2(30) NOT NULL
,CREATED_DATE DATE NOT NULL
,MODIFIED_BY VARCHAR2(30) NOT NULL
,MODIFIED_DATE DATE NOT NULL
);
Create the primary key, which ensures the uniqueness of the records:
ALTER TABLE STUDENT_YEAR ADD CONSTRAINT PK_STDTY PRIMARY KEY (STUDENT_ID);
Create an index:
CREATE INDEX IDX1_STDTY_ZIP ON STUDENT_YEAR (ZIP);
Create the metadata tables
Use the following code to create the PARTITION_META_DATA, PARTITION_TABLE_DATA, and PARTITION_LOG metadata tables (alternatively, you can use partition_mgmt_tables.sql to create all the metadata tables):
sqlplus PARTSRVC/********@orclserds
SQL>@partition_mgmt_tables.sql
The script runs the following commands.
CREATE TABLE PARTITION_META_DATA
(
META_DATA_ID NUMBER GENERATED BY DEFAULT ON NULL AS IDENTITY,
TABLE_OWNER VARCHAR2(32) NOT NULL,
TABLE_NAME VARCHAR2(64) NOT NULL,
TABLE_ALIAS VARCHAR2(8) NOT NULL,
VIEW_NAME VARCHAR2(64) NOT NULL,
PARTITION_COLUMN_NAME VARCHAR2(64) NOT NULL,
PRIMARYKEY_COLUMN_NAME VARCHAR2(64) NOT NULL,
PARTITION_TYPE CHAR(1), /* D-DAILY, W-Weekly, M-MONTHLY, Y-YEARLY */
NUM_PRECREATE_PARTITIONS NUMBER(3) DEFAULT 3,
NUM_RETAIN_PARTITIONS NUMBER(3) DEFAULT 90,
AUTO_MANAGE_PARTITIONS CHAR(1) DEFAULT ‘Y’, /* Y-Yes, N-No */
DROP_OLD_PARTITIONS CHAR(1) DEFAULT ‘N’, /* Y-Yes, N-No */
ENABLE_LOGGING CHAR(1) DEFAULT ‘Y’ /* Y-Yes, N-No */
, CONSTRAINT PK_PARTMETADATA PRIMARY KEY (META_DATA_ID) ENABLE
, CONSTRAINT CK1_PMD_AUTOPART CHECK (AUTO_MANAGE_PARTITIONS IN (‘Y’, ‘N’)) ENABLE
, CONSTRAINT CK2_PMD_DROPPART CHECK (DROP_OLD_PARTITIONS IN (‘Y’, ‘N’)) ENABLE
, CONSTRAINT CK3_PMD_DEBUG CHECK (ENABLE_LOGGING IN (‘Y’, ‘N’)) ENABLE
);
CREATE TABLE PARTITION_TABLE_DATA
(
META_DATA_ID NUMBER NOT NULL,
PARTITION_TABLE_NAME VARCHAR2(64) NOT NULL,
PARTITION_DATE_VALUE DATE,
CRT_DT DATE,
STATUS CHAR(1) /* A-Active, D-Deleted */
);
CREATE TABLE PARTITION_LOG
(
LOG_ID NUMBER GENERATED BY DEFAULT ON NULL AS IDENTITY,
LOG_TYPE VARCHAR2(8) NOT NULL, /* DEBUG, ERROR */
META_DATA_ID NUMBER,
OBJECT_NAME VARCHAR2(64),
LOG_MESSAGE VARCHAR2(4000),
LOG_DATE DATE DEFAULT SYSDATE
);
Create the automation package
Create the manage_partition package using the pkg_MANAGE_PARTITIONS.sql and pkg_body_MANAGE_PARTITIONS.sql files, which we use to automate the partition management tasks:
sqlplus PARTSRVC/********@orclserds
SQL>@pkg_MANAGE_PARTITIONS.sql
SQL>@pkg_body_MANAGE_PARTITIONS
Run the automated procedure
Now we run the manage_partition.setup_partition procedure. The procedure uses the main table and input values and creates the partition tables, a view by combining all the partition tables, and the DML triggers to manage data. We pass the following values in the syntax:
PARTSRVC – Owner of the partition table
STUDENT_YEAR – Main partition table
STDTY – Unique partition name for metadata information
REGISTRATION_DATE – Name of the partition column
STUDENT_ID – Name of the primary key column
STUDENT_YEAR_VW – Name of the view created by combining all the partition tables
Y –The yearly partition (the types of partition supported are Y, M, W, and D)
2020-01-01 – Date from which partitions are created
3 – Number of future partition tables to create
3 – How many old partitions we can retain
Y – Flag to automatically manage partitions (if you want to disable partition management on the table, set this to N)
N – Flag to indicate if old partitions are to be dropped
Y – Flag for logging
Run the following code:
sqlplus PARTSRVC/********@orclserds
SQL> EXEC MANAGE_PARTITIONS.setup_partitions (‘PARTSRVC’,’STUDENT_YEAR’,’STDTY’,’REGISTRATION_DATE’,’STUDENT_ID’,’STUDENT_YEAR_VW’,’Y’,’2021-01-01′,3,3,’Y’,’N’,’Y’);
The preceding command calls the controlling function MANAGE_PARTITIONS.main_process, which uses the main table STUDENT_YEAR and creates YEARLY partition tables called STUDENT_YEAR_2021, STUDENT_YEAR_2022, STUDENT_YEAR_2023, and STUDENT_YEAR_2024 for data from years 2021–2024, respectively, and STUDENT_YEAR_DEFAULT for the data for any other year data and its dependent objects. It creates STUDENT_YEAR_VW and also creates DML management triggers TRG_STUDENT_YEAR_VW_INS, TRG_STUDENT_YEAR_VW_UPD, and TRG_STUDENT_YEAR_VW_DEL to manage the data route to correct partition table. The procedure also creates an entry into the partition metadata tables.
The command is an example for YEARLY partition management. We can also create daily, weekly, and monthly partitions. The partition tables are created in following format based on the type of partition.
Daily – <partition_main_table>_YYYYMMDD
Weekly – <partition_main_table>_YYYYMMDD, where DD refers to Monday
Monthly – <partition_main_table>_YYYYMM
Yearly – <partition_main_table>_YYYY
The automation tracks the partition tables created using the PARTITION_TABLE_DATA table.
For the first run of the automation, no records exist in PARTITION_TABLE_DATA, so it creates the partition table with reference to the current date (SYSDATE).
The following code confirms that the partition tables are empty:
select ‘STUDENT_YEAR_VW’ TableName,count(*) rowcount from STUDENT_YEAR_VW
union all
select ‘STUDENT_YEAR_2021’ TableName,count(*) rowcount from STUDENT_YEAR_2021
union all
select ‘STUDENT_YEAR_2022’ TableName,count(*) rowcount from STUDENT_YEAR_2022
union all
select ‘STUDENT_YEAR_2023’ TableName,count(*) rowcount from STUDENT_YEAR_2023
union all
select ‘STUDENT_YEAR_2024’ TableName,count(*) rowcount from STUDENT_YEAR_2024
union all
select ‘STUDENT_YEAR_DEFAULT’ TableName,count(*) rowcount from STUDENT_YEAR_DEFAULT;
Sample Output
TABLENAME ROWCOUNT
——————– ———-
STUDENT_YEAR_VW 0
STUDENT_YEAR_2021 0
STUDENT_YEAR_2022 0
STUDENT_YEAR_2023 0
STUDENT_YEAR_2024 0
STUDENT_YEAR_DEFAULT 0
6 rows selected.
The DML example in the next section shows how the INSTEAD OF triggers store the data in appropriate partition tables.
Validate the triggers
Now we can validate that the triggers are working as expected.
The following code inserts the records in each partition table and also one 2025 record in the default partition (because we don’t have a 2025 partition table):
INSERT INTO STUDENT_YEAR_VW VALUES (2021101,’Mr.’,’FNAME2021′,’LNAME2021′,’101-09 21th St.’,’11421′,’718-555-5521′,’Albert Jr22 Hildegard Co.’,TO_DATE(‘2021-OCT-21’, ‘YYYY-MON-DD’),’BROSENZWEIG’,TO_DATE(’01-JAN-2021 00:00:00′,’DD-MON-YYYY HH24:MI:SS’),’BROSENZW’,TO_DATE(’01-FEB-2021 00:00:00′,’DD-MON-YYYY HH24:MI:SS’));
INSERT INTO STUDENT_YEAR_VW VALUES (2021102,’Mr.’,’FNAME2021′,’LNAME2021′,’101-09 21th St.’,’11421′,’718-555-5521′,’Albert Jr21 Hildegard Co.’,TO_DATE(‘2021-OCT-21’, ‘YYYY-MON-DD’),’BROSENZWEIG’,TO_DATE(’01-JAN-2021 00:00:00′,’DD-MON-YYYY HH24:MI:SS’),’BROSENZW’,TO_DATE(’01-FEB-2021 00:00:00′,’DD-MON-YYYY HH24:MI:SS’));
INSERT INTO STUDENT_YEAR_VW VALUES (2022101,’Mr.’,’FNAME2022′,’LNAME2022′,’101-09 21th St.’,’11422′,’718-555-5522′,’Albert Jr22 Hildegard Co.’,TO_DATE(‘2022-OCT-22’, ‘YYYY-MON-DD’),’BROSENZWEIG’,TO_DATE(’01-JAN-2021 00:00:00′,’DD-MON-YYYY HH24:MI:SS’),’BROSENZW’,TO_DATE(’01-FEB-2021 00:00:00′,’DD-MON-YYYY HH24:MI:SS’));
INSERT INTO STUDENT_YEAR_VW VALUES (2022102,’Mr.’,’FNAME2022′,’LNAME2022′,’101-09 21th St.’,’11422′,’718-555-5522′,’Albert Jr22 Hildegard Co.’,TO_DATE(‘2022-OCT-22’, ‘YYYY-MON-DD’),’BROSENZWEIG’,TO_DATE(’01-JAN-2021 00:00:00′,’DD-MON-YYYY HH24:MI:SS’),’BROSENZW’,TO_DATE(’01-FEB-2021 00:00:00′,’DD-MON-YYYY HH24:MI:SS’));
INSERT INTO STUDENT_YEAR_VW VALUES (2023101,’Mr.’,’FNAME2023′,’LNAME2023′,’101-09 23th St.’,’11423′,’718-555-5523′,’Albert Jr23 Hildegard Co.’,TO_DATE(‘2023-OCT-21’, ‘YYYY-MON-DD’),’BROSENZWEIG’,TO_DATE(’01-JAN-2021 00:00:00′,’DD-MON-YYYY HH24:MI:SS’),’BROSENZW’,TO_DATE(’01-FEB-2021 00:00:00′,’DD-MON-YYYY HH24:MI:SS’));
INSERT INTO STUDENT_YEAR_VW VALUES (2023102,’Mr.’,’FNAME2023′,’LNAME2023′,’101-09 23th St.’,’11423′,’718-555-5523′,’Albert Jr23 Hildegard Co.’,TO_DATE(‘2023-OCT-25’, ‘YYYY-MON-DD’),’BROSENZWEIG’,TO_DATE(’01-JAN-2021 00:00:00′,’DD-MON-YYYY HH24:MI:SS’),’BROSENZW’,TO_DATE(’01-FEB-2021 00:00:00′,’DD-MON-YYYY HH24:MI:SS’));
INSERT INTO STUDENT_YEAR_VW VALUES (2024101,’Mr.’,’FNAME2024′,’LNAME2024′,’101-09 24th St.’,’11424′,’718-555-5524′,’Albert Jr24 Hildegard Co.’,TO_DATE(‘2024-OCT-21’, ‘YYYY-MON-DD’),’BROSENZWEIG’,TO_DATE(’01-JAN-2021 00:00:00′,’DD-MON-YYYY HH24:MI:SS’),’BROSENZW’,TO_DATE(’01-FEB-2021 00:00:00′,’DD-MON-YYYY HH24:MI:SS’));
INSERT INTO STUDENT_YEAR_VW VALUES (2024102,’Mr.’,’FNAME2024′,’LNAME2024′,’101-09 24th St.’,’11424′,’718-555-5524′,’Albert Jr24 Hildegard Co.’,TO_DATE(‘2024-OCT-21’, ‘YYYY-MON-DD’),’BROSENZWEIG’,TO_DATE(’01-JAN-2021 00:00:00′,’DD-MON-YYYY HH24:MI:SS’),’BROSENZW’,TO_DATE(’01-FEB-2021 00:00:00′,’DD-MON-YYYY HH24:MI:SS’));
INSERT INTO STUDENT_YEAR_VW VALUES (2025101,’Mr.’,’FNAME2025′,’LNAME2025′,’101-09 24th St.’,’11425′,’718-555-5524′,’Albert Jr25 Hildegard Co.’,TO_DATE(‘2025-OCT-21’, ‘YYYY-MON-DD’),’BROSENZWEIG’,TO_DATE(’01-JAN-2021 00:00:00′,’DD-MON-YYYY HH24:MI:SS’),’BROSENZW’,TO_DATE(’01-FEB-2021 00:00:00′,’DD-MON-YYYY HH24:MI:SS’));
Commit;
Query the view and partition tables to confirm that the data is inserted into the correct partition tables and the view can select data from all the tables:
select ‘STUDENT_YEAR_VW’ TableName,count(*) rowcount from STUDENT_YEAR_VW
union all
select ‘STUDENT_YEAR_2021’ TableName,count(*) rowcount from STUDENT_YEAR_2021
union all
select ‘STUDENT_YEAR_2022’ TableName,count(*) rowcount from STUDENT_YEAR_2022
union all
select ‘STUDENT_YEAR_2023’ TableName,count(*) rowcount from STUDENT_YEAR_2023
union all
select ‘STUDENT_YEAR_2024’ TableName,count(*) rowcount from STUDENT_YEAR_2024
union all
select ‘STUDENT_YEAR_DEFAULT’ TableName,count(*) rowcount from STUDENT_YEAR_DEFAULT;
Sample Output
TABLENAME ROWCOUNT
——————– ———-
STUDENT_YEAR_VW 9
STUDENT_YEAR_2021 2
STUDENT_YEAR_2022 2
STUDENT_YEAR_2023 2
STUDENT_YEAR_2024 2
STUDENT_YEAR_DEFAULT 1
6 rows selected.
select * from STUDENT_YEAR_VW order by 1;
select * from STUDENT_YEAR_2021 order by 1;
select * from STUDENT_YEAR_2022 order by 1;
select * from STUDENT_YEAR_2023 order by 1;
select * from STUDENT_YEAR_2024 order by 1;
select * from STUDENT_YEAR_DEFAULT order by 1;
Sample Output
SQL> select * from STUDENT_YEAR_VW order by 1;
STUDENT_ID SALUT FIRST_NAME LAST_NAME STREET_ADDRESS ZIP PHONE EMPLOYER REGISTRAT CREATED_BY CREATED_D MODIFIED_BY MODIFIED_
———- —– ————————- ————————- ————————————————– —– ————— ————————————————– ——— —————————— ——— —————————— ———
2021101 Mr. FNAME2021 LNAME2021 101-09 21th St. 11421 718-555-5521 Albert Jr22 Hildegard Co. 21-OCT-21 BROSENZWEIG 01-JAN-21 BROSENZW 01-FEB-21
2021102 Mr. FNAME2021 LNAME2021 101-09 21th St. 11421 718-555-5521 Albert Jr21 Hildegard Co. 21-OCT-21 BROSENZWEIG 01-JAN-21 BROSENZW 01-FEB-21
2022101 Mr. FNAME2022 LNAME2022 101-09 21th St. 11422 718-555-5522 Albert Jr22 Hildegard Co. 22-OCT-22 BROSENZWEIG 01-JAN-21 BROSENZW 01-FEB-21
2022102 Mr. FNAME2022 LNAME2022 101-09 21th St. 11422 718-555-5522 Albert Jr22 Hildegard Co. 22-OCT-22 BROSENZWEIG 01-JAN-21 BROSENZW 01-FEB-21
2023101 Mr. FNAME2023 LNAME2023 101-09 23th St. 11423 718-555-5523 Albert Jr23 Hildegard Co. 21-OCT-23 BROSENZWEIG 01-JAN-21 BROSENZW 01-FEB-21
2023102 Mr. FNAME2023 LNAME2023 101-09 23th St. 11423 718-555-5523 Albert Jr23 Hildegard Co. 25-OCT-23 BROSENZWEIG 01-JAN-21 BROSENZW 01-FEB-21
2024101 Mr. FNAME2024 LNAME2024 101-09 24th St. 11424 718-555-5524 Albert Jr24 Hildegard Co. 21-OCT-24 BROSENZWEIG 01-JAN-21 BROSENZW 01-FEB-21
2024102 Mr. FNAME2024 LNAME2024 101-09 24th St. 11424 718-555-5524 Albert Jr24 Hildegard Co. 21-OCT-24 BROSENZWEIG 01-JAN-21 BROSENZW 01-FEB-21
2025101 Mr. FNAME2025 LNAME2025 101-09 24th St. 11425 718-555-5524 Albert Jr25 Hildegard Co. 21-OCT-25 BROSENZWEIG 01-JAN-21 BROSENZW 01-FEB-21
9 rows selected.
SQL> select * from STUDENT_YEAR_2021 order by 1;
STUDENT_ID SALUT FIRST_NAME LAST_NAME STREET_ADDRESS ZIP PHONE EMPLOYER REGISTRAT CREATED_BY CREATED_D MODIFIED_BY MODIFIED_
———- —– ————————- ————————- ————————————————– —– ————— ————————————————– ——— —————————— ——— —————————— ———
2021101 Mr. FNAME2021 LNAME2021 101-09 21th St. 11421 718-555-5521 Albert Jr22 Hildegard Co. 21-OCT-21 BROSENZWEIG 01-JAN-21 BROSENZW 01-FEB-21
2021102 Mr. FNAME2021 LNAME2021 101-09 21th St. 11421 718-555-5521 Albert Jr21 Hildegard Co. 21-OCT-21 BROSENZWEIG 01-JAN-21 BROSENZW 01-FEB-21
SQL> select * from STUDENT_YEAR_2022 order by 1;
STUDENT_ID SALUT FIRST_NAME LAST_NAME STREET_ADDRESS ZIP PHONE EMPLOYER REGISTRAT CREATED_BY CREATED_D MODIFIED_BY MODIFIED_
———- —– ————————- ————————- ————————————————– —– ————— ————————————————– ——— —————————— ——— —————————— ———
2022101 Mr. FNAME2022 LNAME2022 101-09 21th St. 11422 718-555-5522 Albert Jr22 Hildegard Co. 22-OCT-22 BROSENZWEIG 01-JAN-21 BROSENZW 01-FEB-21
2022102 Mr. FNAME2022 LNAME2022 101-09 21th St. 11422 718-555-5522 Albert Jr22 Hildegard Co. 22-OCT-22 BROSENZWEIG 01-JAN-21 BROSENZW 01-FEB-21
SQL> select * from STUDENT_YEAR_2023 order by 1;
STUDENT_ID SALUT FIRST_NAME LAST_NAME STREET_ADDRESS ZIP PHONE EMPLOYER REGISTRAT CREATED_BY CREATED_D MODIFIED_BY MODIFIED_
———- —– ————————- ————————- ————————————————– —– ————— ————————————————– ——— —————————— ——— —————————— ———
2023101 Mr. FNAME2023 LNAME2023 101-09 23th St. 11423 718-555-5523 Albert Jr23 Hildegard Co. 21-OCT-23 BROSENZWEIG 01-JAN-21 BROSENZW 01-FEB-21
2023102 Mr. FNAME2023 LNAME2023 101-09 23th St. 11423 718-555-5523 Albert Jr23 Hildegard Co. 25-OCT-23 BROSENZWEIG 01-JAN-21 BROSENZW 01-FEB-21
SQL> select * from STUDENT_YEAR_2024 order by 1;
STUDENT_ID SALUT FIRST_NAME LAST_NAME STREET_ADDRESS ZIP PHONE EMPLOYER REGISTRAT CREATED_BY CREATED_D MODIFIED_BY MODIFIED_
———- —– ————————- ————————- ————————————————– —– ————— ————————————————– ——— —————————— ——— —————————— ———
2024101 Mr. FNAME2024 LNAME2024 101-09 24th St. 11424 718-555-5524 Albert Jr24 Hildegard Co. 21-OCT-24 BROSENZWEIG 01-JAN-21 BROSENZW 01-FEB-21
2024102 Mr. FNAME2024 LNAME2024 101-09 24th St. 11424 718-555-5524 Albert Jr24 Hildegard Co. 21-OCT-24 BROSENZWEIG 01-JAN-21 BROSENZW 01-FEB-21
SQL> select * from STUDENT_YEAR_DEFAULT order by 1;
STUDENT_ID SALUT FIRST_NAME LAST_NAME STREET_ADDRESS ZIP PHONE EMPLOYER REGISTRAT CREATED_BY CREATED_D MODIFIED_BY MODIFIED_
———- —– ————————- ————————- ————————————————– —– ————— ————————————————– ——— —————————— ——— —————————— ———
2025101 Mr. FNAME2025 LNAME2025 101-09 24th St. 11425 718-555-5524 Albert Jr25 Hildegard Co. 21-OCT-25 BROSENZWEIG 01-JAN-21 BROSENZW 01-FEB-21
Use following code to delete a record to confirm the delete trigger functionality. For this post, we delete the 2023101 student_id record:
SQL> select * from STUDENT_YEAR_2023;
STUDENT_ID SALUT FIRST_NAME LAST_NAME STREET_ADDRESS ZIP PHONE EMPLOYER REGISTRAT CREATED_BY CREATED_D MODIFIED_BY MODIFIED_
———- —– ————————- ————————- ————————————————– —– ————— ————————————————– ——— —————————— ——— —————————— ———
2023101 Mr. FNAME2023 LNAME2023 101-09 23th St. 11423 718-555-5523 Albert Jr23 Hildegard Co. 21-OCT-23 BROSENZWEIG 01-JAN-21 BROSENZW 01-FEB-21
2023102 Mr. FNAME2023 LNAME2023 101-09 23th St. 11423 718-555-5523 Albert Jr23 Hildegard Co. 25-OCT-23 BROSENZWEIG 01-JAN-21 BROSENZW 01-FEB-21
SQL> delete FROM STUDENT_YEAR_VW where student_id = 2023101;
1 row deleted.
SQL> commit;
Commit complete.
SQL> select * from STUDENT_YEAR_2023;
STUDENT_ID SALUT FIRST_NAME LAST_NAME STREET_ADDRESS ZIP PHONE EMPLOYER REGISTRAT CREATED_BY CREATED_D MODIFIED_BY MODIFIED_
———- —– ————————- ————————- ————————————————– —– ————— ————————————————– ——— —————————— ——— —————————— ———
2023102 Mr. FNAME2023 LNAME2023 101-09 23th St. 11423 718-555-5523 Albert Jr23 Hildegard Co. 25-OCT-23 BROSENZWEIG 01-JAN-21 BROSENZW 01-FEB-21
SQL> select * from STUDENT_YEAR_VW;
SQL> select * from STUDENT_YEAR_VW order by 1;
STUDENT_ID SALUT FIRST_NAME LAST_NAME STREET_ADDRESS ZIP PHONE EMPLOYER REGISTRAT CREATED_BY CREATED_D MODIFIED_BY MODIFIED_
———- —– ————————- ————————- ————————————————– —– ————— ————————————————– ——— —————————— ——— —————————— ———
2021101 Mr. FNAME2021 LNAME2021 101-09 21th St. 11421 718-555-5521 Albert Jr22 Hildegard Co. 21-OCT-21 BROSENZWEIG 01-JAN-21 BROSENZW 01-FEB-21
2021102 Mr. FNAME2021 LNAME2021 101-09 21th St. 11421 718-555-5521 Albert Jr21 Hildegard Co. 21-OCT-21 BROSENZWEIG 01-JAN-21 BROSENZW 01-FEB-21
2022101 Mr. FNAME2022 LNAME2022 101-09 21th St. 11422 718-555-5522 Albert Jr22 Hildegard Co. 22-OCT-22 BROSENZWEIG 01-JAN-21 BROSENZW 01-FEB-21
2022102 Mr. FNAME2022 LNAME2022 101-09 21th St. 11422 718-555-5522 Albert Jr22 Hildegard Co. 22-OCT-22 BROSENZWEIG 01-JAN-21 BROSENZW 01-FEB-21
2023102 Mr. FNAME2023 LNAME2023 101-09 23th St. 11423 718-555-5523 Albert Jr23 Hildegard Co. 25-OCT-23 BROSENZWEIG 01-JAN-21 BROSENZW 01-FEB-21
2024101 Mr. FNAME2024 LNAME2024 101-09 24th St. 11424 718-555-5524 Albert Jr24 Hildegard Co. 21-OCT-24 BROSENZWEIG 01-JAN-21 BROSENZW 01-FEB-21
2024102 Mr. FNAME2024 LNAME2024 101-09 24th St. 11424 718-555-5524 Albert Jr24 Hildegard Co. 21-OCT-24 BROSENZWEIG 01-JAN-21 BROSENZW 01-FEB-21
2025101 Mr. FNAME2025 LNAME2025 101-09 24th St. 11425 718-555-5524 Albert Jr25 Hildegard Co. 21-OCT-25 BROSENZWEIG 01-JAN-21 BROSENZW 01-FEB-21
8 rows selected.
Use the following code to update a record to confirm the update trigger functionality. We update the dataset for student_id 2023102:
select * from STUDENT_YEAR_2023;
STUDENT_ID SALUT FIRST_NAME LAST_NAME STREET_ADDRESS ZIP PHONE EMPLOYER REGISTRAT CREATED_BY CREATED_D MODIFIED_BY MODIFIED_
———- —– ————————- ————————- ————————————————– —– ————— ————————————————– ——— —————————— ——— —————————— ———
2023102 Mr. FNAME2023 LNAME2023 101-09 23th St. 11423 718-555-5523 Albert Jr23 Hildegard Co. 25-OCT-23 BROSENZWEIG 01-JAN-21 BROSENZW 01-FEB-21
SQL> update STUDENT_YEAR_VW set LAST_NAME=’UPDATEDLNAME2023′ where Student_id=2023102;
1 row updated.
SQL> commit;
Commit complete.
SQL> select * from STUDENT_YEAR_VW;
STUDENT_ID SALUT FIRST_NAME LAST_NAME STREET_ADDRESS ZIP PHONE EMPLOYER REGISTRAT CREATED_BY CREATED_D MODIFIED_BY MODIFIED_
———- —– ————————- ————————- ————————————————– —– ————— ————————————————– ——— —————————— ——— —————————— ———
2025101 Mr. FNAME2025 LNAME2025 101-09 24th St. 11425 718-555-5524 Albert Jr25 Hildegard Co. 21-OCT-25 BROSENZWEIG 01-JAN-21 BROSENZW 01-FEB-21
2021101 Mr. FNAME2021 LNAME2021 101-09 21th St. 11421 718-555-5521 Albert Jr22 Hildegard Co. 21-OCT-21 BROSENZWEIG 01-JAN-21 BROSENZW 01-FEB-21
2021102 Mr. FNAME2021 LNAME2021 101-09 21th St. 11421 718-555-5521 Albert Jr21 Hildegard Co. 21-OCT-21 BROSENZWEIG 01-JAN-21 BROSENZW 01-FEB-21
2022101 Mr. FNAME2022 LNAME2022 101-09 21th St. 11422 718-555-5522 Albert Jr22 Hildegard Co. 22-OCT-22 BROSENZWEIG 01-JAN-21 BROSENZW 01-FEB-21
2022102 Mr. FNAME2022 LNAME2022 101-09 21th St. 11422 718-555-5522 Albert Jr22 Hildegard Co. 22-OCT-22 BROSENZWEIG 01-JAN-21 BROSENZW 01-FEB-21
2023102 Mr. FNAME2023 UPDATEDLNAME2023 101-09 23th St. 11423 718-555-5523 Albert Jr23 Hildegard Co. 25-OCT-23 BROSENZWEIG 01-JAN-21 BROSENZW 01-FEB-21
2024101 Mr. FNAME2024 LNAME2024 101-09 24th St. 11424 718-555-5524 Albert Jr24 Hildegard Co. 21-OCT-24 BROSENZWEIG 01-JAN-21 BROSENZW 01-FEB-21
2024102 Mr. FNAME2024 LNAME2024 101-09 24th St. 11424 718-555-5524 Albert Jr24 Hildegard Co. 21-OCT-24 BROSENZWEIG 01-JAN-21 BROSENZW 01-FEB-21
8 rows selected.
After the partition logic is implemented and in use, we can use the following command to manage the partitioning process. The procedure uses the PARTITION_META_DATA table to add new and delete old partition tables:
SQL> EXEC MANAGE_PARTITIONS.MAIN_PROCESS
Limitations
A unique index or primary key isn’t possible at the global table level, but we can implement them at the local table level.
If you want to implement an auditing trigger at the table level, this feature isn’t handled by the automation. We recommend studying the source code and customizing your implementation.
In the preceding example, we used REGISTRATION_DATE as our key column to define the YEARLY partitions. You can’t update the key column that is REGISTRATION_DATE data. For example, in the following code, we try to modify the REGISTRATION_DATE for STUDENT_ID 2024101, which resides in the default partition table.
SQL> select * from STUDENT_YEAR_DEFAULT;
STUDENT_ID SALUT FIRST_NAME LAST_NAME STREET_ADDRESS ZIP PHONE EMPLOYER REGISTRAT CREATED_BY CREATED_D MODIFIED_BY MODIFIED_
———- —– ————————- ————————- ————————————————– —– ————— ————————————————– ——— —————————— ——— —————————— ———
2025101 Mr. FNAME2025 LNAME2025 101-09 24th St. 11425 718-555-5524 Albert Jr25 Hildegard Co. 21-OCT-25 BROSENZWEIG 01-JAN-21 BROSENZW 01-FEB-21
SQL> update STUDENT_YEAR_VW set REGISTRATION_DATE=’27-OCT-24′ where STUDENT_ID=2024101;
update STUDENT_YEAR_VW set REGISTRATION_DATE=’27-OCT-24′ where STUDENT_ID=2024101
*
ERROR at line 1:
ORA-20001: Partition key column ‘REGISTRATION_DATE’ cannot be modified
ORA-06512: at “PARTSRVC.TRG_STUDENT_YEAR_VW_UPD”, line 29
ORA-04088: error during execution of trigger ‘PARTSRVC.TRG_STUDENT_YEAR_VW_UPD’
Conclusion
In this post, we described how we can use an automated process to manage a table as partitions in Oracle SE. The process improves partition management efficiency and helps avoid human error. The process provides the automation required for functionality to create and manage partitions in Oracle SE.
We’re looking forward to you trying this approach in your environment. Please reach out with questions or feature requests via the comments.
About the Authors
Srinivas Potlachervoois a Lead Database Consultant with the Professional Services team at Amazon Web Services. He works as database migration specialist to help AWS customers to move their on-premises database environment to AWS cloud database solutions.
Bhavesh Rathod is a Senior Database Consultant with the Professional Services team at Amazon Web Services. He works as database migration specialist to help Amazon customers to move their on-premises database environment to AWS cloud database solutions.
Samujjwal Roy is a Principal DB Consultant with the Professional Services team at Amazon Web Services. He has been with Amazon for 17+ years and has led migration projects for internal and external Amazon customers to move their on-premises database environment to AWS Cloud database solutions.
AWS Database Blog

