

Identifying paraphrased text has business value in many use cases. For example, by identifying sentence paraphrases, a text summarization system could remove redundant information. Another application is to identify plagiarized documents. In this post, we fine-tune a Hugging Face transformer on Amazon SageMaker to identify paraphrased sentence pairs in a few steps.
A truly robust model can identify paraphrased text when the language used may be completely different, and also identify differences when the language used has high lexical overlap. In this post, we focus on the latter aspect. Specifically, we look at whether we can train a model that can identify the difference between two sentences that have high lexical overlap and very different or opposite meanings. For example, the following sentences have the exact same words but opposite meanings:
I took a flight from New York to Paris
I took a flight from Paris to New York
Solution overview
We walk you through the following high-level steps:
Set up the environment.
Prepare the data.
Tokenize the dataset.
Fine-tune the model.
Deploy the model and perform inference.
Evaluate model performance.
If you want to skip setting up the environment, you can use the following notebook on GitHub and run the code in SageMaker.
Hugging Face and AWS announced a partnership earlier in 2022 that makes it even easier to train Hugging Face models on SageMaker. This functionality is available through the development of Hugging Face AWS Deep Learning Containers (DLCs). These containers include Hugging Face Transformers, Tokenizers, and the Datasets library, which allows us to use these resources for training and inference jobs. For a list of the available DLC images, see Available Deep Learning Containers Images. They are maintained and regularly updated with security patches. You can find many examples of how to train Hugging Face models with these DLCs and the Hugging Face Python SDK in the following GitHub repo.
The PAWS dataset
Realizing the lack of efficient sentence pairs datasets that exhibit high lexical overlap without being paraphrases, the original PAWS dataset released in 2019 aimed to provide the natural language processing (NLP) community a new resource for training and evaluating paraphrase detection models. PAWS sentence pairs are generated in two steps using Wikipedia and the Quora Question Pairs (QQP) dataset. A language model first swaps words in a sentence pair with the same Bag of Words (BOW) to generate a sentence pair. A back translation step then generates paraphrases with high BOW overlap but using a different word order. The final PAWS dataset contains a total of 108,000 human-labeled and 656,000 noisily labeled pairs.
In this post, we use the PAWS-Wiki Labeled (Final) dataset from Hugging Face. Hugging Face has already performed the data split for us, which results in 49,000 sentence pairs in the training dataset, and 8,000 sentence pairs each for the validation and test datasets. Two sentence pair examples from the training dataset are shown in the following example. A label of 1 indicates that the two sentences are paraphrases of each other.
Sentence 1
Sentence 2
Label
Although interchangeable, the body pieces on the 2 cars are not similar.
Although similar, the body parts are not interchangeable on the 2 cars.
0
Katz was born in Sweden in 1947 and moved to New York City at the age of 1.
Katz was born in 1947 in Sweden and moved to New York at the age of one.
1
Prerequisites
You need to complete the following prerequisites:
Sign up for an AWS account if you don’t have one. For more information, see Set Up Amazon SageMaker Prerequisites.
Get started using SageMaker notebook instances.
Set up the right AWS Identity and Access Management (IAM) permissions. For more information, see SageMaker Roles.
Set up the environment
Before we begin examining and preparing our data for model fine-tuning, we need to set up our environment. Let’s start by spinning up a SageMaker notebook instance. Choose an AWS Region in your AWS account and follow the instructions to create a SageMaker notebook instance. The notebook instance may take a few minutes to spin up.
When the notebook instance is running, choose conda_pytorch_p38 as your kernel type. To use the Hugging Face dataset, we first need to install and import the Hugging Face library:
Next, let’s establish a SageMaker session. We use the default Amazon Simple Storage Service (Amazon S3) bucket associated with the SageMaker session to store the PAWS dataset and model artifacts:
Prepare the data
We can load the Hugging Face version of the PAWS dataset with its load_dataset() command. This call downloads and imports the PAWS Python processing script from the Hugging Face GitHub repository, which then downloads the PAWS dataset from the original URL stored in the script and caches the data as an Arrow table on the drive. See the following code:
Before we begin fine-tuning our pre-trained BERT model, let’s look at our target class distribution. For our use case, the PAWS dataset has binary labels (0 indicates the sentence pair is not a paraphrase, and 1 indicates it is). Let’s create a column chart to view the class distribution, as shown in the following code. We see that there is a slight class imbalance issue in our training set (56% negative samples vs. 44% positive samples). However, the imbalance is small enough to avoid employing class imbalance mitigation techniques.
Tokenize the dataset
Before we can begin fine-tuning, we need to tokenize our dataset. As a starting point, let’s say we want to fine-tune and evaluate the roberta-base transformer. We selected roberta-base because it’s a general-purpose transformer that was pre-trained on a large corpus of English data and has frequently shown high performance on a variety of NLP tasks. The model was originally introduced in the paper RoBERTa: A Robustly Optimized BERT Pretraining Approach.
We perform tokenization on the sentences with a roberta-base tokenizer from Hugging Face, which uses byte-level Byte Pair Encoding to split the document into tokens. For more details about the RoBERTa tokenizer, refer to RobertaTokenizer. Because our inputs are sentence pairs, we need to tokenize both sentences simultaneously. Because most BERT models require the input to have a fixed tokenized input length, we set the following parameters: max_len=128 and truncation=True. See the following code:
The last preprocessing step for fine-tuning our BERT model is to convert the tokenized train and validation datasets into PyTorch tensors and upload them to our S3 bucket:
Fine-tune the model
Now that we’re done with data preparation, we’re ready to fine-tune our pre-trained roberta-base model on the paraphrase identification task. We can use the SageMaker Hugging Face Estimator class to initiate the fine-tuning process in two steps. The first step is to specify the training hyperparameters and metric definitions. The metric definitions variable tells the Hugging Face Estimator what types of metrics to extract from the model’s training logs. Here, we’re primarily interested in extracting validation set metrics at each training epoch.
The second step is to instantiate the Hugging Face Estimator and start the fine-tuning process with the .fit() method:
The fine-tuning process takes approximately 30 minutes using the specified hyperparameters.
Deploy the model and perform inference
SageMaker offers multiple deployment options depending on your use case. For persistent, real-time endpoints that make one prediction at a time, we recommend using SageMaker real-time hosting services. If you have workloads that have idle periods between traffic spurts and can tolerate cold starts, we recommend using Serverless Inference. Serverless endpoints automatically launch compute resources and scale them in and out depending on traffic, eliminating the need to choose instance types or manage scaling policies. We demonstrate how to deploy our fine-tuned Hugging Face model to both a real-time inference endpoint and a Serverless Inference endpoint.
Deploy to a real-time inference endpoint
You can deploy a training object onto real-time inference hosting within SageMaker using the .deploy() method. For a full list of the accepted parameters, refer to Hugging Face Model. To start, let’s deploy the model to one instance, by passing in the following parameters: initial_instance_count, instance_type, and endpoint_name. See the following code:
The model takes a few minutes to deploy. After the model is deployed, we can submit sample records from the unseen test dataset to the endpoint for inference.
Deploy to a Serverless Inference endpoint
To deploy our training object onto a serverless endpoint, we need to first specify a serverless config file with memory_size_in_mb and max_concurrency arguments:
memory_size_in_mb defines the total RAM size of your serverless endpoint; the minimal RAM size is 1024 MB (1 GB) and it can scale up to 6144 MB (6 GB). Generally, you should aim to choose a memory size that is at least as large as your model size. max_concurrency defines the quota for how many concurrent invocations can be processed at the same time (up to 50 concurrent invocations) for a single endpoint.
We also need to supply the Hugging Face inference image URI, which you can retrieve using the following code:
Now that we have the serverless config file, we can create a serverless endpoint in the same way as our real-time inference endpoint, using the .deploy() method:
The endpoint should be created in a few minutes.
Perform model inference
To make predictions, we need to create the sentence pair by adding the [CLS] and [SEP] special tokens and subsequently submit the input to the model endpoints. The syntax for real-time inference and serverless inference is the same:
In the following examples, we can see the model is capable of correctly classifying whether the input sentence pair contains paraphrased sentences.
The following is a real-time inference example.
The following is a Serverless Inference example.
Evaluate model performance
To evaluate the model, let’s expand the preceding code and submit all 8,000 unseen test records to the real-time endpoint:
Next, we can create a classification report using the extracted predictions:
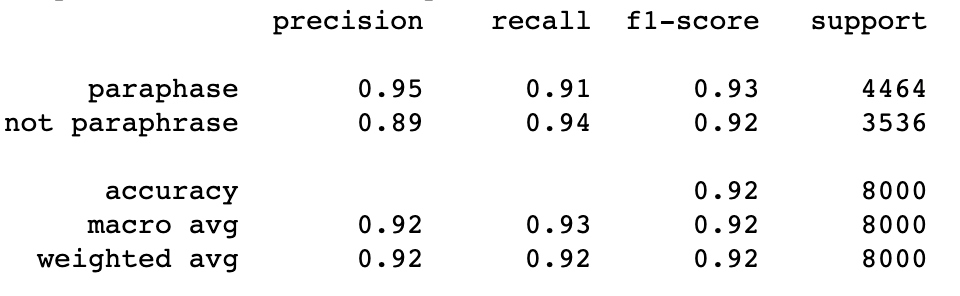
We get the following test scores.
We can observe that roberta-base has a combined macro-average F1 score of 92% and performs slightly better at detecting sentences that are paraphrases. The roberta-base model performs well, but it’s good practice to calculate model performance using at least one other model.
The following table compares roberta-base performance results on the same test set against another fine-tuned transformer called paraphrase-mpnet-base-v2, a sentence transformer pre-trained specifically for the paraphrase identification task. Both models were trained on an ml.p3.8xlarge instance.
The results show that roberta-base has a 1% higher F1 score with very similar training and inference times using real-time inference hosting on SageMaker. The performance difference between the models is relatively minor, however, roberta-base is ultimately the winner since it has marginally better performance metrics and almost identical training and inference times.
Precision
Recall
F1-score
Training time (billable)
Inference time (full test set)
roberta-base
0.92
0.93
0.92
18 minutes
2 minutes
paraphrase-mpnet-
base-v2
0.92
0.91
0.91
17 minutes
2 minutes
Clean up
When you’re done using the model endpoints, you can delete them to avoid incurring future charges:
Conclusion
In this post, we discussed how to rapidly build a paraphrase identification model using Hugging Face transformers on SageMaker. We fine-tuned two pre-trained transformers, roberta-base and paraphrase-mpnet-base-v2, using the PAWS dataset (which contains sentence pairs with high lexical overlap). We demonstrated and discussed the benefits of real-time inference vs. Serverless Inference deployment, the latter being a new feature that targets spiky workloads and eliminates the need to manage scaling policies. On an unseen test set with 8,000 records, we demonstrated that both models achieved an F1 score greater than 90%.
To expand on this solution, consider the following:
Try fine-tuning with your own custom dataset. If you don’t have sufficient training labels, you could evaluate the performance of a fine-tuned model like the one demonstrated in this post on a custom test dataset.
Integrate this fine-tuned model into a downstream application that requires information on whether two sentences (or blocks of text) are paraphrases of each other.
Happy building!
About the Authors
Bala Krishnamoorthy is a Data Scientist with AWS Professional Services, where he enjoys applying machine learning to solve customer business problems. He specializes in natural language processing use cases and has worked with customers in industries such as software, finance and healthcare. In his free time, he enjoys trying new food, watching comedies and documentaries, working out at Orange Theory, and being out on the water (paddle-boarding, snorkeling and hopefully diving soon).
Ivan Cui is a Data Scientist with AWS Professional Services, where he helps customers build and deploy solutions using machine learning on AWS. He has worked with customers across diverse industries, including software, finance, pharmaceutical, and healthcare. In his free time, he enjoys reading, spending time with his family, and maximizing his stock portfolio.
Read MoreAWS Machine Learning Blog