

This is a guest post by Jeremy Welch, Data Software Engineer Sr. Staff on the Cloud, Data Management And Governance team with Panasonic Avionics Corporation, in partnership with AWS Sr. Database Solutions Architect Saikat Banerjee and Sr. Partner SA (Database) Venkatesh Periyathambi.
Panasonic Avionics Corporation (PAC) is the world’s leading supplier of in-flight entertainment and communication systems. Headquartered in Irvine, California, with over 3,500 employees and operations in more than 50 global locations, it has delivered over 15,000 in-flight entertainment (IFE) systems and over 3,400 in-flight connectivity solutions to the world’s leading airlines. Over 2.7 billion passengers use Panasonic Avionics solutions every year. PAC is currently undertaking a company-wide initiative to migrate and re-platform existing infrastructure and workloads to AWS to centralize and build an avionics data lake. In this post, we discuss how we modernized our environment using Amazon Aurora MySQL- Compatible Edition.
IFE application architecture and challenges
The IFE application is a critical solution that captures data about passengers’ activities while onboard the aircraft, like what music or movies they listen to or watch during the flight. This application has a MySQL database as a backend, which we decided to upgrade as a part of the initiative.
The legacy architecture with on-premises MySQL installation posed several challenges in our day-to-day operations as well as our overall migration effort to AWS:
EOL support – The legacy MySQL 5.1 version had reached end-of-life.
Backup – We used to automate the backup process for disaster recovery using scripts; however, there was still a manual overhead in terms of managing and monitoring the backups.
Patching – Because these databases were self-managed, on-premises systems, we had to perform heavy differentiated tasks like patching the operating system, step-by-step database upgrade, and more.
Replication lag – With native binlog replication, we used to face significant challenges with replication lag of hundreds of seconds under high load.
Monitoring – Monitoring the performance with multiple third-party tools was challenging due to their integration complexity with the database and the maintenance of the tools themselves.
Scalability – We had to monitor resources like storage utilization and often had to increase storage allocation by the database administrator team.
Availability – Our applications have to be constantly up and running. Any downtime could have a significant reporting impact to both employees and customers.
In short, we had been facing quite a few challenges with our legacy on-premises infrastructure. So we had to think about an alternative migration path that would be reliable with minimal downtime.
Why Amazon Aurora
Aurora MySQL was the perfect fit for our particular use case for many reasons. Amazon Aurora comes with all the benefits of managed services. Most relevant for our use case are innovative features like a purpose-built distributed storage system, cloud-native storage replication, storage auto scaling, survivable page cache, fast failover, read scalability with 15 read replicas, and built-in monitoring.
Migration approach
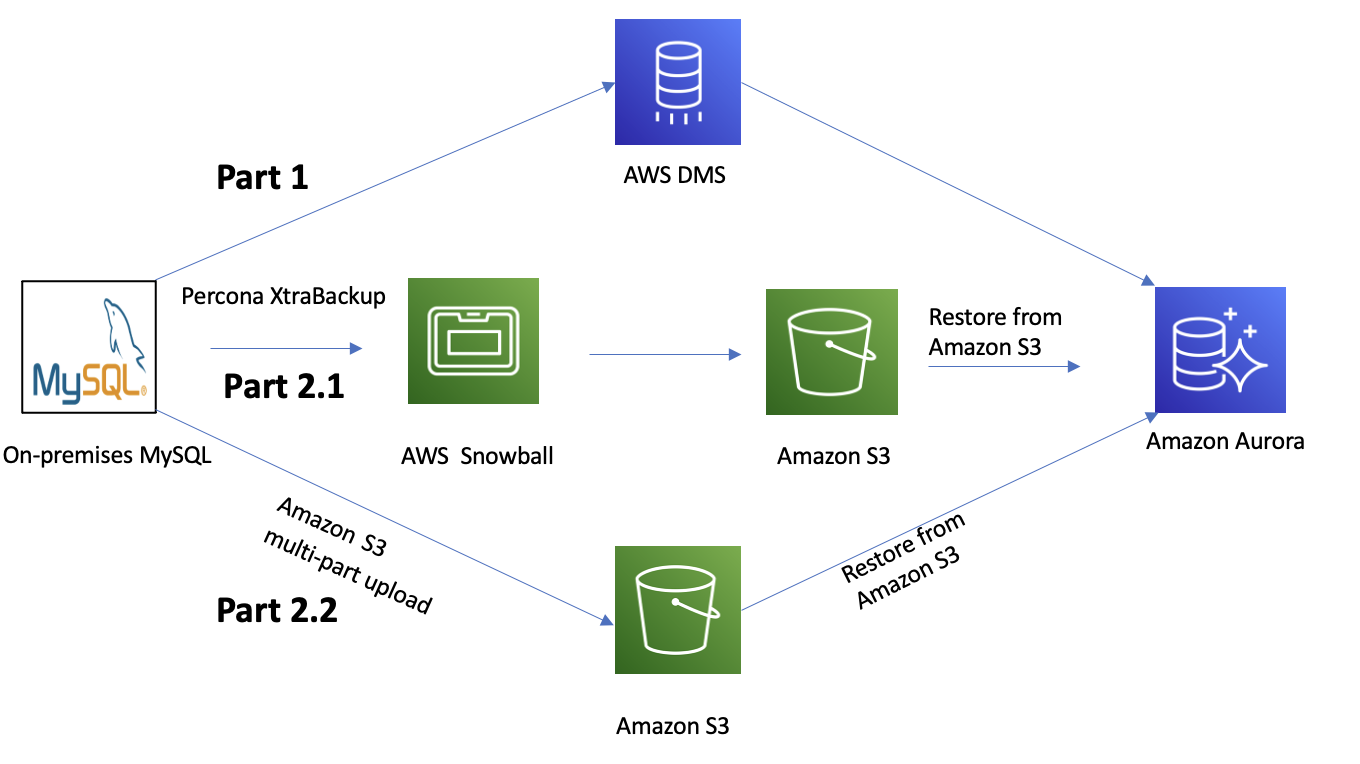
In this section, we discuss the two components to our migration approach: AWS Database Migration Service (AWS DMS) and Percona XtraBackup.
Part 1: AWS DMS
You might be wondering why we used AWS DMS as opposed to a native binlog replication approach. We wanted to manage the replication using a managed service, and AWS DMS was the right fit for this use case.
AWS DMS helps you migrate databases to AWS quickly and securely. This is a great tool to easily migrate databases with minimal downtime by keeping the source database fully operational. AWS DMS can migrate the data to and from most widely-used commercial and open-source databases. We used AWS DMS to migrate more than 50 on-premises MySQL databases to Aurora MySQL.
AWS DMS offers significant advantages, the first being easy replication setup. AWS DMS provides ongoing replication of data, keeping the source and target databases in sync. Additionally, AWS DMS monitors data transfer, replication latency, and data validation for data integrity.
At a very high level, the process outline is as follows:
Schema conversion – AWS DMS could only migrate primary keys in the schema; therefore we used mysqldump from the source database to perform a schema dump for table definition including primary keys, indexes, stored procedures, users, and grants.
Data export and import – We manually imported the dump into the target Aurora DB cluster and verified it.
Replication and CDC – Lastly, we initiated an AWS DMS task for initial full load of data migration as well as change data capture (CDC) replication. As a prerequisite for using AWS DMS CDC, we enabled binary logs in the source MySQL database and increased the retention period for 5 days (recommended is 24 hours) because we were experimenting with AWS Snowball. As a best practice, to determine the retention period, it’s important to understand the binlog creation rate on the source system. Alternatively, you can check the binlog folder on the file system to monitor the growth. You can use the following query to show the binary logs:
This approach is attractive because it allows data migration to occur in the background without any business impact. When the full load task is complete and CDC is ongoing, we can easily perform a cutover when CDCLatencySource and CDCLatencyTarget metrics become zero.
In the last year, around 50 of our databases (for other applications) were migrated to AWS using AWS DMS (approximately 4 TB in size).
Part 2: Percona XtraBackup
As we started migrating larger databases (approximately 9–10 TB) with limited (1Gbps) AWS Direct Connect bandwidth available to us, the AWS DMS tasks for these large databases started consuming much of it, which in turn saturated our bandwidth. This forced us to explore an alternative migration approach to seamlessly migrate these giant databases without saturating our Direct Connect bandwidth.
We approached AWS for an alternative migration strategy, and they proposed using Percona XtraBackup (initial snapshot and incremental snapshot) and Snowball to transfer the Percona XtraBackup files. Snowball moves terabytes of data in about a week (inclusive of shipping) and you can use it to move things like databases, backups, and archives, especially when network conditions prevent realistic timelines for transferring large amounts of data both in and out of AWS.
Aurora supports migration from Percona XtraBackup files stored in Amazon Simple Storage Service (Amazon S3). We can transfer the XtraBackup files to Amazon S3 using Snowball. Migration using physical data files can be significantly faster than using logical schema and data dumps using tools such as mysqldump. You can use this feature to easily and efficiently migrate large (2 TB or more) MySQL databases to Aurora with minimal performance impact on the source database. From our testing, the migration process with Amazon S3 can be up to 20 times faster than using a traditional mysqldump. This is because logical imports work by running SQL commands to recreate the schema and data from your source database, which carries considerable processing overhead. However, Percona XtraBackup files can be ingested directly into an Aurora storage volume, which removes the additional SQL run cost and therefore provides a faster import time.
The outline of the migration process using Percona XtraBackup is as follows:
Source DB backup – We used Percona XtraBackup 2.4 to create a hot backup because we were moving to Aurora 5.7. This tool doesn’t lock database tables or rows, doesn’t block transactions, and produces compressed backups. We opted to create backups in compressed xbstream format because we’re familiar with this format.
Amazon S3 upload – Because we have varying database sizes, we used a mix of two different approaches to upload the backup files to Amazon S3:
Approach 1 – For larger databases, we used Snowball to transfer the backup files to the S3 bucket. This solved one of the major challenges we had due to limited network bandwidth between our data center and AWS. This is illustrated in Part 2.1 of the following figure.
Approach 2 – Direct upload to Amazon S3. For the incremental backups after the full backup, we used a multi-part upload to transfer them to Amazon S3. Refer to Part 2.2 in the following figure.
IAM role – We used an AWS Identity and Access Management (IAM) user with specific permissions to perform the restore. For example, the following IAM policy grants a user the minimum required permissions to use the Amazon Management Console to list IAM roles, create an IAM role, list the S3 buckets for your account, and list the AWS Key Management Service (AWS KMS) keys:
Restoration – We restored the backup from Amazon S3 using the Amazon Relational Database Service (Amazon RDS) console. For more information, visit Restoring an Amazon Aurora MySQL DB cluster from an Amazon S3 bucket.
The following diagram illustrates the various migration paths to Aurora.
Due to limited bandwidth from Direct Connect for this migration, we didn’t want to set up replication to preserve the stability of the network. Moreover, the reduced downtime achieved from using incremental backup was adequate for this application, and therefore, we didn’t have to set up binlog replication.
Testing and validation
We conducted preliminary tests using Percona XtraBackup and Aurora cluster restore from Amazon S3, and we uploaded the data to Amazon S3 via the AWS Command Line Interface (AWS CLI). We validated the data between source and target with a simple script that checks the row count between the source and target DB tables. During the migration process, we used various monitoring tools like Amazon CloudWatch metrics for both Aurora (visit Monitoring Amazon Aurora metrics with Amazon CloudWatch) and AWS DMS, Amazon RDS Performance Insights (refer to Monitoring DB load with Performance Insights on Amazon Aurora), and Enhanced Monitoring to monitor the performance, latency of migration, and more.
Migration best practices and lessons learned
Although the end result was a successful migration from our on-premises data center to AWS, there were some significant lessons along the way. In this section, we share some key points to pay attention to.
Backup format
One of the common issues we saw was related to backup file format.
The current Amazon S3 to Aurora restore process (as of this writing) only supports three verified backup formats generated by the Percona XtraBackup utility on version 2.3 or 2.4 for MySQL 5.6 compatible:
Gzip (.gz)
tar (.tar)
Percona xbstream (.xbstream)
We used a compressed xbstream format file to store full and incremental backup files in the S3 bucket.
Version support
Our source MySQL version was 5.1. As a part of our modernization program, we upgraded our on-premises systems from 5.1 to version 5.7 using the multi-step approach of 5.1 to 5.5 to 5.6 to 5.7. This also helped us meet the prerequisites for migration using Percona XtraBackup and AWS DMS. At the time of this writing, we’re on Aurora 5.7 2.09.2 version.
Amazon S3 file size limitations
Amazon S3 limits the size of a file uploaded to an S3 bucket to 5 TB. Because the total size of our database backups was 10 TB, we had to compress the databases and split the backup file into multiple smaller files. Because the restore from Amazon S3 requires only the bucket name, it can automatically retrieve the files for import.
Incremental backups and multi-part upload
Aurora supports incremental backups created using Percona XtraBackup, which means we can copy only the data that has changed since the last backup. An incremental backup copies each page whose log sequence number (LSN) is newer than the previous incremental or full backup’s LSN. Because we used two different approaches and both took days to upload to Amazon S3 due to sheer size, to save up some time, we created incremental backups every day and uploaded it to Amazon S3.
Time and cost comparison
You can transfer the Percona backup files to Amazon S3 via an Amazon S3 upload or Snowball. Both methods have their own trade-offs. The end-to-end time to transfer the data into AWS via Snowball is approximately a week, including the usual shipping and handling time in AWS service data centers. In contrast, the time to upload the backup via Amazon S3 upload primarily depends on the available bandwidth. Therefore, for smaller backups with plenty of bandwidth, an Amazon S3 upload can be faster than transferring them via Snowball. Because we could afford the downtime, we decided to go with Amazon S3 upload.
User accounts
User accounts are not imported automatically. Therefore, we had to manually export user accounts from our source database and import them to the new DB instance later.
Recommendations
If you’re considering implementing this solution for your own use case, we have the following recommendations:
Do as many test runs as possible to find the right migration approach. During our trial runs with Snowball, we were able to migrate and validate two larger instances; however, for a couple of other instances from other environments, we couldn’t validate the data because we were missing around 5% of data. Due to the absence of error logs and our time constraint for migration, we had to use a different approach by performing a multi-part upload to Amazon S3 using the AWS CLI for these two instances.
Although all the metrics are important, consider setting up alerts for some metrics using CloudWatch alarms or Amazon Simple Notification Service (Amazon SNS). Some notable AWS DMS replication instance metrics are CPUUtilization and FreeMemory, and replication task metrics are CDCLatencySource and CDCLatencyTarget. Based on your use case, you can set up alerts on other available metrics. For more information, visit Monitoring AWS DMS tasks.
Similarly, for Aurora, set up monitoring and alerts.
For MySQL 5.7 migration, you must use Percona XtraBackup 2.4. For earlier MySQL versions, use Percona XtraBackup 2.3 or 2.4. For more information, refer to Migrating data from an external MySQL database to an Amazon Aurora MySQL DB cluster.
Also, pay attention to the following while doing this migration, because most of the errors we see are from these issues:
Percona backup compatibility – For example, unsupported backup format or orphaned tables
Source MySQL version compatibility – For example, unsupported version
Parameter compatibility – Amazon RDS MySQL and Aurora MySQL don’t allow for the following parameters to be customized, so make sure that the parameters aren’t set on your source database because these parameters lead to failure while restoring from Amazon S3:
innodb_data_file_path
innodb_undo_directory
innodb_undo_tablespaces
Physical migration has the following limitations:
The innodb_page_size parameter must be set to its default value (16 KB).
The innodb_data_file_path must be configured with the default data file name ibdata1. The following are examples of file names that aren’t allowed: innodb_data_file_path=ibdata1:50M; ibdata2:50M:autoextend and innodb_data_file_path=ibdata01:50M:autoextend.
The innodb_log_files_in_group parameter must be set to its default value (2).
Benefits
We observed the following benefits with this solution:
Auto scaling storage – Generally, the maximum size of the restored database is the maximum database size supported minus the size of the backup. The Aurora auto scaling feature solved the problem of us calculating the headroom for migration as well as future growth. With the latest Aurora version, we also got the benefit of dynamic storage resizing when we drop or truncate tables.
Higher reliability – With the innovative architecture in Aurora, we can achieve higher reliability. Databases migrated are now highly available, durable, and fault tolerant—data is stored across multiple Availability Zones and is self-healing. The reader is created in a different Availability Zone to have Multi-AZ failover capability. The storage is self-healing so we don’t need to deal with corruption and storage management work anymore.
Backups – Backups are automated, taken continually without any operational impact or overhead, and maintenance is completed within a scheduled window. Notably, Aurora offloads all this backup work to its purpose-built distributed storage layer so that the compute nodes can perform in the most efficient way. With continuous backup in Aurora, we are able to perform point-in-time recovery (PITR) to achieve minimal Recovery Point Objective (less than 5 minutes) with no additional performance penalty.
Provisioning test environments – We can now use the cloning feature in Aurora to set up development and staging clusters, which is faster than restoring from a snapshot or PITR, and is less expensive due to copy-on-write rather than copying the entire volume.
Monitoring – Aurora manages monitoring and alerting of both DB resources (via CloudWatch) and application performance (via Performance Insights), whereas before we tried various third-party tools with limited success.
Performance – With the cloud-native architecture in Aurora and purpose-built log structured distributed storage, the queries are performing on average 15% faster.
Replication – Before migrating to Aurora MySQL, with binary logs replication we used to see replication lag in tens of seconds under heavy workload. With cloud-native storage level replication in Aurora (doesn’t use binary logs), and high performant, distributed storage architecture, now we see the replication lags in milliseconds even under heavy workload.
Conclusion and next steps
With Aurora MySQL, we were able to improve the scalability and resiliency of our IFE applications, reduce the undifferentiated heavy lifting of maintenance work, improve replication performance, and optimize cost. The Panasonic Avionics team is now focused on its cloud migration delivering internet of things (IoT), cloud, and data analytics for the company’s NEXT platform, while also managing operations-focused data, such as maintenance and the health monitoring of aircraft IFEC systems. Now, with this highly successful migration and all the benefits realized, Aurora MySQL is our preferred relational database platform. We plan to use Aurora MySQL for many of our upcoming migrations following this methodology.
About the Authors
Jeremy Welch is a Data Software Engineer Sr. Staff on the Cloud, Data Management And Governance team with Panasonic Avionics Corporation.
Saikat Banerjee is a Sr. Database Solutions Architect with Amazon Web Services. He works with customers to modernize their database architecture on Amazon Web Services.
Venkatesh Periyathambi is a Senior Database Solutions Architect with Amazon Web Services. He helps customers architect and migrate their database solutions to AWS.
Read MoreAWS Database Blog