

You can use various tools to define and run machine learning (ML) pipelines or DAGs (Directed Acyclic Graphs). Some popular options include AWS Step Functions, Apache Airflow, KubeFlow Pipelines (KFP), TensorFlow Extended (TFX), Argo, Luigi, and Amazon SageMaker Pipelines. All these tools help you compose pipelines in various languages (JSON, YAML, Python, and more), followed by viewing and running them using a workflow orchestrator. A deep comparison of each of these options is out of scope for this post, and involves appropriately selecting and benchmarking tools for your specific use case.
In this post, we discuss how to author end-to-end ML pipelines in Step Functions using three different methods:
Python – Using the Step Functions Data Science SDK
Drag and drop – Using the new Step Functions Workflow Studio
JSON – Using the Amazon States language
Solution overview
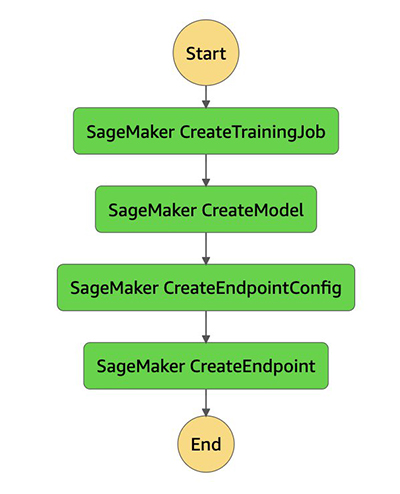
In this post, we create a simple workflow that involves a training step, creating a model, configuring an endpoint, and deploying the model
You can also create more complex workflows involving other steps such as Amazon SageMaker Processing, or automatic model tuning (HPO). You can also use Step Functions to integrate with other AWS services such as AWS Lambda, Amazon DynamoDB, AWS Glue, Amazon EMR, Amazon Athena, Amazon Elastic Kubernetes Service (Amazon EKS), and AWS Fargate. For more information on supported services, see Supported AWS Service Integrations for Step Functions. We provide guidance on other similar pipeline tools later in this post.
In this post, we use the MNIST dataset, which is a widely used dataset for handwritten digit classification. It consists of 70,000 labeled 28×28 pixel grayscale images of hand-written digits. The dataset is split into 60,000 training images and 10,000 test images. There are 10 classes (one for each of the 10 digits). The code used here closely follows a similar use case where the task is to classify each input image as one of the 10 digits (0–9).
The main training code uses a class from the standard PyTorch example for the model definition:
The main training function works for both single instance and distributed training, and does so by checking ARGs:
The number of hosts is conveniently stored in an Amazon SageMaker environment variable, which can also be passed in as an argument:
Next, we load the datasets from the default data directory:
We then enter the main training loop:
Finally, we save the model:
This code is stored in a file called mnist.py and used in later steps (see the full code on GitHub). The following are two important takeaways in connection to the pipeline:
You can use the data input location on Amazon Simple Storage Service (Amazon S3) as a parameter for the training step in a pipeline. This data is delivered to the training container, the local path of which is stored in an environment variable (for example, SAGEMAKER_CHANNEL_TRAINING).
The model is shown here as being saved locally in model_dir; the local path of the model directory (/opt/ml/model) is stored in an environment variable (SM_MODEL_DIR). At the end of the SageMaker training job, the model is copied to an Amazon S3 location so that model and endpoint related pipeline steps can access the model.
Now let’s look at our three methods to author end-to-end ML pipelines in Step Functions.
Use the Step Functions Data Science SDK
The Step Functions Data Science SDK is an open-source library that lets you create workflows entirely in Python. Installing this SDK is as simple as entering the following code:
The SDK allows you to do the following:
Create steps that accomplish tasks
Chain those steps together into workflows
Branch out to run steps in parallel or based on conditions
Include retry, succeed, or fail steps
Review a graphical representation and definition for your workflow
Create a workflow in Step Functions
Start and review runs in Step Functions
Although we don’t use many of these functions, the Step Functions Data Science SDK can include the following:
Standard states such as Pass, Fail, Succeed, and Wait
Choice rules
Compute steps such as using AWS Lambda, AWS Batch, AWS Glue, and Amazon Elastic Container Service (Amazon ECS)
SageMaker specific steps
Other service integrations such as DynamoDB, Amazon Simple Notification Service (Amazon SNS), Amazon Simple Queue Service (Amazon SNS), and Amazon EMR
To get started, we first create a PyTorch estimator with the mnist.py file. We configure the estimator with the training script, an AWS Identity and Access Management (IAM) role, the number of training instances, the training instance type, and hyperparameters:
The Data Science SDK provides two ways of defining a pipeline. Firstly, you can use individual steps. For example, you can define a training step with the following code:
Then you create a model step:
Finally, you chain all the steps using the following code:
For more information, see Build a machine learning workflow using Step Functions and SageMaker.
Alternatively, you can use a standard training pipeline class that is built in to the SDK:
The workflow execution role allows you to create and run workflows in Step Functions. The following code creates the desired workflow and lets you render the same:
Finally, you can create and run the workflow using pipeline.create() and pipeline.execute().
An example output from the execute() statement looks as follows, and provides you with a link to Step Functions where you can view and monitor your execution:
You can also render the current state of your workflow as it runs from a notebook using the following code:
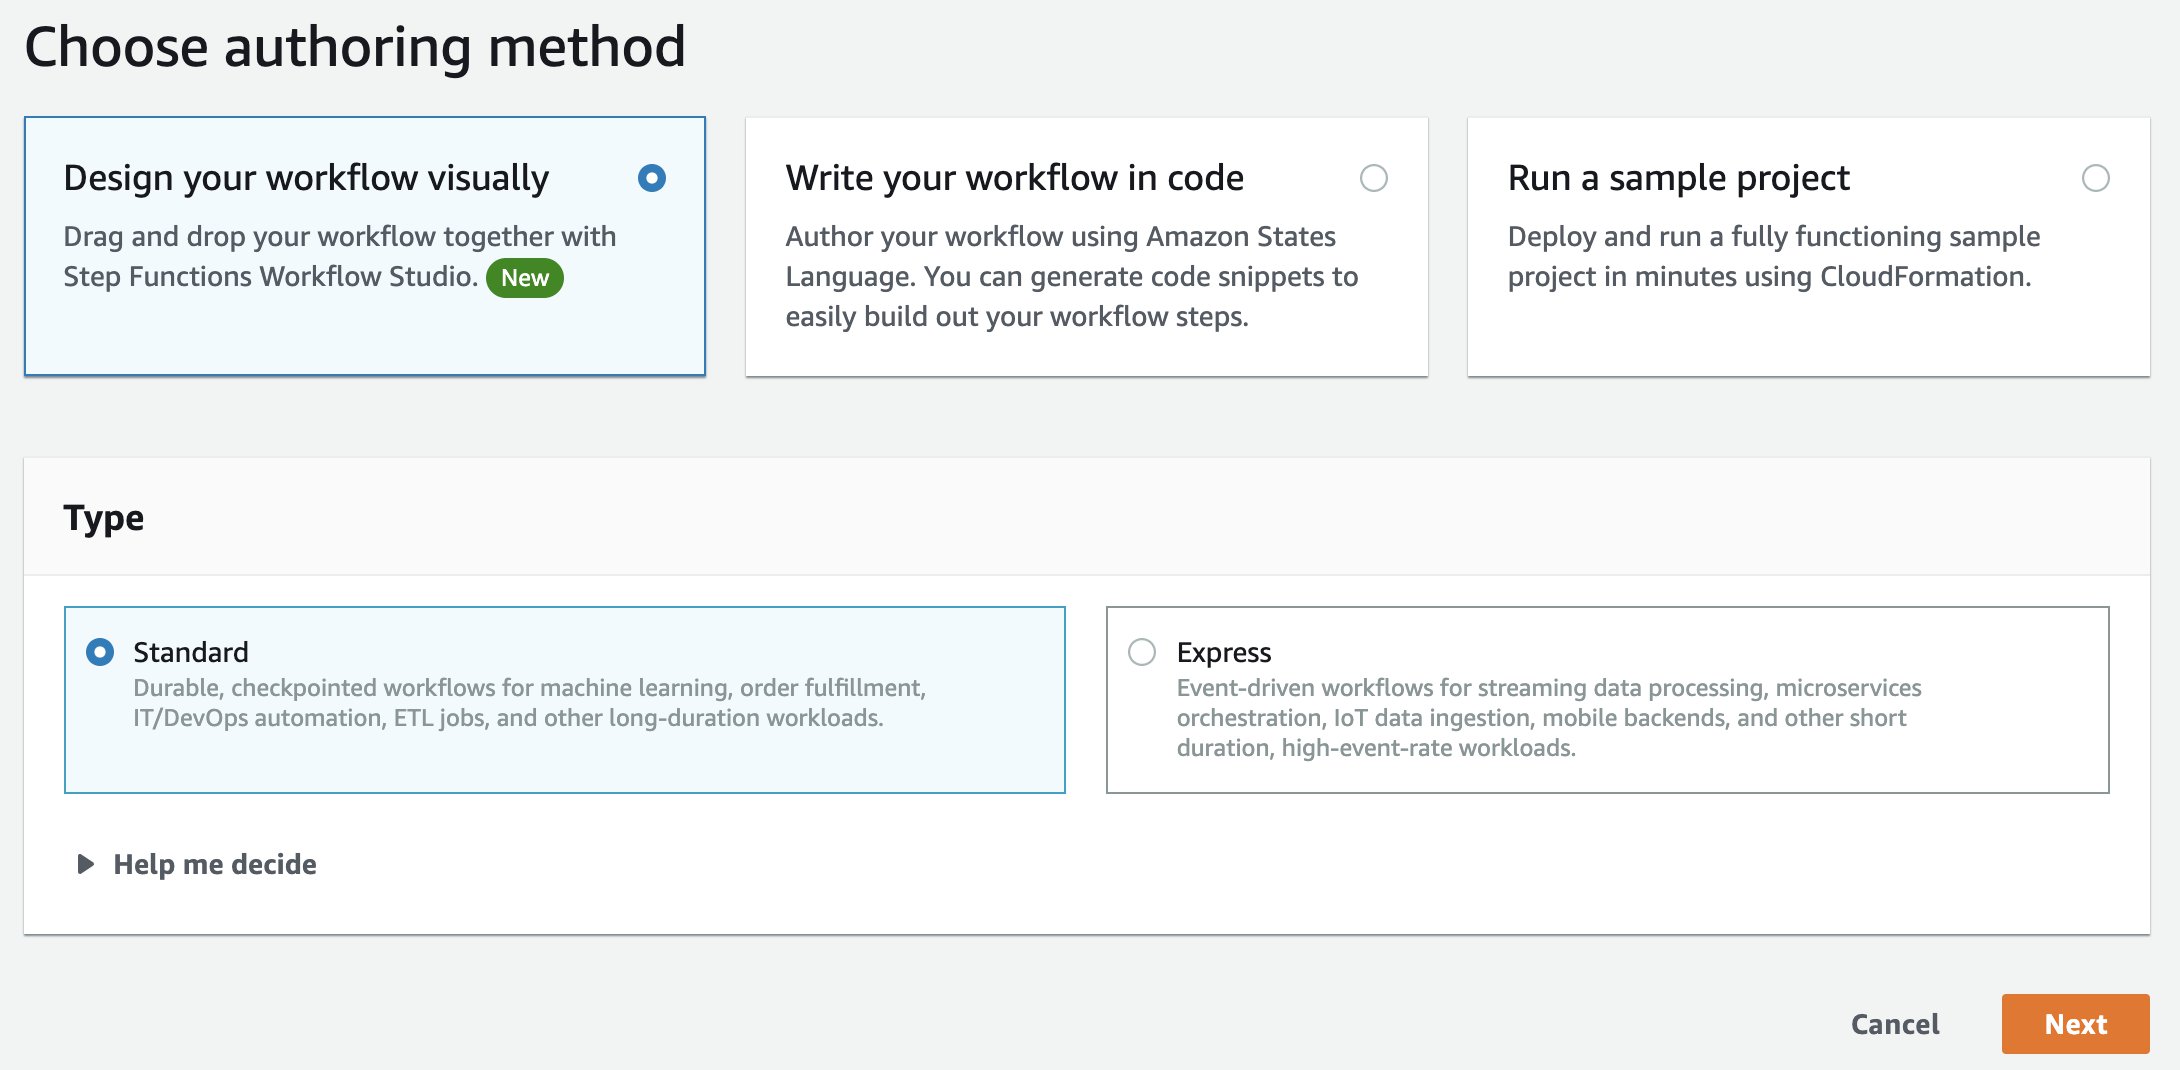
Use Step Functions Workflow Studio
To use Step Functions Workflow Studio, complete the following steps:
On the Step Functions console, choose Create state machine.
Select Design your workflow visually.
Choose Next.
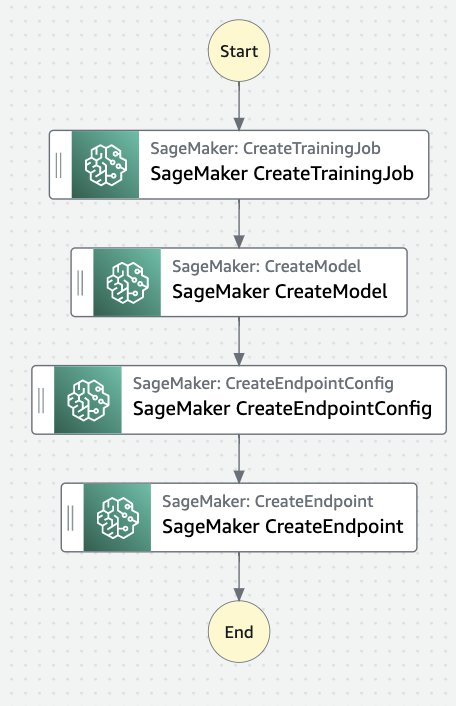
Enter and filter your SageMaker steps, then drag and drop them to the training step.
In a similar fashion, drag and drop the following states in order:
Create Model
Create Endpoint Config
Create Endpoint
Your workflow should now look like the following diagram.
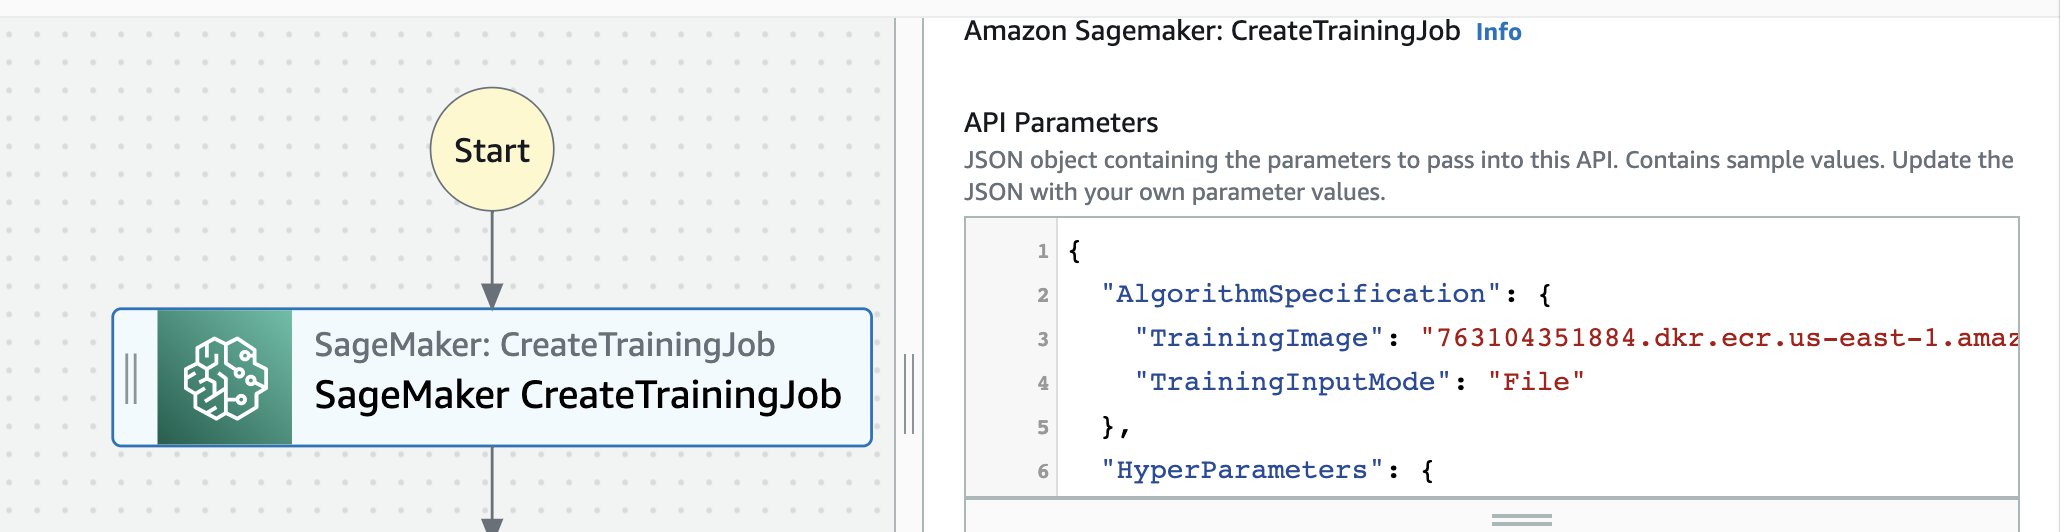
Now, let’s configure each of these steps.
Choose SageMaker CreateTrainingJob and edit the API parameters in the Form box.
Use the following JSON object if you are following this example:
Select Wait for task to complete.
Edit the API parameters for CreateModel:
Edit the API parameters for CreateEndpointConfig:
Edit the API parameters for CreateEndpoint:
Choose Next, review the generated code, and choose Next.
Step Functions can look at the resources you use and create a role. However, you may see the following message:
“Step Functions cannot generate an IAM policy if the RoleArn for SageMaker is from a Path. Hardcode the SageMaker RoleArn in your state machine definition, or choose an existing role with the proper permissions for Step Functions to call SageMaker.”
We use a role that we created in the Data Science SDK section instead.
Select Use existing role and use the role StepFunctionsWorkflowExecutionRole.
Choose Create state machine.
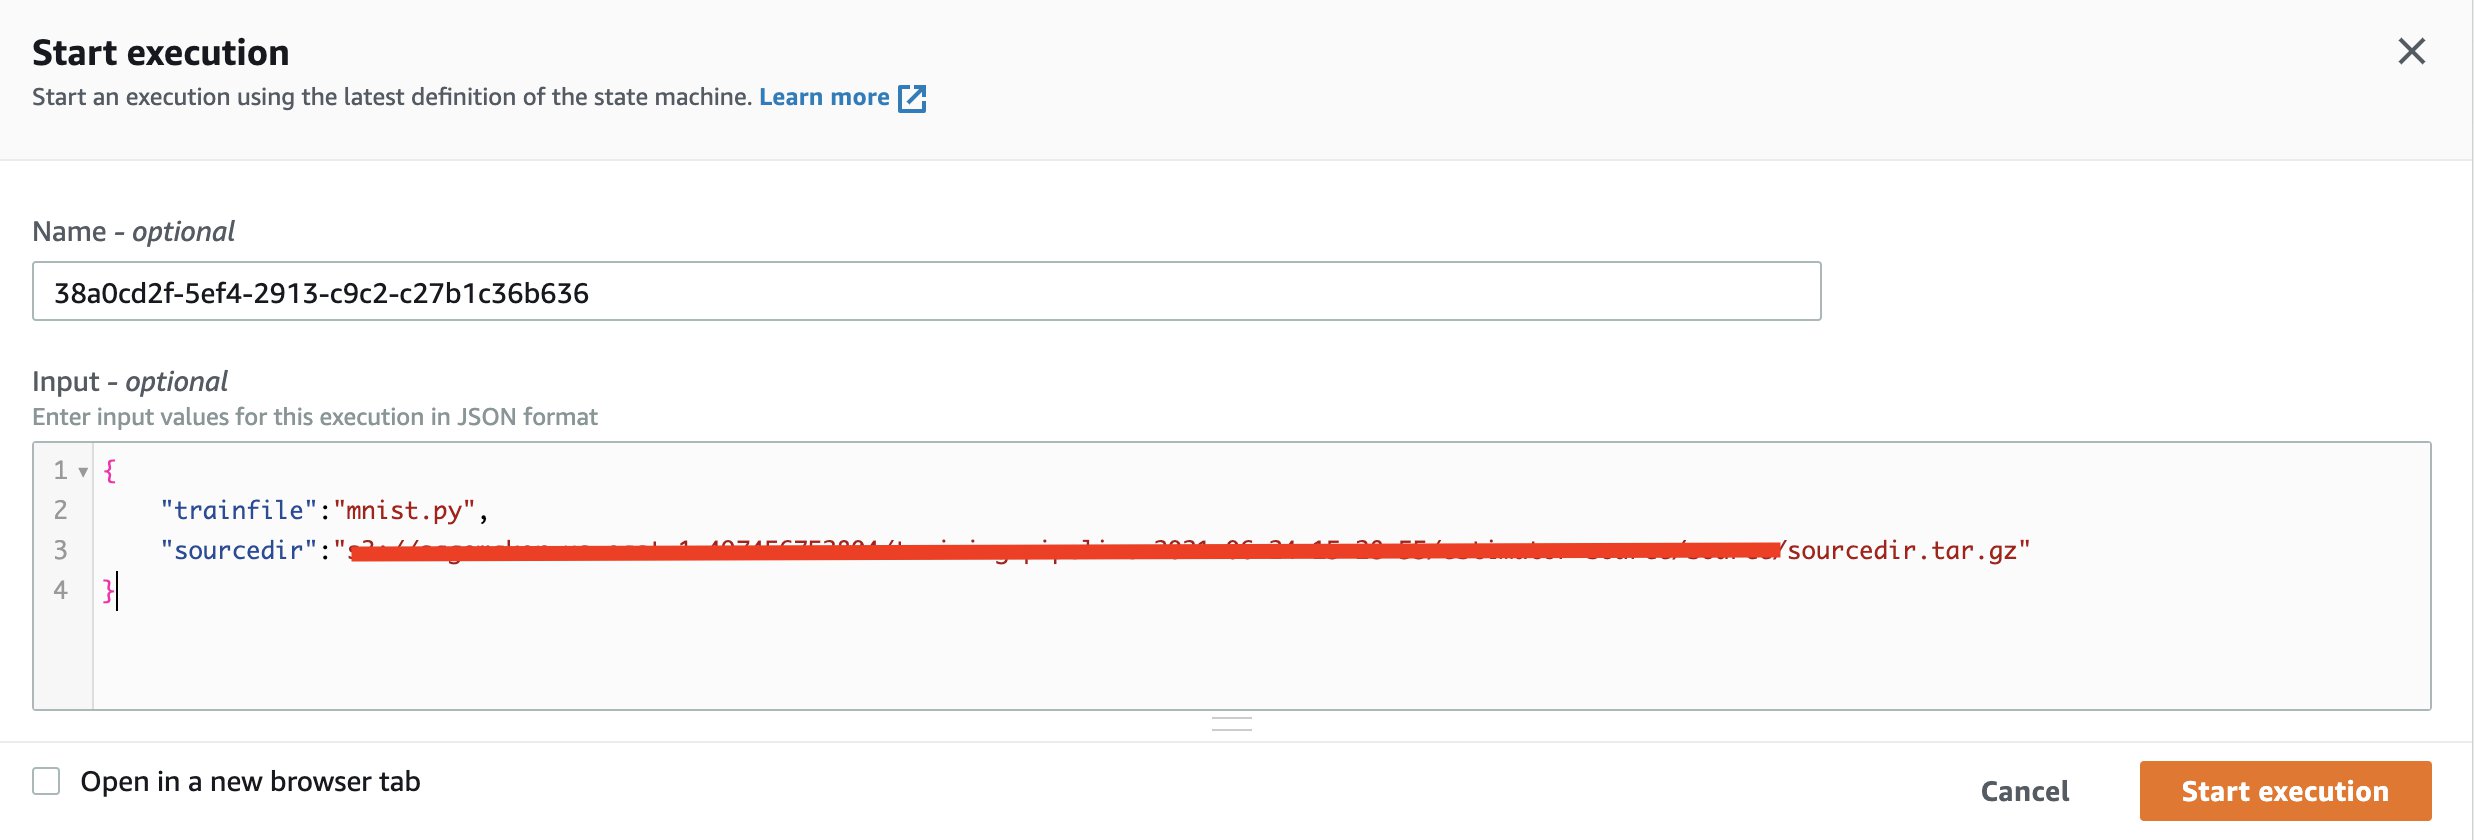
When you receive the message that the machine was successfully created, run it with the following input:
Monitor and wait for the run to finish.
Use the Amazon States Language
Both the methods we just discussed are great ways to quickly prototype a state machine on Step Functions. When you need to edit the Step Functions definition directly, you can use the States language. See the following code:
You can create a new Step Functions state machine on the Step Functions console by selecting Write your workflow in code.
A successful run shows each state in green.
Each state points to resources in SageMaker. In the following screenshot, the link under Resource points to the model created as a result of the CreateModel step.
When to use what?
The following table summarizes the supported service integrations.
Supported Service
Amazon States Language
(New) Step Functions Workflow Studio
AWS Step Functions Data Science SDK
AWS Lambda
✓
✓
✓
AWS Batch
✓
✓
✓
Amazon DynamoDB
✓
✓
✓
Amazon ECS/AWS Fargate
✓
✓
✓
Amazon SNS
✓
✓
✓
Amazon SQS
✓
✓
✓
AWS Glue
✓
✓
✓
Amazon SageMaker
✓
✓
✓
Amazon EMR
✓
✓
✓
Amazon EMR on EKS
✓
✓
AWS CodeBuild
✓
✓
Amazon Athena
✓
✓
Amazon EKS
✓
✓
Amazon API Gateway
✓
✓
AWS Glue DataBrew
✓
✓
Amazon EventBridge
✓
✓
AWS Step Functions
✓
✓
Although most of what you typically need for your pipelines is included in the Step Functions Data Science SDK, you may need to integrate with other supported services that are supported by other choices shown in the preceding table.
In addition, consider the skillsets in your existing team—teams that are used to working with a particular tool may prefer sticking to the same for maximizing productivity. This is true when considering the options within Step Functions explored here, but also others such as the AWS Cloud Development Kit (AWS CDK), AWS Serverless Application Model (AWS SAM), Airflow, KubeFlow, and SageMaker Pipelines. Specifically around Pipelines, consider that data scientists and ML engineers may benefit from working on a single platform that includes the ability to not only maintain and run pipelines, but also manage models, endpoints, notebooks and other features.
Lastly, consider a hybrid set of services for using the right tool for the right job. For example:
You can use AWS CodePipeline along with Step Functions for orchestrating ML pipelines that require custom containers. CodePipeline invokes Step Functions and passes the container image URI and the unique container image tag as parameters to Step Functions. For more information, see Build a CI/CD pipeline for deploying custom machine learning models using AWS services.
You can use Kubeflow pipelines to define the training pipeline, and SageMaker to host trained models on the cloud. For more information, see Cisco uses Amazon SageMaker and Kubeflow to create a hybrid machine learning workflow.
You can use Pipelines for automating feature engineering pipelines using SageMaker Data Wrangler and SageMaker Feature Store. Pipelines is a purpose-built CI/CD tool for ML model building and deployment that not only includes workflow orchestration, but is also related to concepts such as model registry, lineage tracking, and projects. When upstream processes are already using Step Functions, for example, to prepare data using AWS services, consider using a hybrid architecture where both Step Functions and Pipelines are used. For more information, see Automate feature engineering pipelines with Amazon SageMaker.
When developers and data scientists need to write infrastructure as code with unit testing, consider using tools like the AWS Data Science SDK and Apache Airflow, because you can use Python to define end-to-end architectures and pipelines.
Summary
In this post, we looked at three different ways of authoring and running Step Functions pipelines, specifically for end-to-end ML workflows. Choosing a pipelining tool for ML is an important step for a team, and is a decision that needs to consider the context, existing skillsets, connections to various other teams with these skillsets in an organization, available service integration, service limits, and applicable quotas. Contact your AWS team to help guide you through these decisions; we are eager to help!
For further reading, check out the following:
New – AWS Step Functions Workflow Studio – A Low-Code Visual Tool for Building State Machines
The step-functions-data-science-sdk GitHub repo
Prototyping at speed with AWS Step Functions new Workflow Studio
Introducing Amazon Managed Workflows for Apache Airflow (MWAA)
Introducing Amazon SageMaker Components for Kubeflow Pipelines
About the Author
Shreyas Subramanian is a AI/ML specialist Solutions Architect, and helps customers by using Machine Learning to solve their business challenges on the AWS Cloud.
Read MoreAWS Machine Learning Blog