

Out-of-stock (OOS) is an essential metric tracked across the retail industry. Brick-and-mortar retailers seek to reduce their costs associated with OOS items, while simultaneously increasing shopper satisfaction without inventory surplus.
A product can be OOS in three main ways: Distribution OOS, Store OOS, and Shelf OOS. This post focuses on Shelf OOS. Shelf OOS occurs when there is inventory in the store, but the item isn’t on the shelf. One OOS study, conducted by NACDS, estimates that 40% of shoppers encounter at least one OOS situation per week, and it assumes that only one in ten shoppers would ask a store associate for hep finding the item they’re looking for. The study estimates annual losses could range between $1–4 million for small to large volume retail chains based on those initial estimates. The study also mentions that 25% of OOS issues occur when the item is available in the store, but not on the shelf at the time the shopper wants to purchase the item. With machine learning (ML) and computer vision (CV) applications, retailers can improve on-shelf product availability, increase sales revenue, and improve shopper satisfaction.
AWS Panorama is a CV and ML appliance and software development kit (SDK) that allows you to add CV applications at the edge, where internet bandwidth is limited, low latency is needed, and data privacy is required. AWS Panorama gives you the ability to add CV to your existing Internet Protocol (IP) cameras and automate tasks that traditionally require human inspection and monitoring.
In this post, we walk you through the steps to build a shelf monitoring application with AWS Panorama to monitor on-shelf availability of bottles and notify the store manager when the count of an item on the shelf goes below a certain threshold. A simple user interface allows store managers to check on stock quantities and change notification settings for OOS issues.
The following image shows an example of this application.
Prerequisites
For this walkthrough, you need the following hardware devices:
AWS Panorama Appliance.
An IP camera with RTSP support with H.264 video compression. For demonstration purposes, we use a JideTech IP Camera. Note that we don’t endorse this particular device; many IP cameras are compatible with AWS Panorama.
Solution overview
The following diagram illustrates the architecture of our solution.
The workflow of the solution is as follows:
An IP camera deployed in the store monitors the shelf and streams video to the AWS Panorama Appliance. An application and a pre-trained ML model deployed to the AWS Panorama Appliance process the video frames from the IP camera. The application invokes a YOLOv3 model to detect “bottles” and captures the total count of bottles on the shelf. The application overlays object detection bounding boxes and confidence scores on the video frames, and these frames along with a JSON payload are sent to AWS Cloud for further processing.
Images from AWS Panorama processing are stored in an Amazon Simple Storage Service (Amazon S3) bucket.
A JSON message that contains information on how many bottles are in the frame and reference to the frame location in Amazon S3 is put into an Amazon Simple Queue Service (Amazon SQS) queue for further processing.
Amazon SQS triggers an AWS Lambda function as messages arrive. The function uses the data in the messages from the queue and calls a GraphQL API hosted on AWS AppSync.
AWS AppSync performs two actions in this step:
First, it stores the data in an Amazon DynamoDB table. When data is written to the table, a DynamoDB Streams event triggers another Lambda function. The function determines whether the bottle count changed, and it compares the new bottle count with the threshold value set by a store manager. The function sends an email and SMS notification to the store manager via Amazon Simple Notification Service (Amazon SNS) if the number of bottles is less than or equal to the threshold value.
AWS Amplify builds and hosts the front end of the shelf monitoring user interface (UI). The front-end UI subscribes to the backend AWS AppSync mutations, which updates the UI with the shelf images and bottle counts automatically.
Store managers can change the threshold value of an item from the UI. Changes to the threshold value from the UI are updated and stored by AWS AppSync and DynamoDB.
To deploy the solution, you complete the following high-level steps:
Get a personal access token from GitHub.
Store your token in AWS Secrets Manager.
Deploy AWS resources using an AWS CloudFormation template.
Configure your AWS Panorama Appliance.
Deploy the shelf monitoring application.
Get a personal access token from GitHub
You need a GitHub account to deploy the solution. You use this GitHub account and personal access token to fork the full stack application into your AWS account using the AWS Amplify console. If you don’t have a GitHub account, you can sign up for one.
After you successfully log in to your GitHub account, use the following guide to generate a personal access token:
On the user drop-down menu, choose Settings.
Choose Developer Settings, then choose Personal access tokens.
Choose Generate new token.
For Note, enter a token name.
For Expiration, choose an expiration date.
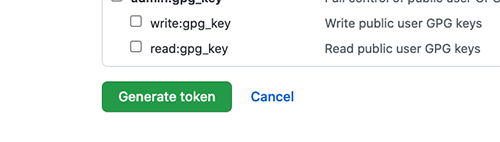
For Select scopes, select repo.
Leave the rest of the options as is and choose Generate token.
On the next page, copy the value of the generated personal access token.
You store this value in Secrets Manager in the next step.
Store your personal access token in Secrets Manager
To store your personal access token, complete the following steps:
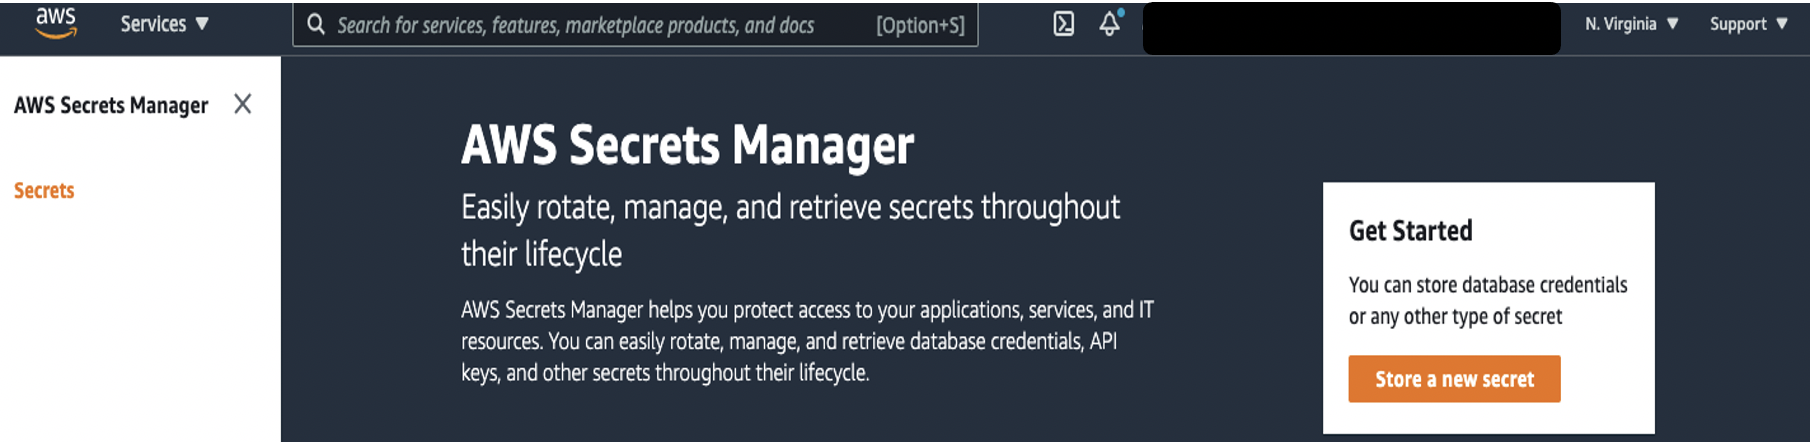
Open the AWS Management Console and choose a Region where AWS Panorama is available.
On the Secrets Manager console, choose Store a new secret.
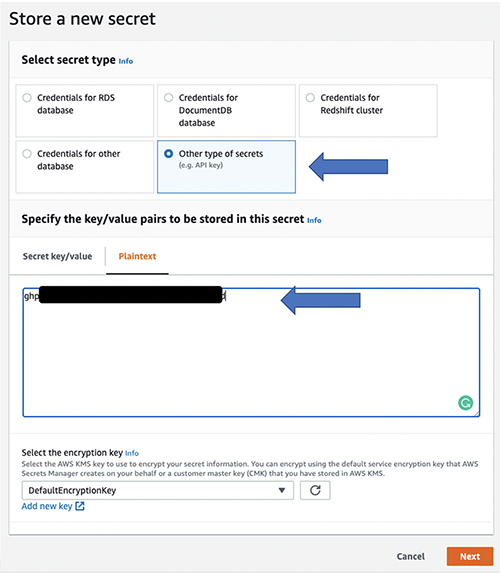
For Select secret type, select Other type of secrets.
On the Plaintext tab, enter the value of the personal access token you copied.
Choose Next.
For Secret name, enter GITHUB_TOKEN.
Any name other than GITHUB_TOKEN may cause issues later in the tutorial.
For Description, enter an optional description.
Choose Next.
Leave everything at its default in the Configure automatic rotation section and choose Next.
In the Review section, choose Store to store the secret.
Deploy AWS resources using AWS CloudFormation
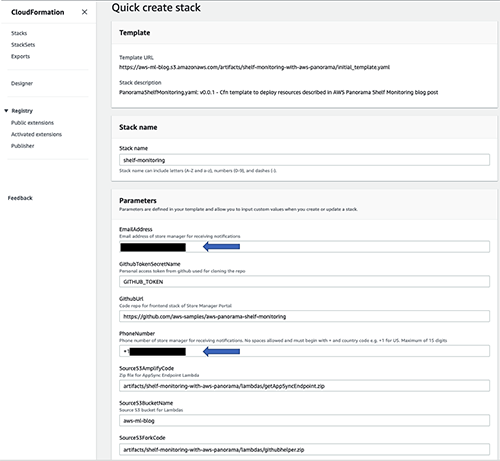
You use a CloudFormation stack to deploy the resources in AWS. This stack creates all the resources to deploy the shelf monitoring application, excluding the AWS Panorama Appliance deployment.
Choose Launch Stack to launch AWS services:
On the Specify stack details page, enter values for EmailAddress and PhoneNumber. OOS notifications are sent to the email address and phone number that you provide in this step.
Leave the rest of the parameter values unchanged.
Choose Next.
Select I acknowledge that AWS CloudFormation might create IAM resources.
Choose Create stack.
You can monitor various events from the stack creation process on the Events tab.
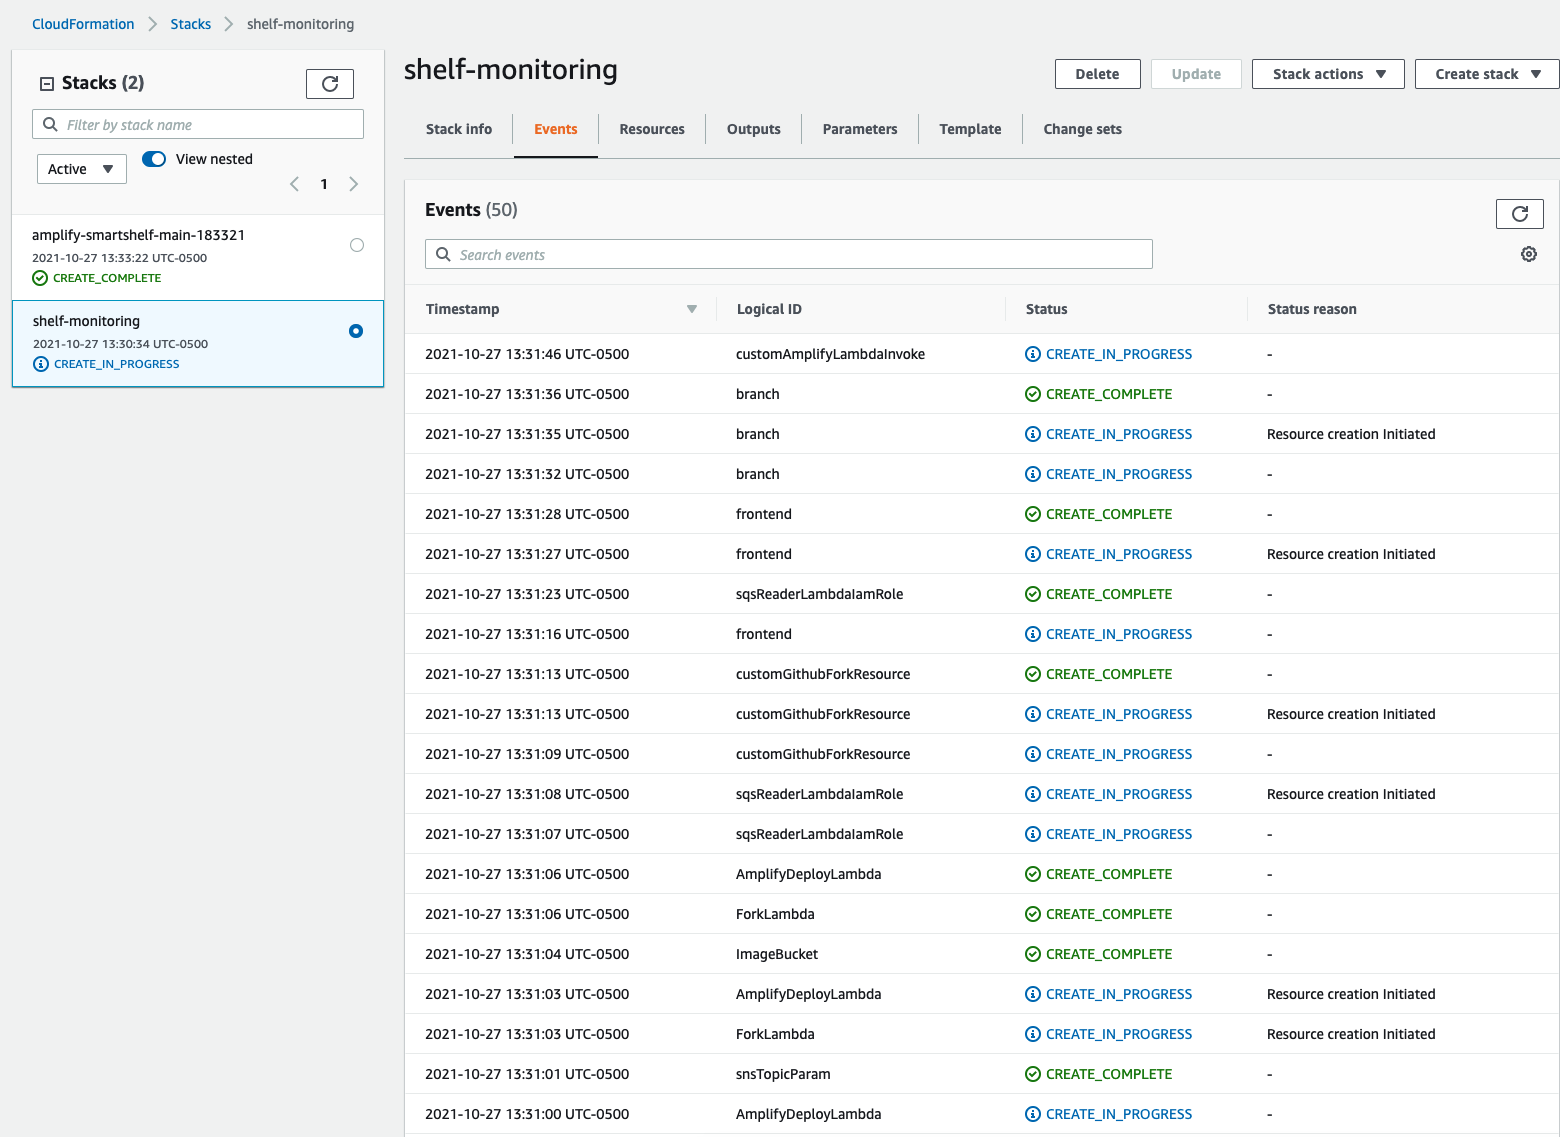
When the stack creation is complete, you see the status CREATE_COMPLETE.
You can look on the Resources tab to see all the resources that the CloudFormation template created.
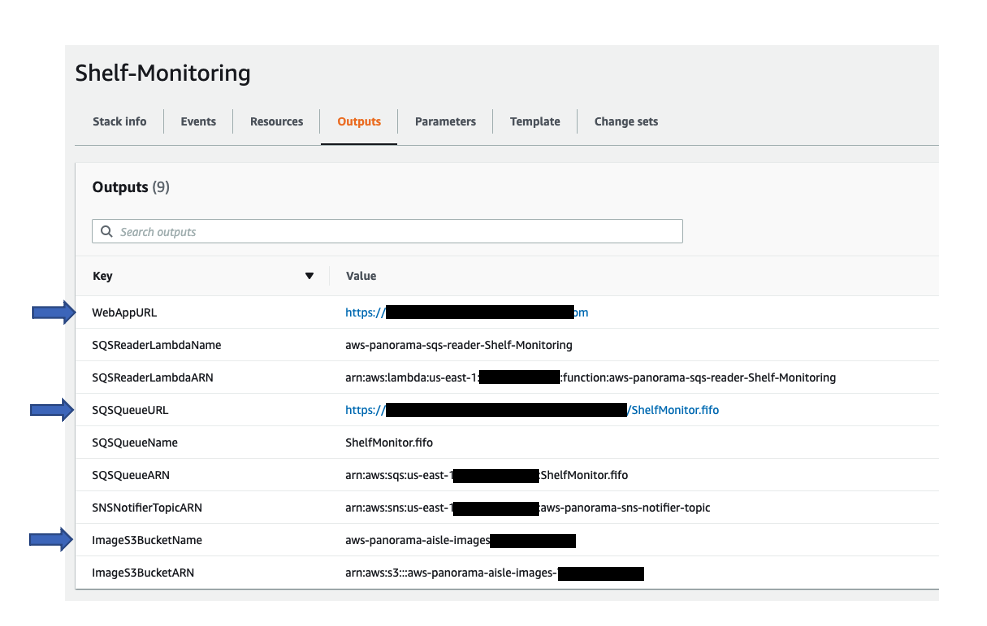
When the CloudFormation stack deployment is complete, choose the Outputs tab and copy the following values to use later in the AWS Panorama application deployment steps:
SQSQueueURL
ImageS3BucketName
WebAppURL
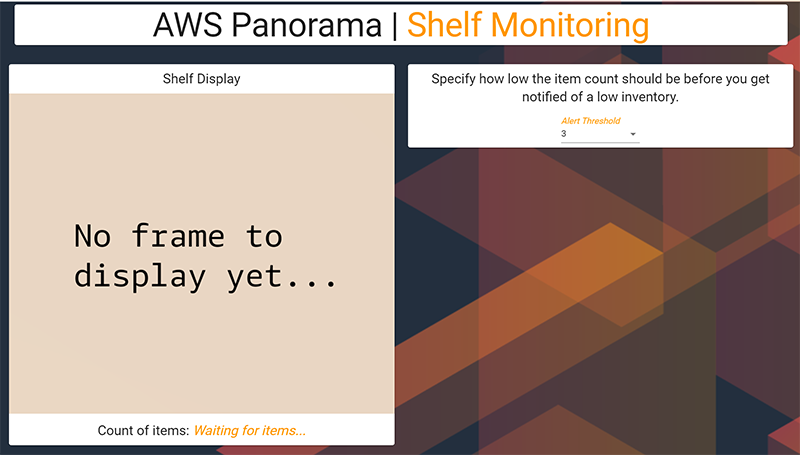
Additionally, open the WebAppURL link in a browser window to verify that the shelf monitoring UI was deployed.
You should receive a subscription confirmation email from Amazon SNS to verify the email address.
Open the email and choose Confirm Subscription to receive OOS notifications.
Set up your AWS Panorama Appliance
In this section, you complete the following steps:
Register and configure the AWS Panorama Appliance.
Upgrade the appliance software.
Add a camera stream.
Register and configure the AWS Panorama Appliance
When you buy the AWS Panorama Appliance, you receive the appliance itself, a power cord, and two Ethernet cables. You also get a USB key to initially configure the appliance.
Connect the AWS-provided USB drive to your computer.
Prepare the AWS Panorama Appliance by connecting the network and power cables.
After the appliance powers on, it waits for a USB drive to be connected.
Open the AWS Panorama console Getting started page.
Choose Create.
This creates the necessary AWS Identity and Access Management (IAM) service roles needed by AWS Panorama.
Choose Add device.
Choose Begin setup.
Enter a name and description for the device resource that represents the appliance in AWS Panorama.
Choose Next.
If you need to manually assign an IP address and DNS settings, choose Advanced network settings. Otherwise, choose Next.
Choose Download archive.
Choose Next.
Copy the configuration archive to the root directory of the USB drive.
Connect the USB drive to the USB 3.0 port on the front of the appliance, next to the HDMI port.
When you connect the USB drive, the appliance copies the configuration archive and network configuration file to itself and connects to the AWS Cloud. The appliance’s status light turns from green to blue while it completes the connection, and then back to green.
To continue, choose Next.
Choose Done.
Upgrade the appliance software
The AWS Panorama Appliance has several software components, including an Ubuntu Linux – based environment, the AWS Panorama application SDK, and supporting CV libraries and frameworks. To ensure that you can use the latest features and applications with your appliance, upgrade its software after setup and whenever an update is available.
Open the AWS Panorama console Appliances page.
Select your appliance.
On the Actions menu, choose Install software update.
Under Software versions, choose a latest version.
Choose Install.
Before you continue to the next section, remove the USB drive from the appliance and format it to delete its contents.
The configuration archive contains sensitive data and is not deleted automatically.
The upgrade process can take up to 30 minutes or more. You can monitor its progress on the AWS Panorama console or a connected monitor. When the process is complete, the appliance reboots.
Add a camera stream
Next, register a camera stream with the AWS Panorama console.
Open the AWS Panorama console Data sources page.
Choose Add data source.
Configure the following settings.
Name – A name for the camera stream.
Description – A short description of the camera, its location, or other details.
RTSP URL – A URL that specifies the camera’s IP address and the path to the stream. For example, rtsp://192.168.4.18/1/h264major.
Credentials – If the camera stream is password protected, specify the user name and password.
Choose Save.
AWS Panorama stores your camera’s credentials securely in Secrets Manager. Multiple applications can process the same camera stream simultaneously.
Deploy the shelf monitoring application
You’re now ready to deploy the shelf monitoring application to your AWS Panorama Appliance. You need a command line terminal or shell to run commands. You also need the following prerequisites:
Docker
The AWS Panorama CLI
The latest version of the AWS Command Line Interface (AWS CLI)
Docker is required for building a Docker image to run on the appliance. The AWS Panorama CLI is required for building the container and uploading the application to the AWS Panorama service. The latest AWS CLI is needed to download a model file from Amazon S3 and package the application for the AWS Panorama service account.
Follow the next steps to create an IAM User for the AWS Panorama CLI.
Open the AWS IAM Console and click on Users.
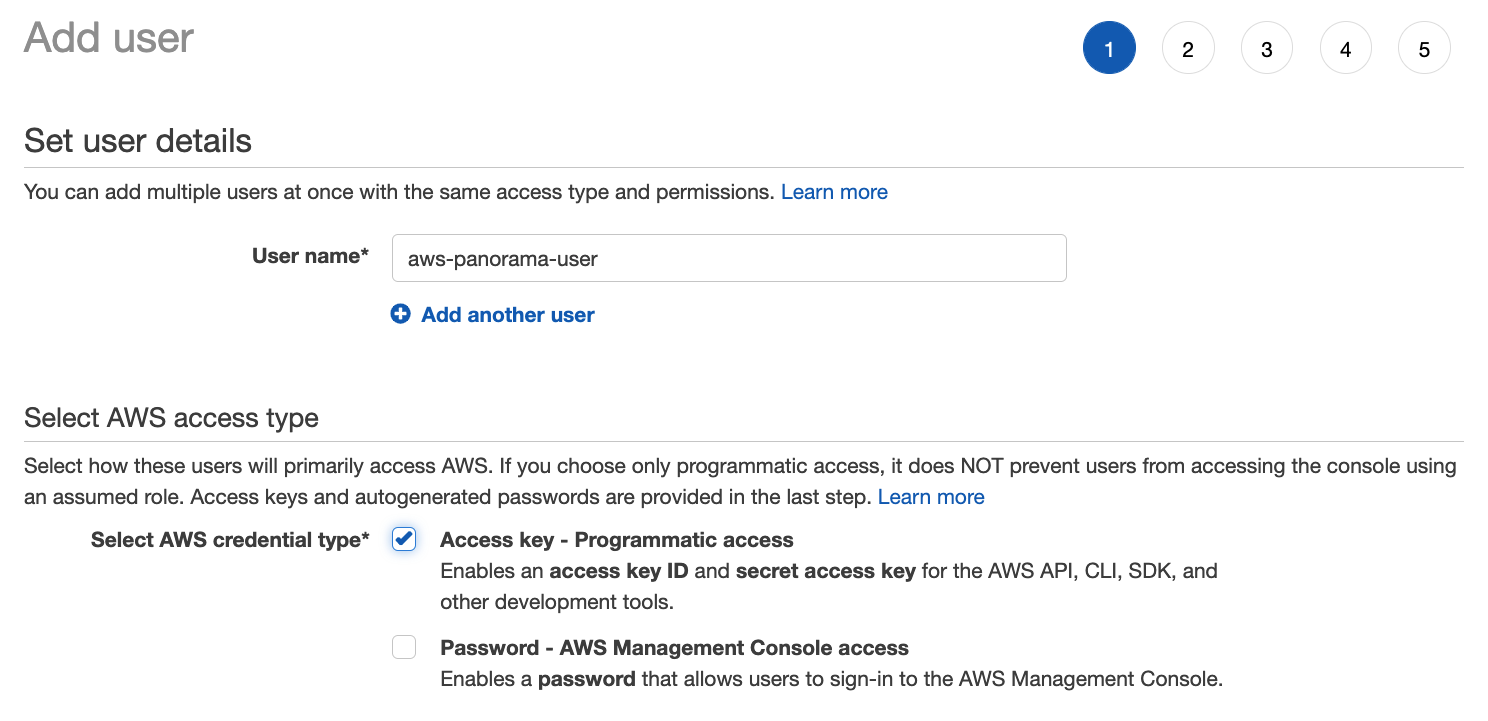
Click on Add users and provide a User name
Select the Access key – Programmatic access from the AWS access type option, as shown below
Click Next: Permissions and then click Attach existing policies directly.
Type AWSPanoramaFullAccess in the search bar and select the check box.
Click Next: Review and Create user on the following pages.
Once the AWS IAM User is created, make note of the Access key ID and Secret access key. They will be used during the AWS CLI configuration setup.
Follow these steps to package the application and upload to the AWS Panorama service account:
Open the terminal (for macOS) or command prompt (for Windows)
Configure the AWS CLI with the access key ID and secret access key that you created earlier
Follow these steps to package the application and upload it to the AWS Panorama service account:
Download the shelf monitoring application (Smart_Shelf.zip).
Unzip the downloaded file.
Open the terminal (for macOS) or command prompt (for Windows) and navigate to the directory where the unzipped folder is present (cd Smart_Shelf).
Run the following commands to build the AWS Panorama application:
Follow these next steps to upload and deploy the application to your AWS Panorama Appliance.
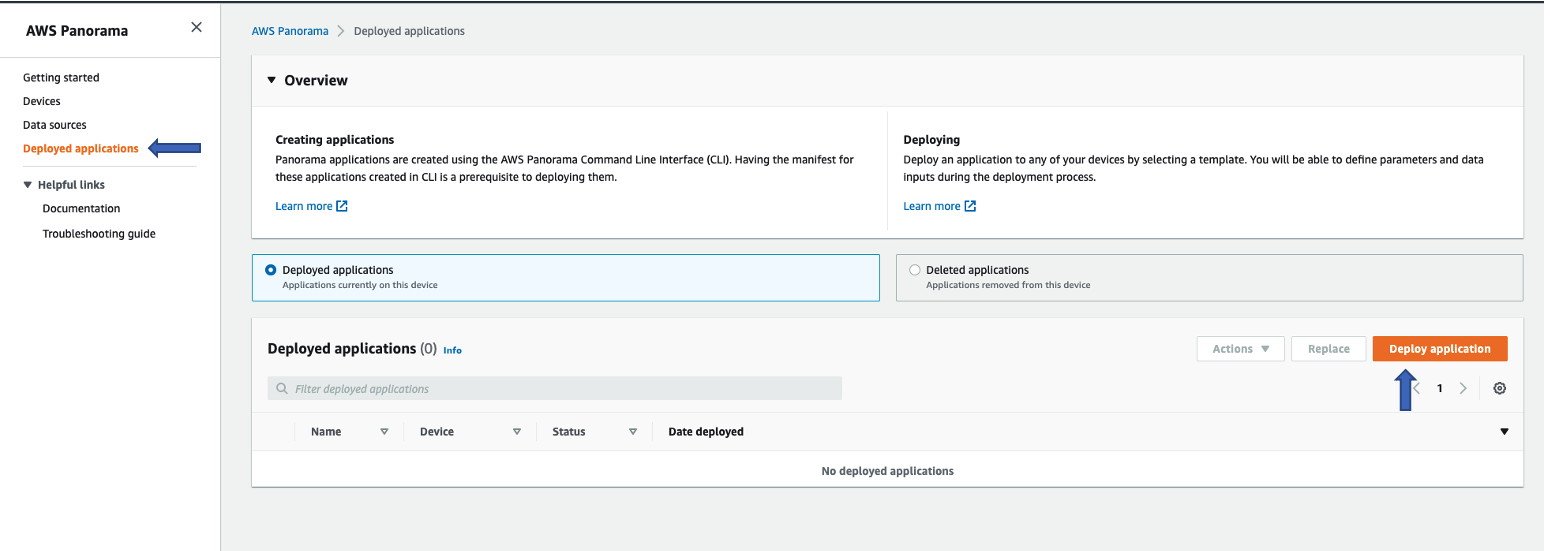
On the AWS Panorama console, choose Deployed applications in the navigation pane.
Choose Deploy application.
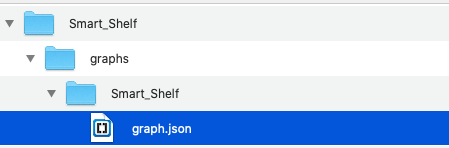
Open the graph.json file from the file folder path illustrated in the following screenshot and copy the contents.
Enter the contents of the graph.json file on the Application template page.
Choose Next.
Provide an application name and deployment description (optional).
Choose Begin deployment.
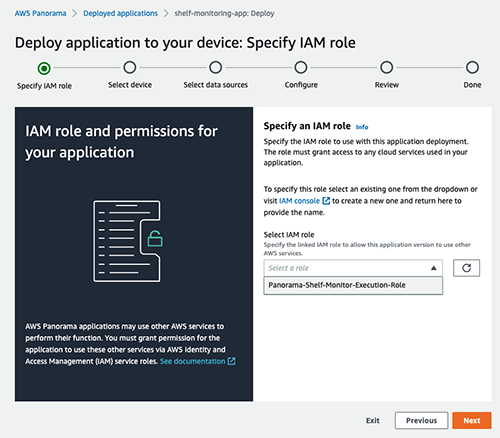
For Select IAM role¸ choose Panorama-Shelf-Monitor-Execution-Role.
Choose Next.
Choose Select device, and then choose your appliance.
Choose Next.
On the Select data sources page, choose View input(s), and add your camera stream as a data source.
Choose Next.
On the Configure application page, replace the default values in S3 Bucket and SQS URL with the values that you copied after CloudFormation stack deployment.
Choose Save.
Choose Next on the next screen and then choose Deploy.
Choose Done.
This process can take up to 15 minutes. When the deployment is complete, the application starts processing the video stream and sending logs to Amazon CloudWatch.
Test the end-to-end solution
At this point, you have an end-to-end application deployed to monitor bottle counts on a shelf. For the purposes of this demonstration, ensure that your IP camera is capturing video of one or more bottles on a surface without any other objects. You may choose to adjust your IP camera’s video frames per second (FPS) setting to less than 10 FPS. Refer to your camera manufacture’s manual to adjust the FPS.
Follow the next steps to see how the entire application works together:
Place three bottles on the surface the IP camera is recording.
In the shelf monitoring UI in your browser, choose the threshold drop-down and set the threshold to 1.
Remove one bottle.
The updating image on the left side displays the current count of bottles and the detected bottles. You shouldn’t receive any notifications at this point.
Remove one more bottle.
You should receive an OOS notification because the bottle count reached the threshold you set.
Remove the last bottle.
You should receive another notification that the count has changed again.
Clean up
When you’re done working with your application, you can use the AWS Panorama console to remove it from the appliance. You also need to remove the resources deployed by the CloudFormation template. Complete the following cleanup steps:
Open the AWS Panorama console Deployed applications page.
Choose your application.
Choose Delete from device.
Empty the S3 buckets used in the demo.
On the AWS CloudFormation console, and delete the CloudFormation stacks you deployed.
For best results, remove the stack with amplify-smartshelf-main in the name, and then remove the Shelf-Monitoring stack created in the first step of the post.
Conclusion
In this post, you learned how to build a shelf monitoring solution using AWS Panorama. You can extend this solution for other physical retail use cases such as the following:
Queue management – Count the number of people waiting in a queue for better staff allocation
Heat maps – Create color-coded images that show the popularity of different areas inside the store
PPE detection – Run computer vision on the edge and identify if your employees are complying with personal protective equipment requirements.
You can also integrate other AWS services such as AWS IoT, AWS Data Lake House services, and Amazon QuickSight to collect, store, and analyze the detected objects; image classification; and other computer vision detections from your AWS Panorama applications.
We will continue to share more examples with you so you can build, develop, and test with the AWS Panorama Appliance SDK.
To get started with AWS Panorama, check out the following resources:
Visit the AWS Panorama service page to learn more
Watch the following recorded Twitch session
Contact an AWS Partner who can help you build, deploy, and scale AWS Panorama in your environment
Find other AWS Panorama examples in our GitHub repository
Find all the source code for the shelf monitoring system in the following GitHub repository
About the Authors
Amit Mukherjee is a Global Solutions Architect Lead with a focus on data analytics and AI/ML. He works with AWS Partners and customers to provide them with architectural guidance for building highly secure and scalable data analytics platforms and adopting machine learning at a large scale.
Laith Al-Saadoon is a Principal Prototyping Architect on the Envision Engineering team. He builds prototypes and solutions using AI, machine learning, IoT/edge computing, streaming analytics, robotics, and spatial computing to solve real-world customer problems. In his free time, Laith enjoys outdoor activities such as photography, drone flights, hiking, and paintballing.
Sourabh Agnihotri is a Solutions Architect with AWS. He works with AWS customers to provide them architectural guidance and help them build on AWS using a broad range of AWS Services. He is also an ML/AI enthusiast and follows the latest trends in ML/AI.
Read MoreAWS Machine Learning Blog