

Amazon Relational Database Service (Amazon RDS) for SQL Server makes it simple to set up and operate SQL Server deployments in the cloud by managing time-consuming database administration tasks, including provisioning, backups, software patching, monitoring, and hardware scaling. Customers running their Microsoft SQL Server workloads on Amazon RDS for SQL Server ask us how they can perform a point-in-time recovery (PITR) at the individual database level.
Today, you can achieve database-level PITR by restoring the Amazon RDS for SQL Server snapshot as a new DB instance and then copying the required database from the newly restored instance to the target DB instance using SQL Server native backup and restore. However, this process requires additional time to perform manual steps, and you still need to pay for the compute, storage, and license costs for the newly restored instance on AWS. To overcome this challenge, Amazon RDS for SQL Server introduced access to transaction log backups. Amazon RDS for SQL Server takes periodic transaction log backups in an AWS managed Amazon Simple Storage Service (Amazon S3) bucket. Now you can access these transaction log backup files and copy them to an S3 bucket in your own account.
In this post, we examine a use case in which you achieve database-level point-in-time recovery (PITR) on Amazon RDS for SQL Server using the transaction log backups feature.
Overview of transaction log and backups
Every SQL Server database has a transaction log that records transactions and the database modifications that are made by each transaction. The transaction log is a critical component of the database and if there is a system failure, the transaction log might be required to bring your database back to a consistent state. Before you can create the first log backup, you will need to create a full backup. To restore a database to a point in time, you first restore the full backup, followed by the subsequent transaction log backups up to that point. Thereafter, backing up the transaction log regularly is necessary.
Solution overview
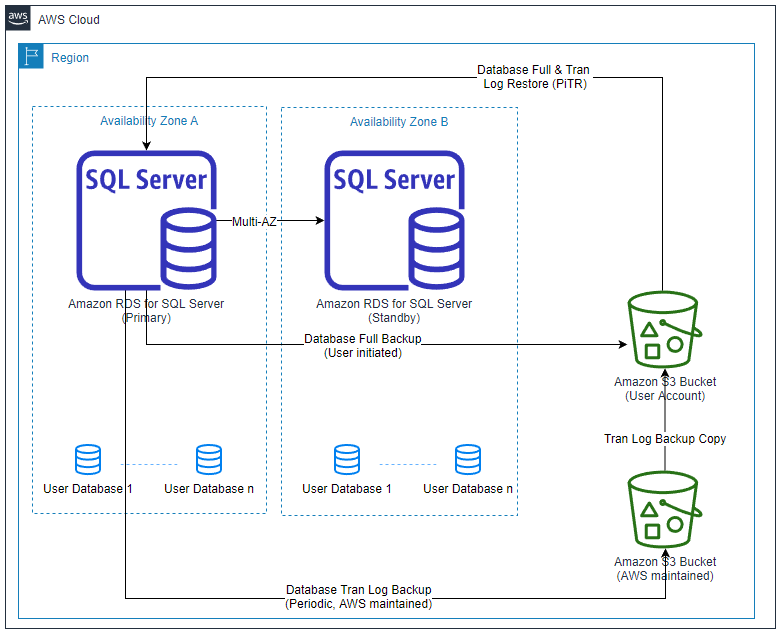
For our use case, we take a scenario in which our Amazon RDS for SQL Server is configured in high availability mode using Multi-AZ and AWS Key Management Service (AWS KMS) for data at rest encryption. In our example, we simulate a scenario where one of your team members has accidentally dropped a table from your production instance. Your goal is to perform a PITR for that specific database and then restore the table. The sequence of events is as follows:
A database full backup occurred at 5:30 PM
The table is dropped at 6:00 PM
PITR is performed and stopped at 5:59 PM to restore the dropped table
This solution involves the creation and utilization of new AWS resources. Therefore, it will incur costs on your account. Refer to AWS Pricing for more information. We strongly recommend that you set this up in a non-production instance and run the end-to-end validations before you implement this solution in a production environment.
The following diagram illustrates our solution architecture.
To implement the solution, complete the following high-level steps:
Create an S3 bucket and add a bucket policy.
Create a KMS key.
Create an AWS Identify and Access Management (IAM) policy and role, and add permissions.
Create an option group and add a native backup and restore option.
Create an Amazon RDS for SQL Server instance.
Enable transaction log backup copy.
Create sample databases.
Perform a full database backup.
Check the transaction log backup metadata.
Copy the transaction log backup files to the target S3 bucket.
Perform database-level PITR.
Restore dropped table using the PITR database.
Prerequisites
To test this solution, you will need the following prerequisites:
An AWS account
An understanding of SQL Server transaction log backups
Latest version of the AWS Command Line Interface (AWS CLI) installed and configured
SQL Server Management Studio (SSMS) installed on Amazon Elastic Compute Cloud (Amazon EC2)
Access to the Amazon RDS for SQL Server instance from the Amazon EC2 instance
Create an S3 bucket and add a bucket policy
Create an S3 bucket in the same Region where you intend to create the Amazon RDS for SQL Server instance. We use the same S3 bucket to place the full backup and copy the transaction log backup files. For this post, we use the bucket rds-sql-server-pitr-bucket and Amazon RDS for SQL Server instance rds-sql-server-pitr-instance in the us-west-2 Region.
As you create the S3 bucket, make sure Object-Ownership is set to BucketOwnerPreferred. Use the following AWS CLI command to create your bucket. You can replace the parameters according to your environment.
After the bucket is created, replace the account ID in the following AWS CLI command and add a bucket policy:
Create a KMS key
After you create the S3 bucket and add the bucket policy, the next step is to create a customer-managed symmetric key. When you create the key, make sure you select the same Region where the S3 bucket is. Take a note of the key ARN from the output because we use it to add an alias rds-sql-server-pitr-kms-key for this key. See the following code:
Create an IAM policy and role, and add permissions
As a next step, use the following AWS CLI command to create an IAM policy and note the policy ARN in the output. We use the policy ARN to attach to a role in next step. In the following example, we use rds-sql-server-pitr-policy as the policy name:
Now create an IAM role and attach the policy to the role. In the following example, we use rds-sql-server-pitr-role as the role name:
Create an option group and add a native backup and restore option
Use the following AWS CLI command to create an option group. In the following example, we use pitr-opt-grp as the option group name and SQL Server version 15.00. You can replace the parameters according to your environment.
Use the following AWS CLI command to add the native backup and restore option to the option group you created. Replace the parameters and the IAM role ARN according to your environment.
Create an Amazon RDS for SQL Server instance
Use the following AWS CLI command to create an RDS instance that acts as both the source and the target of the PITR. The option group you created earlier is attached to the instance. In our example, we use Multi-AZ for high availability, the default profile, and AWS KMS for data-at-rest encryption. Based on your database level native full backup schedule, you will need to set the backup-retention-period parameter to a minimum of one day for database level PITR to work. For this post, we use backup-retention-period 7 while creating the RDS instance.
Enable transaction log backup copy
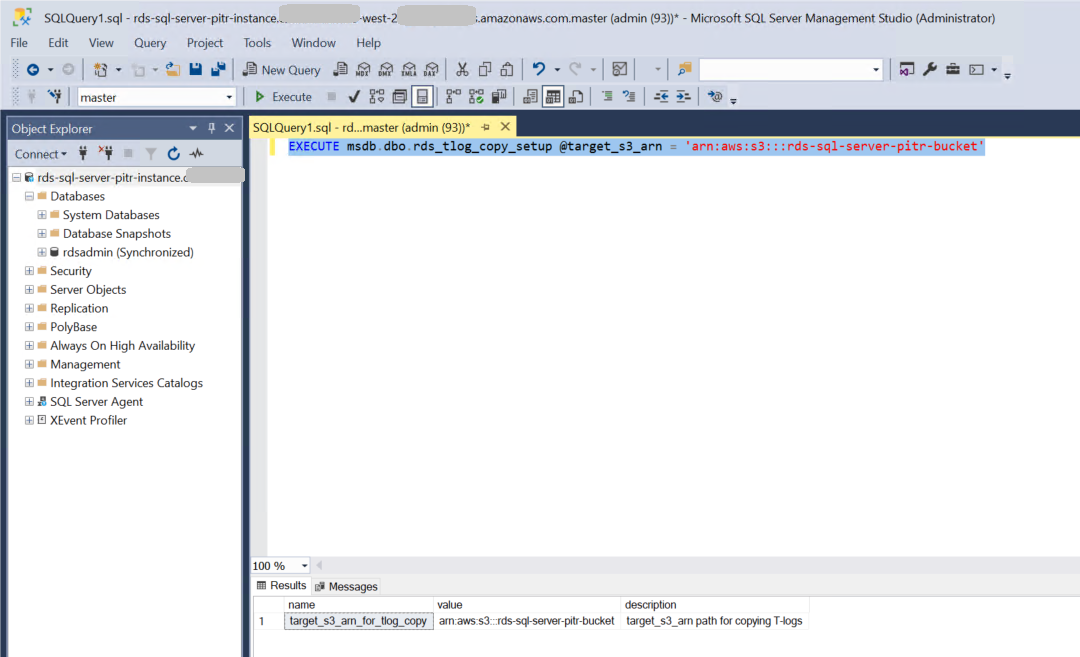
To be able to copy the transaction log backups from the AWS managed S3 bucket to your bucket, you will need to enable transaction log backup copy for your Amazon RDS for SQL Server instance. Run the following SQL command against your Amazon RDS for SQL Server instance using SSMS from the Amazon EC2 host. You will need to pass the S3 bucket ARN to the Amazon RDS procedure rds_tlog_copy_setup as input.
To verify the Amazon RDS for SQL Server instance is configured with transaction log backup copy set up, run the following SQL command:
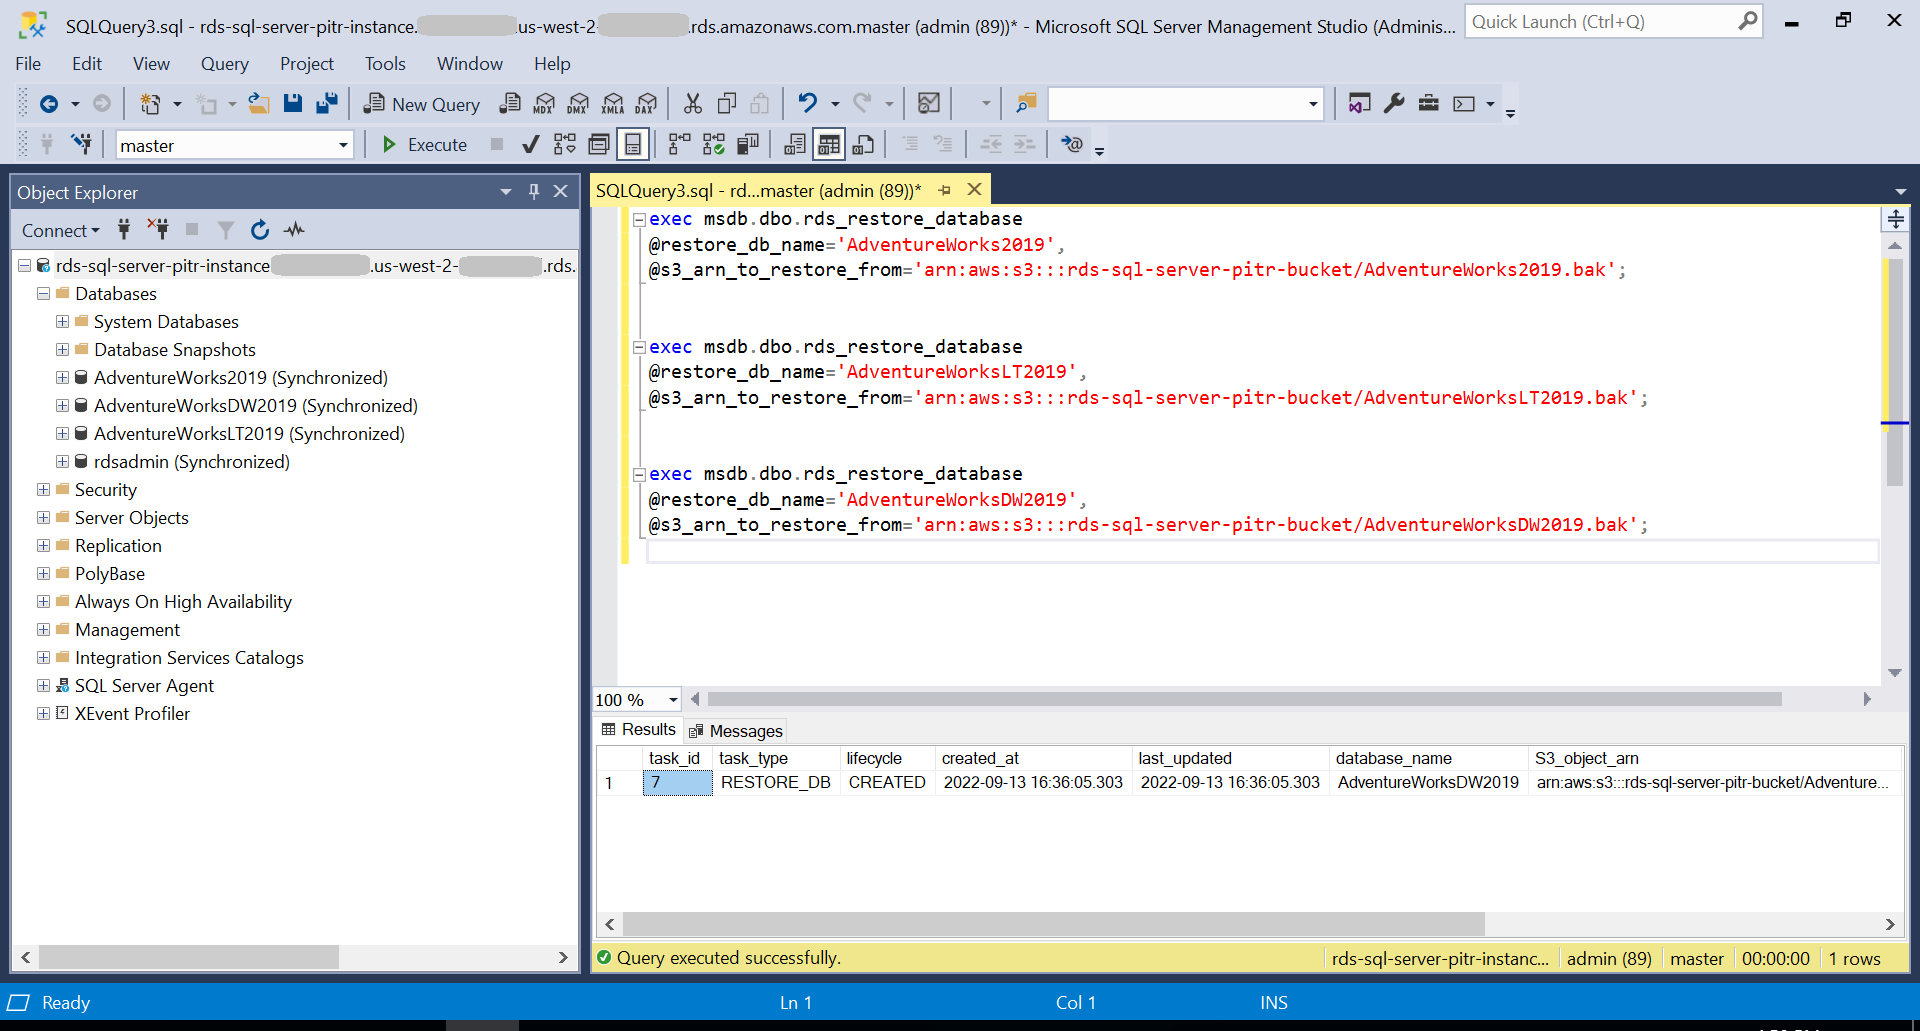
Create sample databases
For our use case, we use the Microsoft SQL Server AdventureWorks sample databases to perform PITR. Download AdventureWorks.zip file and extract AdventureWorks2019.bak, AdventureWorksLT2019.bak, AdventureWorksDW2019.bak files. Upload these three backup files to the S3 bucket rds-sql-server-pitr-bucket. Use the following script to restore the databases by connecting to the rds-sql-server-pitr-instance RDS instance using SSMS. This creates the AdventureWorks2019, AdventureWorksLT2019, and AdventureWorksDW2019 databases.
Perform full database backup
We use the following SQL command to take the full backup of the AdventureWorks2019 sample database. In our example, we don’t use the KMS key while taking the full backup. If you decide to use the key during your full backup, make sure to use the key while you perform the database restore in the PITR process.
Check the status of the full backup using the following SQL command to verify the status of the task is successful:
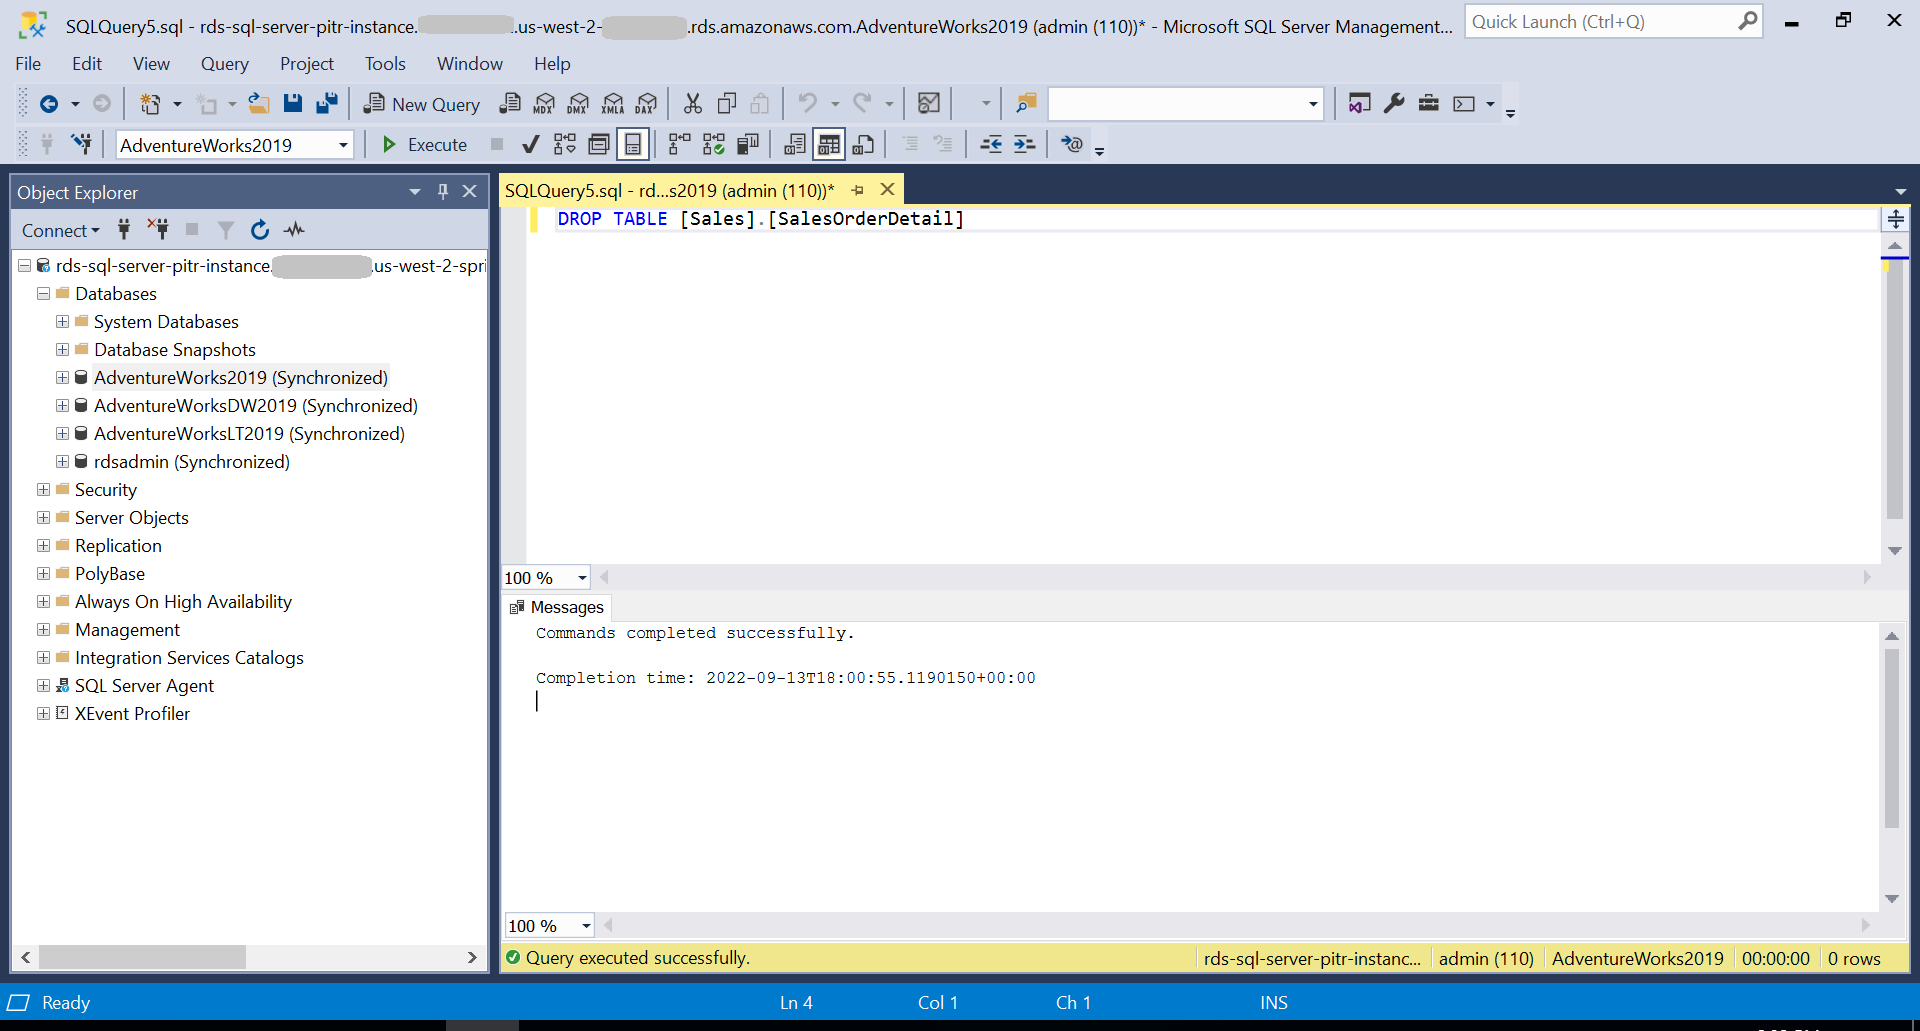
Now at 6:00 PM, the table is dropped using the following command:
Check the transaction log backup metadata
Before we start the PITR, we need to know if we have all the transaction log backup files available to restore. Run the following command to find out the transaction log backup files taken by the Amazon RDS engine. Make sure is_log_chain_broken is 0 for the set of transaction log backup files that we need to copy to perform the database-level PITR.
The rds_fn_list_tlog_backup_metadata function returns the following columns:
Column
Data type
Description
db_name
sysname
The database name for which transaction log backups has to be listed
db_id
int
database identifier for the input parameter db_name
family_guid
uniqueidentifier
Unique ID of the original database at creation. This value remains the same when the database is restored, even to a different name
rds_backup_seq_id
int
This field is what RDS uses internally to maintain a sequence number for each transaction log backup file
backup_file_epoch
bigint
Transactional backup file time in epoch format
backup_file_time_utc
datetime
UTC time conversion value for column backup_file_epoch
starting_lsn
numeric(25,0)
Log sequence number of the first or oldest log record for the given transaction log backup file
ending_lsn
numeric(25,0)
Log sequence number of the last or next log record for the given transaction log backup file
is_log_chain_broken
bit
boolean value indicating whether the log chain is broken between the current transaction log backup file and the previous transaction log backup file
file_size_bytes
bigint
Size of the transactional backup set, in bytes
Error
varchar(4000)
This Column will display error messages when rds_fn_list_tlog_backup_metadata hits an exception. This value remains NULL if no other exceptions
Copy the transaction log backup files to the S3 bucket
You can copy the transactional log backup files to the S3 bucket using the rds_tlog_backup_copy_to_S3 procedure based on any of the following sets. Only one set of parameters can be specified while running the procedure.
Set 1: backup_file_start_time and backup_file_end_time – This is in datetime format, and is used in relation to file_epoch of the transaction log backup file time
Set 2: starting_lsn and ending_lsn – This is used in relation to the starting_lsn and ending_lsn of the transaction log backup file
Set 3: rds_backup_starting_seq_id and rds_backup_ending_seq_id – This field is what Amazon RDS uses to maintain a sequence number for each transaction log file.
The following table lists the input parameters for the rds_tlog_backup_copy_to_S3 procedure.
Input parameter
Description
@db_name
The database name for which transaction log backup copy has to be done.
@backup_file_start_time
The UTC timestamp as provided from the backup_file_time_utc column of the rds_fn_list_tlog_backup_metadata function.
@backup_file_end_time
The UTC timestamp as provided from the backup_file_time_utc column of the rds_fn_list_tlog_backup_metadata function.
@starting_lsn
The log sequence number (LSN) as provided from the starting_lsn column of the rds_fn_list_tlog_backup_metadata function.
@ending_lsn
The LSN as provided from the ending_lsn column of the rds_fn_list_tlog_backup_metadata function.
@rds_backup_starting_seq_id
The sequence ID as provided from the rds_backup_seq_id column of the rds_fn_list_tlog_backup_metadata function.
@rds_backup_ending_seq_id
The sequence ID as provided from the rds_backup_seq_id column of the rds_fn_list_tlog_backup_metadata function.
@kms_key_arn
The ARN of the KMS key used to encrypt a storage-encrypted DB instance. Do not include this parameter when using an unencrypted DB instance.
For our use case, we use Set 1, where @backup_file_start_time is set as 5:30 PM and @backup_file_end_time is 6:10 PM:
To check the status of the transaction log backup copy task, run the following command:
The rds_tlog_backup_copy_to_S3 procedure creates a folder inside the S3 bucket and starts copying the transaction log backup files. Amazon RDS uses the following naming standards for the folder and files:
Folder – {db_id}.{family_guid}
Files – {db_id}.{family_guid}.{rds_backup_seq_id}.{backup_file_epoch}
You can get the details of db_id, family_guid, rds_backup_seq_id and backup_file_epoch by running the function rds_fn_list_tlog_backup_metadata.
Perform database-level PITR
To perform database-level PITR, we need to restore the database full backup and subsequent transaction log backup files with NORECOVERY. We need to confirm the RDS instance has enough storage capacity to restore a copy of the impacted database. Transaction log restore isn’t supported on an Amazon RDS for SQL Server Multi-AZ instance. To continue this in your production Multi-AZ environment, remove the Multi-AZ setup using the following AWS CLI command for the duration of the PITR. After the database is recovered, you will need to add the Multi-AZ back to establish high-availability.
We now restore the full backup with NO RECOVERY using the following script:
After the full backup is restored, we use the following script to generate the Amazon S3 ARN and restore the transaction log backup files taken between the full backup and the table drop event, which in our case is 6:00 PM. If you used a KMS key to encrypt the storage while creating the Amazon RDS for SQL Server instance, you will need to use the key ARN while restoring the transaction log backups.
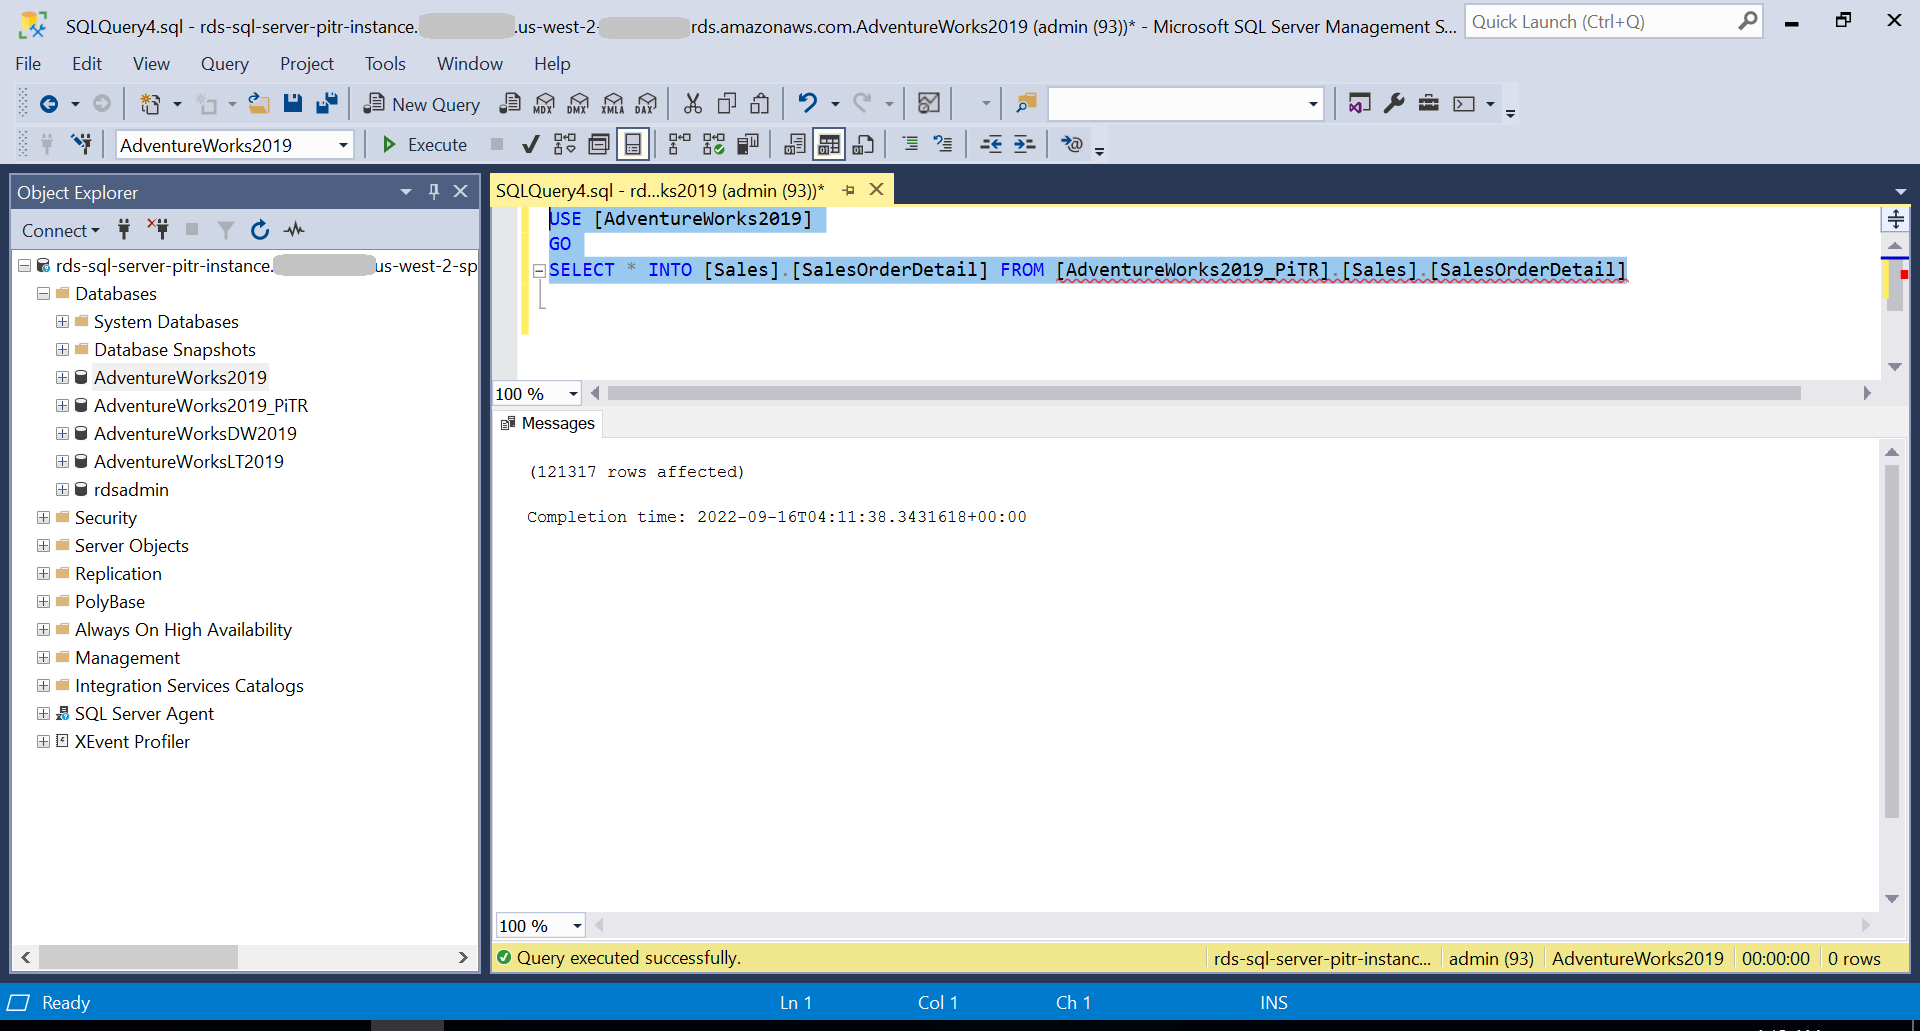
Restore dropped table using the PITR database
There are several ways to restore the dropped table in the original database from the newly performed PITR database. For this post, we use the following script to restore the table and later add the indexes or other table-level objects like indexes, triggers, or constraints from the source code or from the PITR database:
After you confirm that the restore of a specific database or object was successful and the PITR database is no longer needed, you can drop the AdventureWorks2019_PiTR database.
Now you can add the Multi-AZ option back for your Amazon RDS for SQL Server instance using the following AWS CLI command:
Clean up
To avoid future charges and remove the components created while testing this use case, complete the following steps:
On the Amazon RDS console, select the databases you set up, and on the Actions menu, choose Delete.
On the Amazon EC2 console, select the Amazon EC2 instance that you used to connect to the RDS instance and on the Actions menu, choose Terminate.
On the Amazon S3 console, locate the bucket you created earlier, then empty the bucket and delete the bucket.
On the IAM console, delete the policies and roles you created.
On the AWS KMS console, delete the keys you created.
Summary
In this post, we demonstrated how you can use Amazon RDS for SQL Server transaction log backup files to perform database-level PITR. Try out Amazon RDS for SQL Server and use the transaction log backups feature to perform database-level PITR to support your business needs.
If you have any comments or feedback, please leave them in the comments section.
About the authors
Rajib Sadhu is Senior Database Specialist Solutions Architect with over 15 years of experience in Microsoft SQL Server and other database technologies. He helps customers architect and migrate their database solutions to AWS. Prior to joining AWS, he supported production and mission-critical database implementation across financial and travel and hospitality industry segments.
Srikanth Katakam is a Senior Database Engineer at Amazon Web Services. He works on the Amazon RDS team, focusing on commercial database engines, Amazon RDS Custom, and SQL Server. He enjoys working on technical challenges in Amazon RDS and is passionate about learning from and sharing knowledge with his teammates and AWS customers.
Read MoreAWS Database Blog