

Amazon Neptune is a fast, reliable, fully managed graph database service that makes it easy to build and run applications that work with highly connected datasets. Whether you’re creating a new graph data model and queries, or exploring an existing graph dataset, it can be useful to have an interactive query environment that allows you to visualize the results.
One of the ways to achieve this is to use Jupyter notebooks. In this post, we show you how to host a Jupyter notebook and use it to load data into your Amazon Neptune database, query it, and visualize the results. You can refer to Analyze Amazon Neptune Graphs using Amazon SageMaker Jupyter Notebooks for steps to use an Amazon SageMaker hosted Jupyter notebook. If you want to deploy Jupyter notebooks locally in your on-premises or any other source environment, you can use the steps mentioned in this post to do so. This option also gives flexibility if you want to customize your notebook and its configurations as per your business needs.
Solution overview
In this walkthrough, we use Docker containers to deploy a self-hosted Jupyter notebook. You can deploy the notebook using Amazon Elastic Container Service (Amazon ECS) as described in this post, or you can deploy the notebook using Amazon Elastic Kubernetes Service (Amazon EKS) or any other host like an Amazon Elastic Compute Cloud (Amazon EC2) instance or on-premises server using similar steps.
You can only create a Neptune DB cluster in Amazon Virtual Private Cloud (Amazon VPC). Its endpoints are only accessible within that VPC. Therefore, if you’re deploying this Jupyter notebook outside the VPC of your Neptune cluster, you also need to establish connectivity via SSH tunneling or a proxy (like Application Load Balancer, Network Load Balancer or Amazon API Gateway), which is out of scope of this post.
Before we begin with the walkthrough, let’s understand the environment variables that we’re using:
GRAPH_NOTEBOOK_AUTH_MODE – This variable indicates the authentication mode. Possible values include DEFAULT and IAM. For this post, we use DEFAULT.
GRAPH_NOTEBOOK_HOST – This variable is the cluster endpoint of your Neptune cluster.
GRAPH_NOTEBOOK_PORT – This variable is the port of your Neptune cluster. For our post, we use 8182.
NEPTUNE_LOAD_FROM_S3_ROLE_ARN – This variable is needed if we plan to load data from Amazon Simple Storage Service (Amazon S3) into our Neptune cluster. For more information, refer to Prerequisites: IAM Role and Amazon S3 Access. For our post, we leave it blank.
AWS_REGION – This variable indicates the Region where our Neptune cluster resides. For our post, we use us-east-1.
NOTEBOOK_PORT – This variable indicates the notebook’s port that we use while accessing the hosted Jupyter notebook. For our post, we use 8888.
LAB_PORT – This variable indicates the port of JupyterLab. For our post, we leave it blank.
GRAPH_NOTEBOOK_SSL – This variable indicates if we should use SSL for communicating with Neptune. Neptune now enforces SSL connections to your database. You have the option to disable SSL in Regions, such as US East (N. Virginia) or Europe (London), where both SSL and non-SSL connections are supported.
NOTEBOOK_PASSWORD – This variable indicates the password that we use to access the hosted Jupyter notebook. If you’re hosting the notebook on an EC2 instance, if you leave this variable, the image assumes the default value (the EC2 instance ID).
Self-managed deployment
The container image is available on GitHub. This container image utilizes an Amazon Linux container image as the base image with Anaconda package, Node.js, Conda, and Jupyter Notebooks. This also includes Jupyter notebook libraries for integration with Apache TinkerPop and RDF SPARQL. Depending on the configurations provided, a Jupyter notebook environment is automatically created.
Build and deploy this image with the following code:
Browse to the URL of your machine (http://<Public IP>:< NOTEBOOK_PORT>).
Log in using the password provided for variable NOTEBOOK_PASSWORD.
In the Jupyter window, open the Neptune directory, and then the Getting-Started directory.
Now you can load data into the database, query it, and visualize the results using this Jupyter notebook.
Host a Jupyter notebook using Amazon ECS
Amazon ECS is a fully managed container orchestration service. The following are the steps to host a Jupyter notebook using Amazon ECS:
Push your Docker image to Amazon Elastic Container Registry (Amazon ECR).
Create a task definition.
Create an ECS cluster.
Create a service definition.
Browse the notebook.
Push a Docker image to Amazon ECR
To push a Docker image, we first create an Amazon ECR repository. Complete the following steps:
On the Amazon ECR console, choose the Region to create your repository in.
On the Repositories page, choose Create repository.
For Repository name, enter a unique name for your repository. For this walkthrough, we name it graph_notebook.
For this walkthrough, we leave the other options at their default.
For details on the other options, refer to Creating a private repository.
Download the repository provided on GitHub.
Complete creating your repository.
Select your repository and choose View push commands.
Choose your current OS to see the OS-specific commands.
Inside the downloaded directory, run the preceding commands to build and push the Docker image to Amazon ECR.
Create a task definition
To create a task definition, complete the following steps:
On the Amazon ECS console, in the navigation pane, choose Task definitions.
Choose Create new task definition.
For Launch type, select a launch type compatibility. For this walkthrough, we select Fargate.
Add your task definition name. For this walkthrough, we use graph_notebook_task_definition.
For Task role, choose ecsTaskExecutionRole.
If the role isn’t available, follow the steps in Amazon ECS task execution IAM role.
Set Task memory and Task CPU as per your requirements. For this walkthrough, we use 2 GB and 1 vCPU, respectively.
For this walkthrough, we leave the other options at their default.
For details on the other options, refer to Creating a task definition using the console.
In the Container Definitions section, choose Add container.
For Container name, enter a name. For this walkthrough, we use graph_notebook_container.
For Image, enter the repository URI that we created in the previous step. It’s in the format <Account_ID>.dkr.ecr.<Region>.amazonaws.com/<Repository Name>.
Under Port mappings, enter 8888, 8889, and 8182.
In the ENVIRONMENT section, enter the key-value pairs under Environment variables as described in the beginning of this post.
You may choose to enter the password for NOTEBOOK_PASSWORD. However, we recommend using AWS Secrets Manager to store sensitive data. In this walkthrough, we use Secrets Manager to store our NOTEBOOK_PASSWORD value. For instructions, visit How can I pass secrets or sensitive information securely to containers in an Amazon ECS task?
Choose Add to add the container definition.
Choose Create to create the task definition.
Create an ECS cluster
To create your ECS cluster, complete the following steps:
On the Amazon ECS console, from the navigation bar, choose the Region to use.
In the navigation pane, choose Clusters.
Choose Create Cluster.
For Select cluster compatibility, choose the required value. For this walkthrough, we use Networking only.
Enter your suitable cluster name. For this walkthrough, we use graph-notebook-cluster.
Deselect Create VPC because we don’t need to create a new VPC.
For more information on other options, refer to Creating a cluster using the classic console.
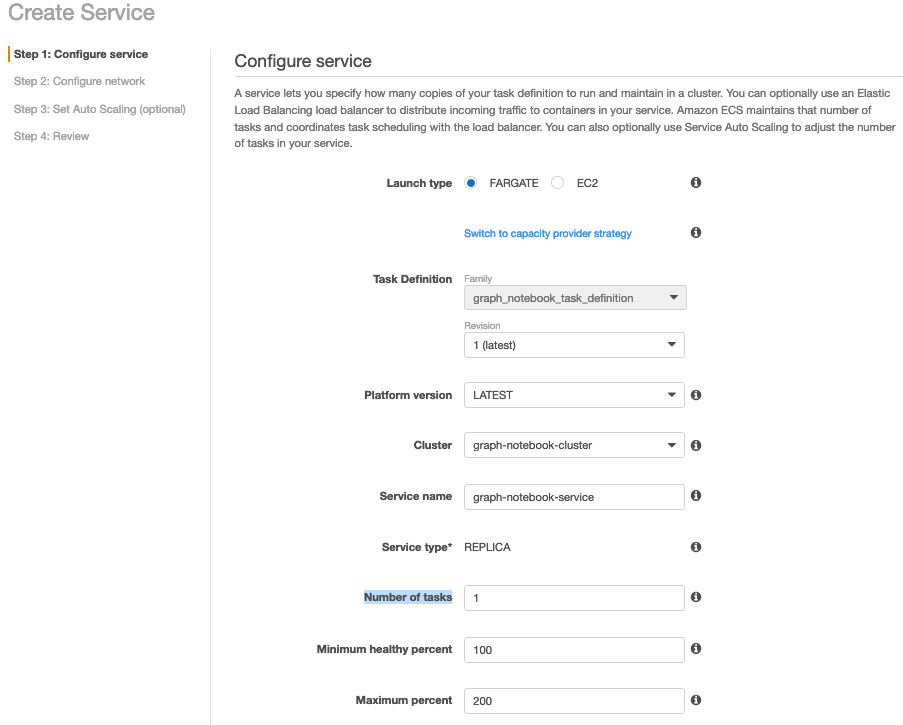
Create a service definition
To create a service definition, complete the following steps:
On the Amazon ECS console, choose the Region that your cluster is in.
In the navigation pane, choose Task Definitions and select the task definition from which to create your service. For this walkthrough, we use graph_notebook_task_definition.
On the Actions menu, choose Create Service.
For Launch type, select your required launch type. For this walkthrough, we select Fargate.
Choose the cluster we created in the previous step (graph-notebook-cluster).
Enter a suitable service name. For this walkthrough, we use graph-notebook-service.
Enter suitable value for Number of tasks. For this walkthrough, we use one task.
Leave the other values to default.
You may wish to change the other options depending on your requirements. For more information, refer to Creating an Amazon ECS service.
Choose Next Step.
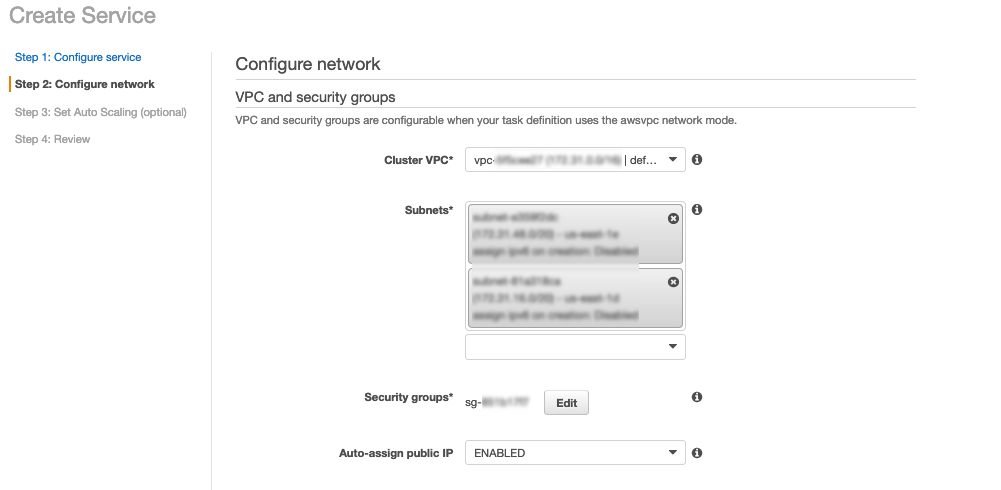
Enter the cluster VPC as the VPC of your Neptune cluster.
Select suitable subnets as needed.
Make sure that the security group has the required rules to allow communication over NOTEBOOK_PORT.
We leave the other values at their default.
You may wish to change these options depending on your requirements. For more information, refer to Creating an Amazon ECS service.
Choose Next Step.
Leave the other values at their default and choose Next Step again.
Review the settings and choose Create Service.
Browse the notebook
To browse your notebook, complete the following steps:
On the Amazon ECS console, from the navigation bar, choose the Region to use.
In the navigation pane, choose Clusters.
Choose the cluster created in the previous step (graph-notebook-cluster).
Choose the service created in the previous step (graph-notebook-service).
Choose Tasks and choose the task created.
Copy the public IP on the Details page.
Browse to the URL http://<Public IP>:< NOTEBOOK_PORT> (for this post, http://54.227.224.60:8888).
Log in using the password provided for the variable NOTEBOOK_PASSWORD.
In the Jupyter window, open the Neptune directory, then the Getting-Started directory.
Now you can load data into the database, query it, and visualize the results using this Jupyter notebook.
Conclusion
In this post, we showed you how to host a Jupyter notebook and use it to load data into the database, query it, and visualize the results. We walked you through the steps to use a self-managed deployment and host a Jupyter notebook using Amazon ECS.
To learn more about Amazon Neptune, refer to What Is Amazon Neptune. If you are curious to integrate ML with your graphs, check out Amazon Neptune ML
About the Authors
Ganesh Sawhney is a Partner Success Solutions Architect supporting India Startups & Digital Native Businesses with their AWS journey through APN partners. He identifies trends/gaps in the industry, and builds/executes India partner technical strategy. He has expertise in architecting web/mobile applications, managing tech teams and designing enterprise solutions cutting across containers, migrations, analytics, machine learning, security, storage, serverless, IOT & emerging technologies on AWS cloud. Being an AWS Database Subject Matter Expert, he supports AWS customers with their database and data warehouse adoption/migrations/optimizations.
Zhang Qiang is a Solution Architect at AWS GCR Public Sector. With experience in bioinformatics development, he currently serves life sciences and healthcare industry customers with solutions involving medical imaging, genomics, and drug R&D. Along with this, he has experience in graph databases, and has developed 2 bioinformatics knowledge graph projects related to Orphan Disease, Microbial metabolic.
Read MoreAWS Database Blog