

Database professionals have used GUI-based tools for many years. They’re feature rich, provide snazzy functionalities such as being able to right-click and view script object definitions (for example, tables to a query window), provide graphical real-time views on what’s happening in your databases, and generally shorten the learning curve if you’re new to a particular database engine.
With Amazon Relational Database Service (Amazon RDS), the OS layer is managed and maintained by AWS, so you don’t have to worry about monitoring it, patching it, or recovering it in the event of failure. You also don’t have direct access to it or access to RDP or SSH to it from a public subnet.
Some company policies don’t allow this in any case, because this requires remote access ports to be open from a public subnet into a private or restricted subnet hosting critical infrastructure such as databases.
In this post, I show you how to use AWS Systems Manager Session Manager to securely connect to an RDS instance from your own workstation.
Architecture overview
It’s best practice to host critical infrastructure in restricted subnets. In the case of databases, this allows you to lock down your databases to only those users and applications that need access.
To allow your database administrators, engineers, and development teams to have access, it’s common to use bastion hosts. The following diagram illustrates RDP/SSH bastion access to SQL Server in a private subnet.
In this scenario, you have the required GUI toolsets installed on the bastion host and can start or stop the instance as needed.
You need multiple hosts to be shared among the teams. If these are Windows-based hosts, which is common in large organizations, you need to manage the RDP session limit of a non-terminal server, or license it accordingly.
This also means your bastion host is in a public subnet, and open on port 3389 to accept remote desktop connections.
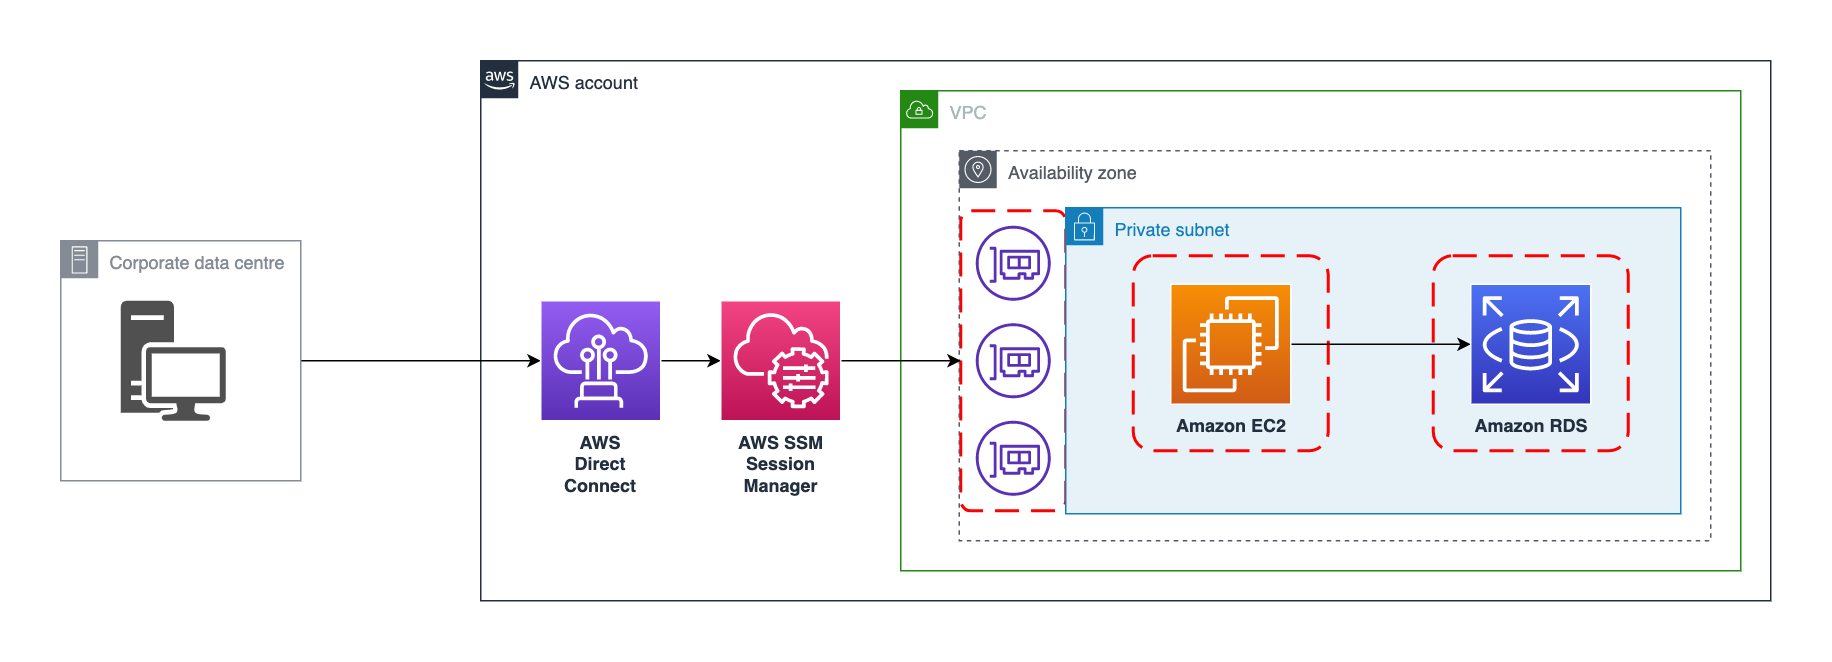
The following diagram depicts Session Manager bastion access to SQL Server in a private subnet.
With Session Manager, you can maintain the security blanket of a bastion host, but in a private subnet and without opening any ports, and connect to Amazon RDS direct from your workstation.
Another benefit with this solution is there is no requirement to manage access to SSH/PEM keys.
All access can be managed within AWS Identity Access Manager.
Prerequisites
For this post, I use a Windows laptop and Windows PowerShell as the scripting language to initiate the remote sessions. You can also use bash, for example, but the commands are a little different.
You must have the following tools and services installed locally your desktop or laptop:
The AWS Command Line Interface (AWS CLI).
Access to the AWS Management Console.
Windows PowerShell 5.1 or greater.
The Session Manager plugin installed locally on your desktop or laptop.
A GUI database toolset installed locally on your desktop or laptop. For this example, we use SQL Server Management Studio (SSMS), but you could also use pgAdmin4, for example.
You also need the following AWS components and services:
An AWS Identity and Access Management (IAM) user with programmatic access to your AWS account.
An existing VPC via Amazon Virtual Private Cloud (Amazon VPC).
An existing RDS instance and DB security group (in the blog post we use RDS for SQL Server, but the solution works for the other RDS engines as well).
Access to Amazon Elastic Compute Cloud (Amazon EC2).
Access to AWS Systems Manager.
VPC endpoints configured for the Systems Manager API calls (for more information, refer to Create a Virtual Private Cloud endpoint).
Solution overview
We create a new EC2 security group and allow this new security group access to an EC2 security group containing an RDS instance.
We then provision an EC2 instance in this new security group and create a port forwarding session from your workstation toolset via the EC2 instance to an RDS instance.
The high-level steps are as follows:
Perform initial setup:
Create a security group for our EC2 bastion host.
Create an IAM role for our EC2 bastion host.
Provision the bastion host.
Create a port forwarding session:
Create a remote port forwarding on our EC2 bastion host to forward traffic to our RDS instance.
Create a local port forwarding session on our desktop to a port on our EC2 bastion host.
Connect to our RDS instance via our locally installed copy of SSMS.
Initial setup
In this section, we walk you through the initial setup steps.
Create the security group for the EC2 instance
To create your security group, complete the following steps:
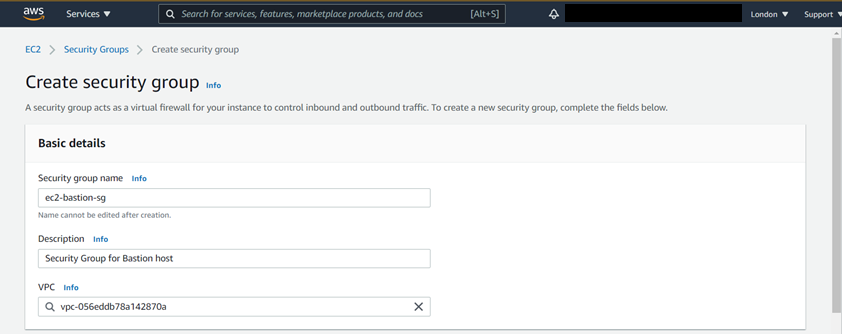
On the Amazon EC2 console, choose Security Groups.
Choose Create security group.
Create an EC2 security group.
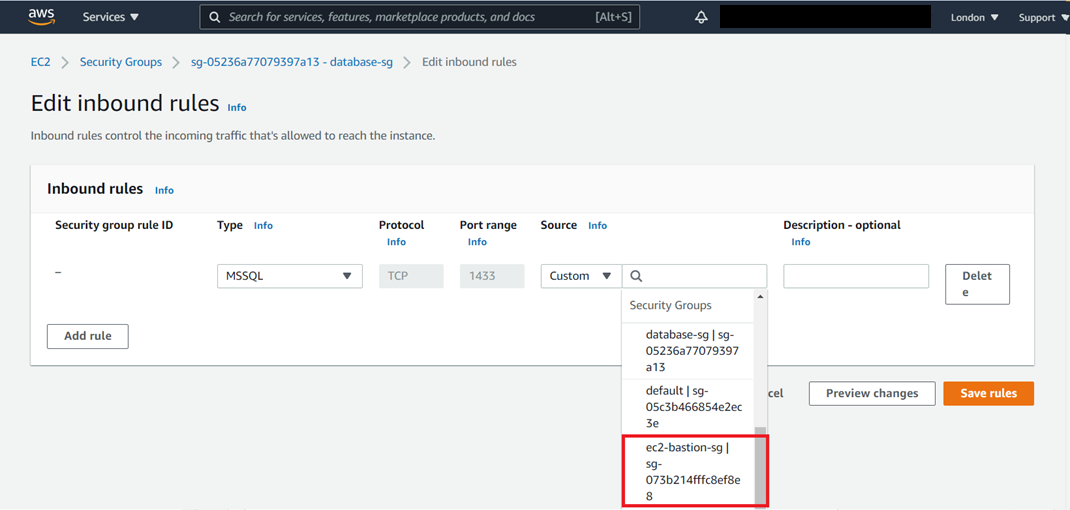
On the EC2 console, choose the existing DB security group.
In the Inbound rules section, allow traffic from the EC2 bastion security group you just created into the DB security group on the DB instance port.
In the Outbound rules section, ensure that at least one rule covers outbound 433 (HTTPS) so the VPC endpoints are reachable.
Choose Save rules.
Create the IAM role for the EC2 instance
To create your IAM role, complete the following steps:
On the IAM console, choose Roles.
Choose Create role.
For Select type of trusted entity, choose AWS service.
For Common use cases, choose EC2.
Choose Next: Permissions.
In the Attach permissions policies section, select the policy AmazonSSMManagedInstanceCore.
Choose Next: Tags.
Add any required tags, and choose Next: Review.
Enter a name for the role and choose Create role.
Provision the bastion host
To provision your bastion host, you start by configuring your EC2 instance.
On the Amazon EC2 console, choose the latest Linux AMI.
Choose the t3.micro instance class as this should be enough for forwarding the traffic.
For Subnet, choose a private subnet (no direct route in from the internet).
For Auto-assign Public IP, choose either Disable, or if disabled at the subnet, choose Use subnet setting (Disable).
For IAM role, choose the IAM role you created earlier.
Choose Review and Launch.
Next, you assign your security group and launch the instance.
On the Review Instance Launch page, choose Edit security groups.
Select the security group you created earlier.
Choose Review and Launch.
Choose Continue to accept the warning.
Because we’re using Session Manager to handle the connection, we don’t need to open any incoming ports open on the instance.
Chose Launch.
Choose Proceed without a key pair and select the acknowledgement check box.
Because we’re using Session Manager to handle the connection, we don’t need a key pair.
Create a port forwarding session
In this section, we create a remote port forwarding session and a local port forwarding session using Systems Manager, and connect to the RDS instance from SSMS.
On your own Windows computer open a new PowerShell window, and make sure your AWS credentials are valid and you can access your AWS account.
If you need to re-authenticate, see Configuring the AWS CLI.
Create a remote Systems Manager Session to our bastion host.
You will see the prompt: sh-4.2$
On the host in the SSM Session: install socat
You will see a number of installation actions here.
Start the socat traffic forwarder to listen on 1433 and forward to SQL on 1433 a.k.a. SQL Default port (-v -d -d prints traffic to host window).
You will see a message confirming socat is listening similar to:
Leave this window open. Make sure to have no extra spaces in your sudo socat command, or you may get something similar the following error message:
In a new PowerShell window set up a local port forwarding session via Systems Manager.
You should see something similar to:
Leave this window open.
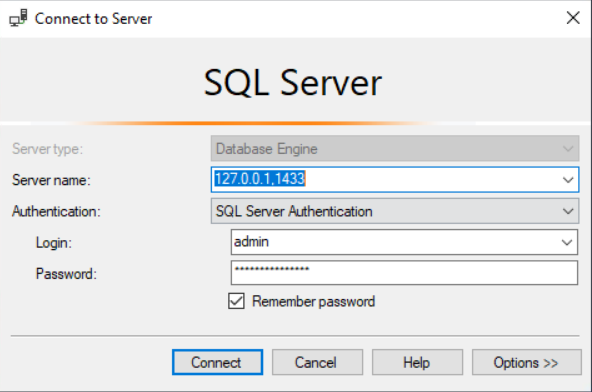
Connect to SQL Server via SSMS and encrypt the connection and trust server certificate on 127.0.0.1,1433.
A self-signed certificate doesn’t guarantee security, but is better than not doing it. For more information, see Using Encryption Without Validation in SQL Server Native Client.
You should now be connected.
Finally, we can connect to a second RDS instance, which is also on port 1433, by repeating the previous steps, except on a different local and remote port on the bastion host. This allows multiple RDS connections to different instances via the same bastion.
Create a second port forwarding session
In this case, we tell our laptop or desktop and the remote port on our bastion host that we want to connect to port 1533.
Create a remote Systems Manager Session to our bastion host.
Start the socat traffic forwarder to listen on 1433 and forward to SQL on 1433 a.k.a. SQL Default port (-v -d -d prints traffic to host window).
Leave this window open.
In a new PowerShell window set up a local port forwarding session via Systems Manager.
Leave this window open.
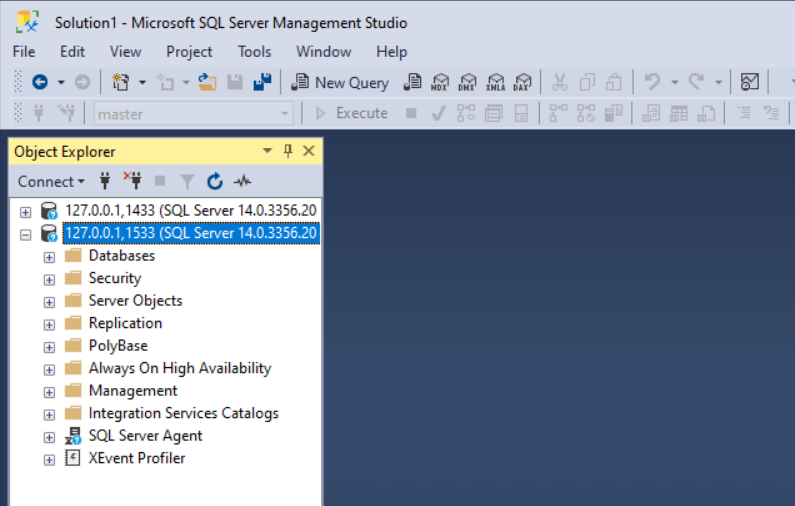
Connect to your second RDS instance on the port you have forwarded (for this post, I use 1533, so mine is 127.0.0.1,1533).
Conclusion
Amazon RDS is a fully managed database service in which the OS is maintained by AWS and you as the database professional have no direct access to it via RDP or SSH.
In this post, we showed how to use your preferred GUI toolset to connect from your workstation to an RDS instance, without compromising the security of your environment.
To learn more about Systems Manager, see the User Guide.
Stay tuned for part 2 of this post, where we automate most of this procedure.
Give this a try and let us know how you get on!
About the Authors
Jonathan Kerr is a Sr. Solutions Architect for Databases at AWS based in London.
He works to provide technical guidance to customers along their cloud database journey. In his role he helps customers to migrate, modernise, and optimise database solutions on AWS.
Vincent Lesiere is a Solutions Architect at AWS. In his role, he helps customers in the Benelux to be successful in the AWS cloud and improve their architecture. Prior to becoming a solutions architect at AWS, Vincent has developed, deployed and ran mission critical applications in production which have been used by hundreds of thousands customers on a daily basis.
Read MoreAWS Database Blog