
 locally using AWS Client VPN")
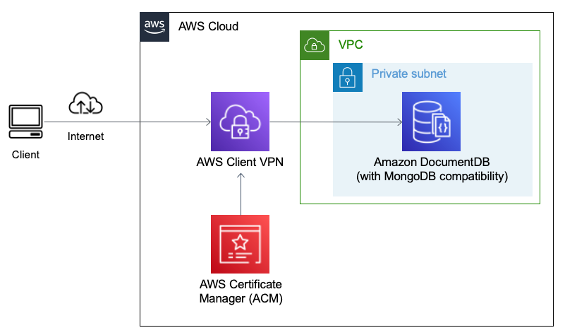
Amazon DocumentDB (with MongoDB compatibility) is a scalable, highly durable, and fully managed database service for operating mission-critical MongoDB workloads. When interfacing with a document database such as Amazon DocumentDB, developers need an environment to test and debug their applications. In this post, we cover how to connect to your Amazon DocumentDB resources from outside the cluster’s VPC by utilizing AWS Certificate Manager (ACM) and AWS Client VPN.
Amazon DocumentDB clusters are deployed within a VPC. The following are options you have for connecting to Amazon DocumentDB resources from your local machine:
AWS Direct Connect – This allows you to create virtual interfaces directly to the Amazon DocumentDB VPC
VPN connection – You can establish a connection to an AWS-managed virtual private gateway, which is the VPN device on the AWS side of the VPN connection
SSH tunneling – If you need to access your Amazon DocumentDB resources from outside the cluster’s VPC, you can use this method (also known as port forwarding)
For developers that are starting their cloud journey, utilizing their local development machine with all its libraries, tools, and custom configurations is the preferred way to connect with AWS services. This allows developers that have custom scripts, resources, and tools kept locally on their machine to call on those scripts without uploading to another environment.
In this post, we create an architecture similar to the following diagram that allows you to connect your local machine to Amazon DocumentDB.
Prerequisites
The following is required to run this solution:
OpenVPN EasyRSA
VPN client (for this demo, we use OpenVPN Connect)
For this post, you use EasyRSA to create your own certificate authority (CA) locally before exporting to ACM to manage your self-generated keys and certificates. The VPN Client is used to securely connect your local machine to your Amazon DocumentDB resources.
The steps we follow in this post and the architecture deployed via the AWS CloudFormation template are meant for testing purposes only. You can use your own CA for creating certificates if available. AWS takes cloud security seriously, and any deployment to your account should incorporate security reviews and controls appropriate with the environment and data being used. Note that it’s best practice to incorporate appropriate logging and detection capability for any VPN connection to your AWS resources. You can contact your security team for guidance and for more information, refer to Security best practices for AWS Client VPN.
You should also have the following prerequisites:
A VPC with at least one public and one private subnet. This architecture allows you to have a private subnet routing to a NAT gateway and a public subnet routing to an internet gateway.
An Amazon DocumentDB cluster. If you don’t have an Amazon DocumentDB cluster set up, refer to Create an Amazon DocumentDB cluster.
An Amazon Simple Storage Service (Amazon S3) bucket.
If you associate more than one subnet with a Client VPN endpoint, each subnet must be in a different Availability Zone. Your public subnet and private subnets must also be in different Availability Zones.
Provision resources with AWS CloudFormation
You can download a CloudFormation template from GitHub that deploys much of this solution for you:
The Client VPN endpoint that you use to connect to the Amazon DocumentDB cluster residing in a private subnet in your VPC from your on-premises workstation.
The necessary resources to make this client VPN work. It creates the security group, client VPN routes, subnet associations, and authorization rule.
A custom resource with an AWS Lambda function, which gives you the OVPN configuration file in an S3 bucket that’s downloadable and ready to use as soon as the CloudFormation stack launches successfully.
To use this template, you first complete the following section to generate the server and client certificates. Refer to the readme from the GitHub repo to see a complete walkthrough of how to launch this CloudFormation stack.
Generate the server and client certificates
The Client VPN endpoint in this post uses mutual authentication. With mutual authentication, Client VPN uses certificates to perform authentication between clients and the Client VPN endpoint. You need to have a server certificate and key, and at least one client certificate and key. You use EasyRSA to create a new CA, generate a server and client certificate and key, and then import the latter into ACM.
You download and install the OpenVPN software and EasyRSA CLI utility to create a root CA, and request and sign your certificates. For this walkthrough, we use the Windows version for both OpenVPN and EasyRSA.
Visit the OpenVPN Community Downloads page, download the installer for your operating system, and run the installer.
Visit the EasyRSA releases page and download the appropriate asset for your operating system.
Extract the ZIP file and copy the EasyRSA folder to the Program FilesOpenVPN folder.
Open the command prompt as an administrator, navigate to the Program FilesOpenVPNEasyRSA directory, and run the following command to open the EasyRSA 3 shell:
You should see output similar to the following, confirming you’re in the EasyRSA shell:
Initialize a new public key infrastructure (PKI) environment with the following code:
You should see an output similar to the following:
To build a new CA, run the following command and follow the prompts. When prompted, provide a common name.
You should see an output similar to the following:
Generate the server certificate and key:
You should see an output similar to the following:
Generate the client certificate and key:
You should see an output similar to the following:
You can now exit the EasyRSA 3 shell:
Create a new folder. Copy the new CA, server certificate and key, and client certificate and key to a custom folder and navigate to the new folder. You can run the following commands to do this from the command prompt:
Upload the server certificate and key to ACM. Be sure to upload them in the same Region in which you intend to create the Client VPN endpoint. The following commands use the AWS Command Line Interface (AWS CLI) to upload the certificates:
Confirm that you have configured the AWS CLI through aws configure with appropriate permissions to perform these actions. To upload the certificates using the ACM console instead, see Importing a certificate.
Create the Client VPN endpoint manually
This section is provided if you wanted to complete the steps of creating the Client VPN endpoint manually. If you’re using the CloudFormation template that we provide, you can skip this section and continue at section Connect to your VPN Client .
With your new private certificate and key, you create a Client VPN endpoint to connect your local machine to the VPC that Amazon DocumentDB resides within.
On the Amazon VPC console, choose Client VPN Endpoints under Virtual private network (VPN) in the navigation pane.
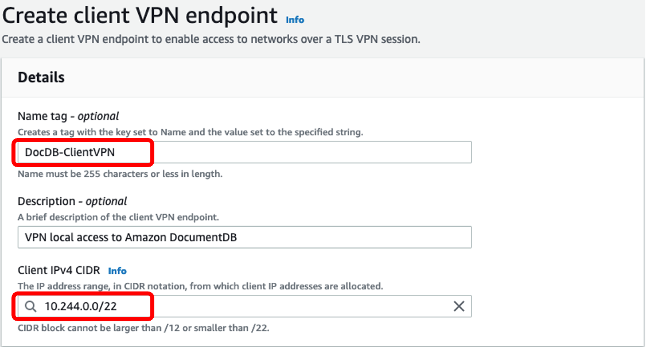
Choose Create client VPN endpoint.
Provide a unique name tag, such as DocDB-ClientVPN, and a brief description.
For Client IPv4 CIDR, choose an IP address for your VPN clients that doesn’t overlap with the resources you want to access via the Client VPN endpoint.
For this example, we use a /22 address space, which is the smallest subnet that can be used. You can specify a larger subnet if required (up to /18). Note that Client VPN uses source NAT (SNAT) to connect to resources in the associated VPCs.
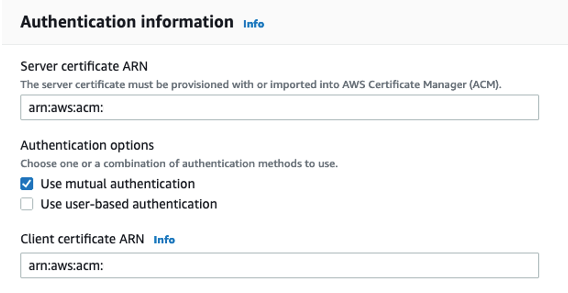
Under Authentication information, choose the private certificate you imported earlier for the Server certificate ARN.
Select Use mutual authentication for Authentication options.
Choose your private certificate for Client certificate ARN. If your server and client certificates have been issued by the same CA, you can use the server certificate ARN for both server and client when you create the Client VPN endpoint. For more information about authentication options, refer to Client authentication.For this example, you can leave Enable log details on client connections under Connection logging to No. However, if you want to enable logging, you can set up an Amazon CloudWatch log group for this purpose. With connection logging, you can get forensics on which clients attempted to connect and the result of the connection attempt.
Leave all other option parameters as their default values and choose Create Client VPN Endpoint.
You receive confirmation that your Client VPN endpoint successfully created with a status of Pending-associate. You now associate your VPN endpoint with a target network (a VPC subnet).
On the Client VPN console, choose your Client VPN endpoint ID.
On the Target network associations tab, choose Associate target network.
Choose the VPC your Amazon DocumentDB cluster resides within and choose one of the private subnets.
Choose Associate target network to begin associating a target network (subnet in a VPC).
Follow this same process for the public subnet assigned to the Amazon DocumentDB VPC.
The public subnet can’t be in the same Availability Zone as the private subnet you used in the previous step. After these steps, the state shows as Associating. You now set up authorization to your VPN Client endpoint.
On the Client VPN console, choose your Client VPN endpoint ID.
On the Authorization rules tab, choose Add authorization rule.
Set Destination network to enable access to 0.0.0.0/0 to enable traffic to flow through the client VPN endpoint, including internet traffic (through a NAT gateway running in your VPC).
Select Allow access to all users and choose Add authorization rule.
To allow your VPC association to provide internet connectivity to VPN clients (though a NAT gateway already running in your VPC), you need to add a default route of 0.0.0.0/0 to the route table.
On the Client VPN console, choose your Client VPN endpoint ID.
On the Route table tab, choose Create route.
Enter a Route destination of 0.0.0.0/0 and choose the public subnet.
Choose Create route.
After a few minutes, the state of your Client VPN endpoint changes to Active.
Select your Client VPN endpoint and choose Download client configuration.
Choose Download client configuration again to get a configuration file that can be imported into your OpenVPN client software.
Return to the Client VPN endpoint page and choose your Client VPN endpoint ID.
On the Security groups tab, choose the link to your security group under the Security groups column.
On the Inbound rules tab, choose Edit inbound rules.
Choose Add rule to create a new inbound rule allowing access from your local machine’s public IP address.
Set Type to All traffic.
Set Source to Custom and enter your public IP address followed by /32.
You can choose Delete to remove any additional rules listed.
Choose Save rules to save the changes.
VPN Client configuration file
You modify your configuration file (OVPN) before you can use it with the OpenVPN client.
Locate the client certificate and private key on your local machine that you created earlier and open them with your preferred text editor
In another text editor window, open your configuration file.
Within your certificate file, scroll down to the section that looks similar to the following code. This section begins and ends with random characters inserted between BEGIN CERTIFICATE and END CERTIFICATE.
Your private key file begins and ends similar to the following code, with random characters inserted between them:
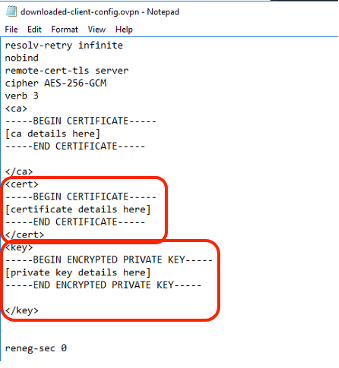
Within your configuration file, locate the section near the bottom that holds your CA details (it begins and ends with <ca>…</ca>).
Immediately after </ca>, add new lines with the following values:
Between <cert> and </cert>, enter the section mentioned earlier from your certificate file, including —–BEGIN CERTIFICATE—– and —–END CERTIFICATE—–.
Between <key> and </key>, enter the entire contents of your private key file, including —–BEGIN ENCRYPTED PRIVATE KEY—– and —–END ENCRYPTED PRIVATE KEY—–.Your configuration file should look similar to the following.
The Client VPN endpoint configuration file includes a parameter called remote-random-hostname. This parameter forces the client to prepend a random string to the DNS name to prevent DNS caching. Some clients don’t recognize this parameter and therefore they don’t prepend the required random string to the DNS name.
Within the configuration file, locate the line that specifies the Client VPN endpoint DNS name, and prepend a random string to it so that the format is random_string.displayed_DNS_name. For example:
Original DNS name – cvpn-endpoint-0102bc4c2eEXAMPLE.clientvpn.us-west-2.amazonaws.com
Modified DNS name – asdfa.cvpn-endpoint-0102bc4c2eEXAMPLE.clientvpn.us-west-2.amazonaws.com
Connect to your VPN Client
We use the configuration file to create a connection from your local machine to your Amazon DocumentDB resources.
Launch OpenVPN Client and navigate to Import Profile. On the File tab, either drag and drop your configuration file or choose BROWSE and navigate to it. This imports the settings and populates the server host name.
Create a unique profile name, then choose CONNECT.
After you’ve successfully connected, you can see connection statistics and details.
Connect to your Amazon DocumentDB resources
With your VPN Client successfully connected, you can connect to your Amazon DocumentDB resources.
To retrieve your cluster endpoint, on the Amazon DocumentDB console, choose Clusters in the navigation pane.
Find your cluster and choose the Regional cluster identifier.
On the Connectivity & security tab, if you haven’t done so already, download the Amazon DocumentDB CA by following the instructions on the console.
Copy the command for connecting to your cluster with the mongo shell.
Enter the command into your local machine’s shell.
If you’re using Studio 3T as a GUI to interact with existing NoSQL databases, you can now take advantage of its powerful capabilities to connect with your Amazon DocumentDB resources directly from your local machine. If you don’t have Studio 3T, download and install it.
Launch Studio 3T and choose Connect.
Choose New Connection.
Select Manually configure my connection settings and choose Next.
For Connection name, enter a name.
On the Server tab, for Server, enter the name of your Amazon DocumentDB cluster endpoint.
If you can’t locate your cluster endpoint, refer to Finding a Cluster’s Endpoints.
On the Authentication tab, for Authentication Mode, choose Legacy (SCRAM-SHA-1).
Enter your Amazon DocumentDB cluster user name and credentials in the User name and Password fields.
Enter admin for Authentication DB.
On the SSL tab, select Use SSL protocol to connect.
Select Use own Root CA file (–sslCAFile) and enter the location of the rds-combined-ca-bundle.pem file you downloaded earlier.
Choose Test Connection to verify all your inputs are correct.
After a successful connection, you see a green status of OK for all operations.
Save the connection settings, then select your cluster and choose Connect.
Clean up
To clean up the resources created in this post, start by removing the target network associations on your Client VPN endpoint.
Navigate to your Client VPN endpoint and the Target network associations section.
Select your association ID, then choose Disassociate.
Follow this step for each of your target network associations.
Select your Client VPN endpoint and on the Actions menu, choose Delete client VPN endpoint.
Confirm deletion and choose Delete.
On the AWS Certificate Manager console, choose List certificates in the navigation pane.
Select your certificate ID, then choose Delete.
Confirm deletion and choose Delete again.
If you deployed resources using the CloudFormation template from GitHub, you can select the CloudFormation stack created and choose Delete. Then on the prompt, select “Delete Stack” to proceed with the deletion of the CloudFormation stack. CloudFormation cleanup instructions can also be found within the readme on GitHub.
Summary
There are times when developers, engineers, and architects need to utilize their local development machine with all its libraries, tools, and custom configurations to connect with AWS services. In this post, you deployed an AWS Client VPN endpoint and connected to your Amazon DocumentDB resources using the OpenVPN based client. Connecting this way gives you the ability to continue using local scripts and resources without transferring them to cloud-based IDEs or compute instances.
To learn more about developing with Amazon DocumentDB, refer to Connecting Programmatically to Amazon DocumentDB.
About the Authors
Cody Allen is a Senior DocumentDB Specialist Solutions Architect based out of Texas. He is passionate about working side by side with customers to solve complex problems, and supporting teammates through mentorship and knowledge transfer. He has spent his career deploying and managing systems, softwares, and infrastructure for B2B SaaS providers, materiel and logistics suppliers, the U.S Air Force, and other government agencies domestic and international.
Ramesh Venkataraman is a Senior Solutions Architect who enjoys working with customers to solve their technical challenges using AWS services. Outside of work, Ramesh enjoys following stack overflow questions and answers them in any way he can.
Read MoreAWS Database Blog