Coding in Python gives developers ultimate control over every aspect of their design, but with a plethora of choices comes the dangers of becoming distracted. Low code, graphical environments provide for easy operation and reuse of components but with shallow levels of control than hand coding. Custom processors allow data engineers to operationalize their code and provide powerful extensibility for coders.
This Python pipeline walkthrough is created for the purpose of demonstrating how a user can run their own Python code into StreamSets Data Collector.
This demo is for installing a Data Collector using Docker. Your complex Python code will be packaged and deployed into PyPI. Simply add the Python package and build your own Docker image on top of StreamSets Docker image. Once the Data Collector is installed using your own custom image, you’ll simply import the Python packages in the jython evaluator.
Let’s get started!
Prerequisites:
Have an account in PyPI.
Install twine to connect to PyPI.
Install docker.
Have a github account to upload your code.
Have an account in Streamsets DataOps platform.
High level steps:
Create a package for your python package.
Build the project.
Upload to PyPI.
Create a Dockerfile and install the python package.
Run the script generated from StreamSets deployment with your custom image.
Create a pipeline with Jython evaluator.
Below are the steps to create your own python package and upload to PyPI.
PyPI is the official Python repository where all Python Packages are stored. You can think of it as the Github for Python Packages.
To make your Python Package available to people around the world, you’ll need to have an account with PyPI.
I am using twine to upload the files to PyPI. you can install twine using the below command:
pip install twine
Benefits and Limitations of a Python Pipeline in StreamSets
Benefits:
Customers can use their existing python packages into StreamSets.
Users do not have to rewrite the complex logic into StreamSets.
Limitations:
Customers have to rebuild the custom images during upgrades.
Python Calculator Project
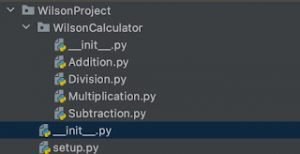
Folder Structure
Content of Addition.py
print(“Performing Addition:”)
def add(x,y):
return x+y
You can grab the complete code here on GitHub.
Create a __init__.py inside the WilsonCalculator and add below content
__author__ = ‘wilson shamim’
__version__ = ‘1.1.0’
from WilsonCalculator.Addition import add
from WilsonCalculator.Subtraction import sub
from WilsonCalculator.Division import div
from WilsonCalculator.Multiplication import Mul
Create a setup.py under WilsonProject.
Navigate to WilsonProject and run the below command to build the project
python setup.py sdist
This will create below folders
wilsonshamim@Wilsons-MBP PythonTutorials % cd WilsonProject
wilsonshamim@Wilsons-MBP WilsonProject % python setup.py sdist
running sdist
running egg_info
creating WilsonCalculators.egg-info
writing WilsonCalculators.egg-info/PKG-INFO
writing top-level names to WilsonCalculators.egg-info/top_level.txt
writing dependency_links to WilsonCalculators.egg-info/dependency_links.txt
writing manifest file ‘WilsonCalculators.egg-info/SOURCES.txt’
reading manifest file ‘WilsonCalculators.egg-info/SOURCES.txt’
writing manifest file ‘WilsonCalculators.egg-info/SOURCES.txt’
warning: sdist: standard file not found: should have one of README, README.rst, README.txt, README.md
running check
warning: check: missing required meta-data: url
creating WilsonCalculators-1.1.0
creating WilsonCalculators-1.1.0/WilsonCalculator
creating WilsonCalculators-1.1.0/WilsonCalculators.egg-info
copying files to WilsonCalculators-1.1.0…
copying setup.py -> WilsonCalculators-1.1.0
copying WilsonCalculator/Addition.py -> WilsonCalculators-1.1.0/WilsonCalculator
copying WilsonCalculator/Division.py -> WilsonCalculators-1.1.0/WilsonCalculator
copying WilsonCalculator/Multiplication.py -> WilsonCalculators-1.1.0/WilsonCalculator
copying WilsonCalculator/Subtraction.py -> WilsonCalculators-1.1.0/WilsonCalculator
copying WilsonCalculator/__init__.py -> WilsonCalculators-1.1.0/WilsonCalculator
copying WilsonCalculators.egg-info/PKG-INFO -> WilsonCalculators-1.1.0/WilsonCalculators.egg-info
copying WilsonCalculators.egg-info/SOURCES.txt -> WilsonCalculators-1.1.0/WilsonCalculators.egg-info
copying WilsonCalculators.egg-info/dependency_links.txt -> WilsonCalculators-1.1.0/WilsonCalculators.egg-info
copying WilsonCalculators.egg-info/top_level.txt -> WilsonCalculators-1.1.0/WilsonCalculators.egg-info
Writing WilsonCalculators-1.1.0/setup.cfg
creating dist
Creating tar archive
removing ‘WilsonCalculators-1.1.0’ (and everything under it)
Once the setup is complete, 2 new folders dist and WilsonCalculator.egg.info will be created.
Navigate to WilsonProject and run below command to upload the project in the PyPI
twine upload dist/*
It will ask for username and password.
Once uploaded successfully, you can now install it using pip
pip install WilsonCalculators
Once installed successfully, you can now use it in your code
Next, create a dockerfile with below content
FROM streamsets/datacollector:4.3.0
USER root
RUN apk add –update –no-cache bash
curl
grep
krb5-libs
krb5
libidn
libstdc++
libuuid
protobuf
sed
python2
py-pip
sudo &&
echo ‘hosts: files mdns4_minimal [NOTFOUND=return] dns mdns4’ >> /etc/nsswitch.conf
RUN python2.7 -m ensurepip –default-pip
RUN python2 -m pip install WilsonCalculators
A docker image named wilsoncalculator will be created
ubuntu@ip-10-10-52-110:~/customImage$ docker images
REPOSITORY TAG IMAGE ID CREATED SIZE
wilsoncalculator latest 5a33c8117856 About a minute ago 952MB
Now we can use this image to run the engine and connect to DataOps
You can refer to the documentation for creating deployments and how to get the install engine scripts. Once you have obtained the install scripts from the deployments, replace streamsets/datacollector:<version> with wilsoncalculator
docker run -d -e STREAMSETS_DEPLOYMENT_SCH_URL=https://na01.hub.streamsets.com -e STREAMSETS_DEPLOYMENT_ID=<deployment ID> -e STREAMSETS_DEPLOYMENT_TOKEN=<Token> wilsoncalculator:latest
3d59d6d37d45598a1dbf6401208e4fa1917ddbeba5dd726c4e8c23b99ff1e667
ubuntu@ip-10-10-52-110:~/customImage$ docker ps
CONTAINER ID IMAGE COMMAND CREATED STATUS PORTS NAMES
3d59d6d37d45 wilsoncalculator:latest “https://streamsets.b-cdn.net/docker-entrypoint.…” 15 seconds ago Up 13 seconds 18630/tcp
Now you can create your Python pipeline.
I have created a WilsonCalculator pipeline with the jython evaluator.
Jython scripts:
try:
sdc.importLock()
import sys
sys.path.append(‘/usr/lib/python2.7/site-packages’)
from WilsonCalculator.Addition import add
finally:
sdc.importUnlock()
# Sample Jython code
for record in sdc.records:
try:
sdc.log.info(“Start calculation…..”)
sdc.log.info(str(record.value[‘input1’]))
sdc.log.info(str(record.value[‘input2’]))
sdc.log.info(str(add(int(record.value[‘input1’]),int(record.value[‘input2’]))))
sdc.log.info(“———————-“)
sdc.output.write(record)
except Exception as e:
# Send record to error
sdc.error.write(record, str(e))
Output:
Generated 3 records
Logged the additional result.
You can see from this example the benefits and limitations of embedded python in your smart data pipelines. StreamSets aims to bridge the gap between the ultimate control of hand coding and ease and repeatability of a graphical interface.
With StreamSets you can:
Quickly build, deploy, and scale streaming, batch, CDC, ETL and ML pipelines
Handle data drift automatically, keeping jobs running even when schemas and structures change
Deploy, monitor, and manage all your data pipelines – across hybrid and multi-cloud – from a single dashboard
Try smart data pipelines out yourself with StreamSets, a fully cloud-based, all-in-one DataOps platform. Sign up now and start building pipelines for free!
The post Python Pipeline: Here’s How to Build Your Python Package and install it in StreamSets appeared first on StreamSets.
Read MoreStreamSets


