

Amazon DocumentDB (with MongoDB compatibility) is a scalable, highly durable, and fully managed database service for operating mission-critical MongoDB workloads. You can use the same MongoDB application code, drivers, and tools to run, manage, and scale workloads on Amazon DocumentDB without having to worry about managing the underlying infrastructure.
In this post, we discuss the approach for seamless migration of live data from a sharded MongoDB cluster to an Amazon DocumentDB cluster with near-zero downtime.
Solution overview
There are three primary approaches for migrating from MongoDB to Amazon DocumentDB: offline, online, and hybrid. For more information, see Migration Approaches.
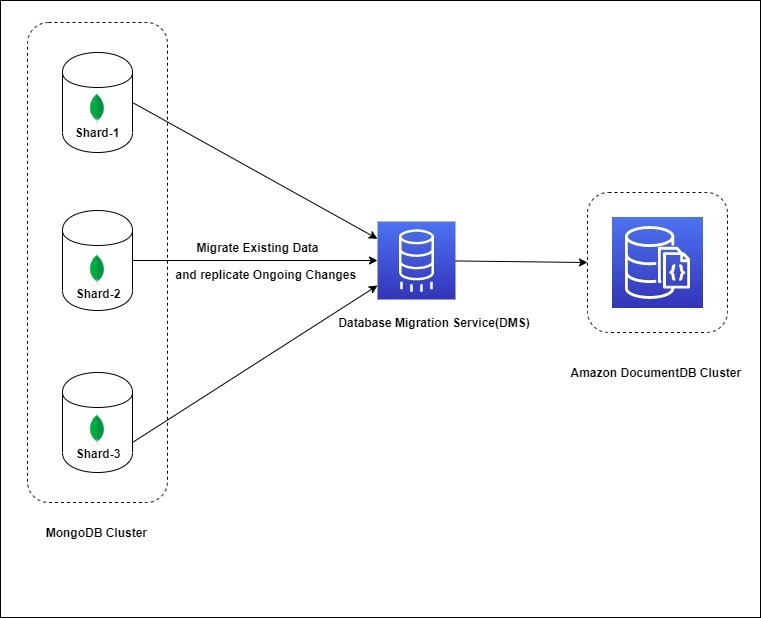
The process of migrating data from a sharded MongoDB cluster to an Amazon DocumentDB cluster is essentially a migration of each individual shard. The following is a high-level diagram that shows the data flow from a MongoDB sharded cluster to Amazon DocumentDB.
In this post, we discuss how to use the online approach to migrate a MongoDB sharded cluster to Amazon DocumentDB. The online approach uses AWS Database Migration Service (AWS DMS) to migrate the data from sharded clusters. It performs a full load of data from a source MongoDB cluster to an Amazon DocumentDB cluster. It then switches to change data capture (CDC) mode to replicate ongoing changes. This solution minimizes downtime because it continually reads the changes from the source MongoDB oplog and applies those changes in near-real time on the target Amazon DocumentDB cluster. oplog is a special capped collection in MongoDB that keeps a rolling record of all the operations that modify the data stored.
Sample MongoDB dataset
In this section, we discuss the migration of a sample open dataset that is derived from Deutsche Börse’s trading systems. The data is provided on a minute-by-minute basis and aggregated from the Xetra and Eurex engines that comprise a variety of equities, funds, and derivative securities. The dataset contains trading data from June 26, 2017, for the Xetra engine. Each document represents an aggregate of 1-minute trade activity for each security, following the open-high-low-close (OHLC) format along with total traded volume.
The sample dataset is stored in a MongoDB collection (in JSON format) as shown in the following example. This collection is sharded, using a shard key index on the ISIN and SecurityID fields.
ISIN is International Securities Identification Number of the security, and SecurityID is a unique identifier for each contract.
Pre-migration steps
Before you start your migration, complete the following pre-migration steps:
Verify your source MongoDB version and configuration.
Prepare the MongoDB cluster for migration.
Set up and choose the size of your Amazon Document DB cluster.
Set up an Amazon Elastic Compute Cloud (Amazon EC2) instance or AWS Cloud9 environment for connecting to the cluster and shards using the command line. AWS Cloud9 is a cloud-based integrated development environment (IDE) that lets you write, run, and debug your code with just a browser. It includes a code editor, debugger, and terminal.
Verify your source MongoDB version and configuration
AWS DMS supports MongoDB versions 3.x and 4.x as a database source. Refer to Sources for AWS DMS for the latest supported MongoDB database versions. You can determine the version of your source deployment by entering the following code in the mongo shell:
If your MongoDB cluster uses a version of MongoDB earlier than 3.6, you should upgrade your application drivers to compatible drivers.
Prepare the MongoDB cluster for migration
To prepare the source cluster for migration, complete the following steps:
To use CDC with a MongoDB source, enable the MongoDB operation log or oplog.
AWS DMS uses oplog to capture the changes. Ensure that the oplog on each shard is large enough to contain all changes made during the entire duration of the data migration process, plus a reasonable buffer.
Make sure you have a system root user in MongoDB with permission to access oplog, the source database, and collections.
Disable the balancer in the source MongoDB cluster and wait for any in-process chunk migrations to complete:
This is required to avoid any errors that involve in-flight chunk migrations from one shard to another.
Run the cleanupOrphaned command in the primary replica of each shard.
This removes any orphaned documents left over by failed migrations or application errors. If you don’t run this command, the tasks might fail because of duplicate document IDs.
Set up and size your source Amazon DocumentDB cluster
For this post, our target Amazon DocumentDB cluster is db.r5.large instances. When you size your cluster, choose the instance type that is suitable for your production cluster. For more information about Amazon DocumentDB instances and costs, see Amazon DocumentDB (with MongoDB compatibility) pricing.
Set up an EC2 instance or AWS Cloud9 environment
Set up an EC2 instance or AWS Cloud9 environment to connect the clusters and shards using the command line. We use this environment for migrating indexes. In this post, we created an EC2 instance and configured a security group for connecting to the source MongoDB cluster and target Amazon DocumentDB clusters.
Migration steps
Here we discuss the actual migration steps:
Write to source.
Dump indexes using the Amazon DocumentDB Index Tool from MongoDB.
Restore indexes using the Amazon DocumentDB Index Tool to Amazon DocumentDB.
Set up the AWS DMS instance with required configuration.
Create an AWS DMS migration task.
Monitor the migration tasks.
Change the application endpoint to an Amazon DocumentDB cluster.
Write to source
When you use the online method to migrate to Amazon DocumentDB, your application continues to write to the source MongoDB database.
Dump indexes using the Amazon DocumentDB Index Tool
Before you begin your migration, create the same indexes on your target Amazon DocumentDB cluster that you have on your source MongoDB cluster. Although AWS DMS handles the migration of data, it doesn’t migrate indexes. To migrate the indexes, on the EC2 instance that you created as a prerequisite, use the Amazon DocumentDB Index Tool to export indexes from the MongoDB cluster. You can get the tool by creating a clone of the Amazon DocumentDB Tools GitHub repo.
The following code dumps indexes from your source MongoDB cluster to a directory on your EC2 instance (replace <username> and <yourpassword> with your database credentials):
After the successful export of the indexes, Run the index tool with the “–show-issues” argument, against the target Amazon DocumentDB cluster, to show any compatibility issues with indexes before importing them into Amazon DocumentDB.
The next step is to restore those indexes in the target Amazon DocumentDB cluster.
Restore indexes using the Amazon DocumentDB Index Tool
we recommend that you first create indexes in Amazon DocumentDB before beginning your migration as it can reduce the overall time and increase the speed of the migration.
To restore the indexes that you exported in your target cluster in the preceding step, use the Amazon DocumentDB Index Tool.
The following code restores the indexes in your Amazon DocumentDB cluster from your EC2 instance:
The Amazon DocumentDB Index Tool allows you to skip incompatible indexes via the “–skip-incompatible” argument.
To confirm that you restored the indexes correctly, connect to your Amazon DocumentDB cluster with the mongo shell and list the indexes for a given collection. See the following code:
Set up the AWS DMS instance with the required configuration
AWS DMS is a managed service that helps you migrate databases to AWS services efficiently and securely. AWS DMS enables database migration using two steps: full data load and CDC. The online migration approach uses AWS DMS to perform a full data copy and then uses CDC to replicate changes to Amazon DocumentDB. For more information about using AWS DMS, refer to Database Migration Step-by-Step Walkthroughs.
To perform the online migration of a sharded cluster, complete the following steps:
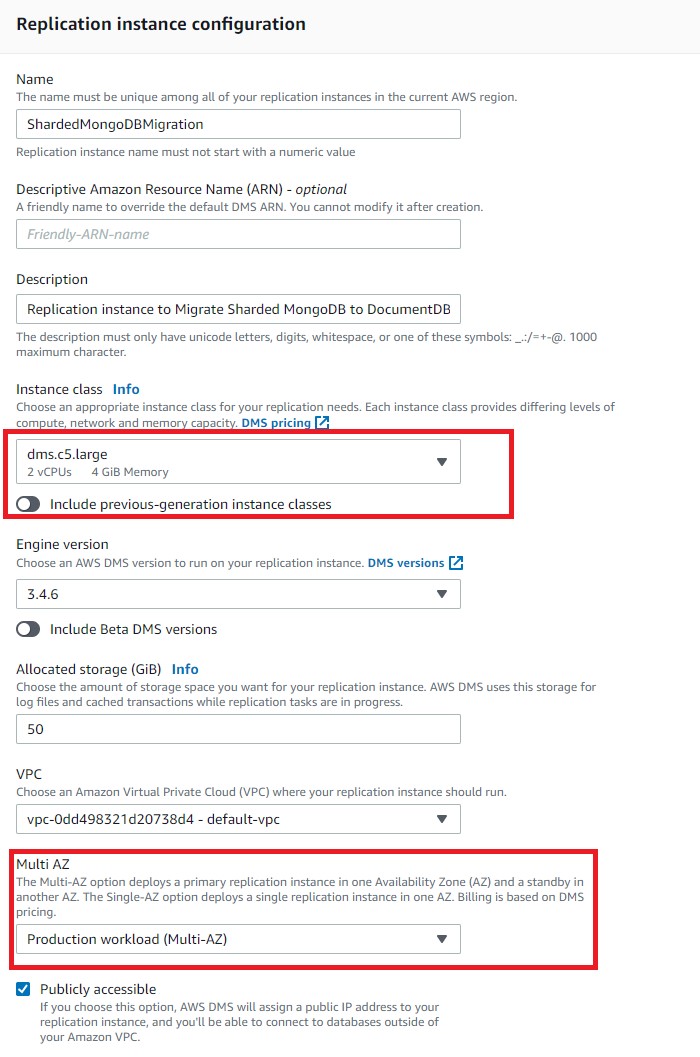
Create an AWS DMS replication instance. AWS DMS uses the replication instance to run the task that migrates data from the source MongoDB cluster to the target Amazon DocumentDB cluster. For instructions, see Working with an AWS DMS replication instance. AWS DMS creates a replication instance in a virtual private cloud (VPC). Select a replication instance class that has sufficient storage and compute power to perform the migration task, as mentioned in the whitepaper AWS Database Migration Service Best Practices. Choose the Multi-AZ option for high availability and failover support, as shown in the following screenshot. For this post, we use the dms.c5.large instance type; you should choose a migration instance suitable for your workload.
Specify whether the replication instance uses a public or private IP address to connect to the source and target databases. A replication instance should have a public IP address if the source database is located in a network that isn’t connected to the replication instance’s VPC using a VPC, AWS Direct Connect, or VPC peering.
Create a replication instance for migrating data from all shard source endpoints, or create one replication instance for each shard source endpoint. We recommend that you create one replication instance for each shard endpoint to achieve better performance when migrating large volumes of data.
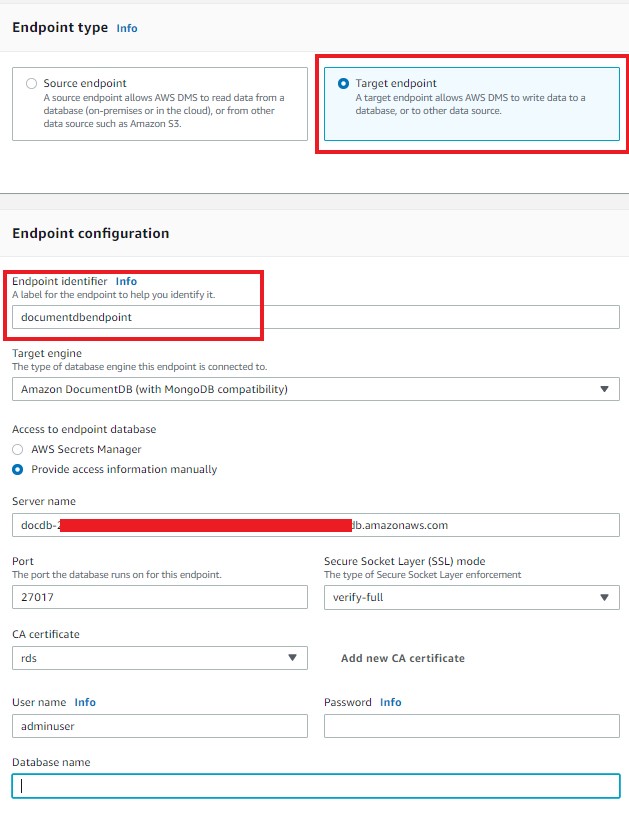
Create the source MongoDB and target Amazon DocumentDB endpoints. For more information, refer to Working with AWS DMS endpoints. The following screenshot shows the creation of the source endpoint for the MongoDB cluster. In this example, we’re creating the source endpoint for the primary of shard-1.
Similarly, create one source endpoint for the primary of each shard.In our example, we have three shards to migrate and their corresponding three source endpoints. This step is required to migrate data from each shard individually. The following screenshot shows the source endpoint for all three shards.
The following screenshot shows the creation of the target endpoint for the Amazon DocumentDB cluster.
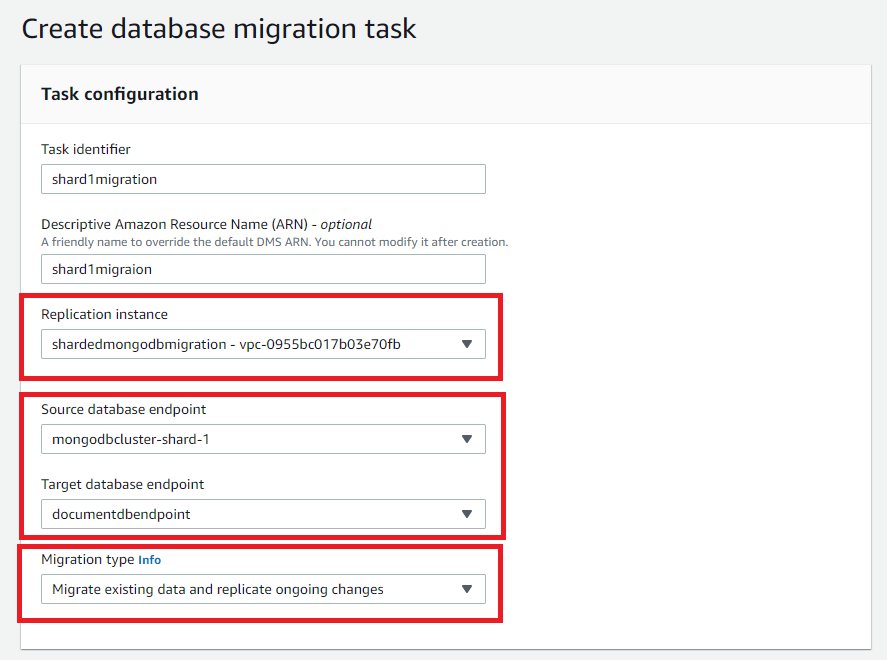
Create an AWS DMS migration task
Create an AWS DMS migration task by choosing the following options on the AWS DMS console for each shard endpoint:
For Replication instance, choose the instance you created in the previous step.
Choose the source and target endpoints.
For Migration type¸ choose Migrate existing data and replicate ongoing changes to capture changes from the source MongoDB database that occur while the data is being migrated.
Choose Start task on create to start the migration task immediately.
For Target table preparation mode, select Do nothing so that existing data and metadata of the target DocumentDB collections aren’t affected. If the target DocumentDB collections don’t exist, the migration task creates a new collection; otherwise, it appends data to an existing collection.
For Stop task after full load completes, select Don’t Stop so that task will immediately apply cached changes and continue.
For Include LOB columns in replication, select Limited LOB mode, this option truncate LOBs to the value of the Max LOB size parameter. This mode is faster than using Full LOB mode. For more information about LOB support, refer to Setting LOB support for source databases in an AWS DMS task.
Select Enable CloudWatch logs to track and debug the migration task.
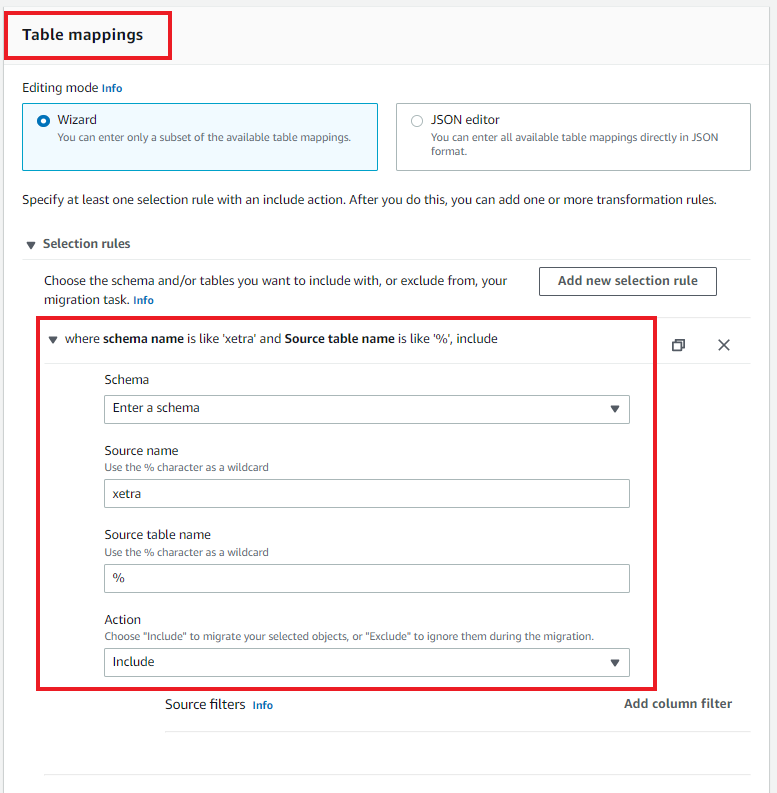
For Table mappings, choose the MongoDB source database and collection you want to include or exclude for migration the task.
The following screenshot shows migration tasks for our three shards (corresponding to the three source endpoints created in the previous step):
Monitor the migration tasks
You can start your AWS DMS tasks immediately or manually depending on the task definition. The task creates the collection in Amazon DocumentDB, if not already present. If you choose the task on the AWS DMS console, you can review more specific details. In the Table statistics section, the task shows the statistics of the full data load, followed by the ongoing replication between the source and target database. See the following screenshots for all three migration tasks corresponding to each shard.
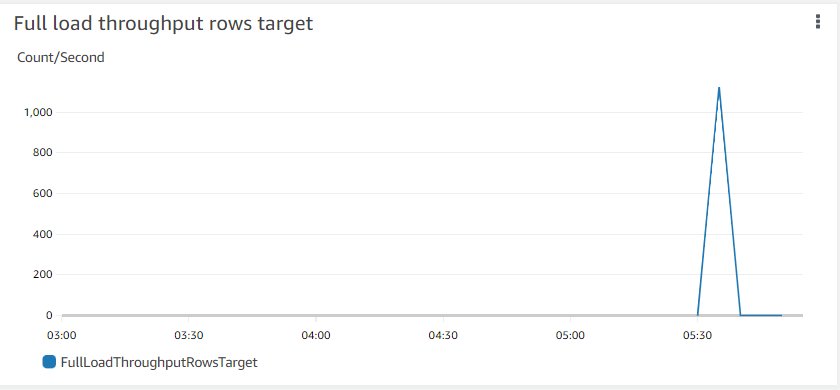
You can monitor the progress of the AWS DMS tasks using Amazon CloudWatch metrics as well, as shown in the following screenshots for one of the tasks. For more information, see Monitoring AWS DMS tasks.
Change the application endpoint to an Amazon DocumentDB cluster
After the full load is complete and the CDC process is replicating continuously, you’re ready to change your application’s database connection string to use the target Amazon DocumentDB cluster. For more information, see Understanding Amazon DocumentDB Endpoints and Best Practices for Amazon DocumentDB.
Conclusion
In this post, we discussed migrating data from a sharded MongoDB cluster to an Amazon DocumentDB cluster in near-real time with continuous data capture using AWS DMS. AWS DMS helps you migrate your data, including sharded data stored in MongoDB, to Amazon DocumentDB quickly and securely. During the migration process, the source MongoDB cluster remains fully operational, minimizing downtime to applications that rely on the database.
Because Amazon DocumentDB is MongoDB-compatible, migrating data from MongoDB cluster is relatively straightforward.
If you have questions or suggestions, please leave a comment.
About the authors
Gururaj S Bayari is a Senior DocumentDB Specialist Solutions Architect at AWS. He enjoys helping customers adopt Amazon’s purpose-built databases. He helps customers design, evaluate, and optimize their internet scale and high performance workloads powered by NoSQL and/or Relational databases.
Anshu Vajpayee is a Senior DocumentDB Specialist Solutions Architect at AWS. He has been helping customers to adopt NoSQL databases and modernize applications leveraging Amazon DocumentDB. Before joining AWS, he worked extensively with relational and NoSQL databases for around 15 years.
Read MoreAWS Database Blog