

There are different strategies you can leverage to migrate an on-premises SQL Server workload to Amazon Relational Database Service (Amazon RDS) Custom for SQL Server. All of them come with pros and cons.
The following are some high-level migration challenges that you may encounter during your analysis and implementation phase:
Lift and shift (backup and restore) is efficient for moving an on-premises workload ‘as is’ to AWS, but has more downtime during the cutover.
AWS Database Migration Service (AWS DMS) helps you migrate databases to AWS quickly and securely. You can also continuously replicate data with low latency from any supported source to any supported target. However, it has some limitations if you need to move the workload as is to the cloud. For more details , refer to Limitations on using SQL Server as a source for AWS DMS.
AWS Snowball moves terabytes of data in about a week. You can use it to move things like databases, backups, archives, healthcare records, analytics datasets, IoT sensor data, and media content, especially when network conditions prevent realistic timelines for transferring large amounts of data both into and out of AWS. AWS Snowball is designed to handle large volume workloads so if your requirement isn’t as large as multiple terabytes then one of the other solutions may be a better fit.
In this post, we provide you a database migration pattern solution for your on-premises SQL Server standalone workload to Amazon RDS Custom, using a domain-independent Always On availability group.
Amazon RDS Custom is a managed database service for legacy, custom, and packaged applications that require access to the underlying OS and DB environment. Amazon RDS Custom for SQL Server automates the setup, operation, and scaling of databases in the cloud, while granting access to the database and underlying operating system to configure settings, install drivers, and enable native features to help you meet the dependent application’s requirements.
The Always On availability group provides a high availability and disaster recovery solution with an enterprise-level alternative to database mirroring. An availability group supports a replicated environment for a discrete set of user databases, known as availability databases, that can fail over together.
Solution overview
This migration pattern typically involves source and destination replica servers. For this post, our source is the on-premises standalone or workgroup server as the primary replica (Node1). Our destination is an RDS Custom for SQL Server database instance as the secondary replica (Node2). DNS configuration is done within the server (hosts file). The following diagram illustrates the solution architecture.
The following are the high-level steps for the solution:
Create a primary and secondary replica
Configure Windows firewall inbound rules/VPC security group rules
Set up connectivity from on-premises to the AWS Cloud
Configure the domain-independent Windows failover cluster
Set up the prerequisites for an Always On an availability group
Create the Always On availability group
Migrate the on-premises database to Amazon RDS Custom for SQL Server
Prerequisites
We assume that you have prior knowledge regarding setting up Always On availability groups.
In this post, we configure a domain-independent availability group to perform a migration. For additional information, refer to What is an Always On availability group and Create a domain-independent availability group. We use SQL Server 2019 Enterprise Edition and Windows Server 2019.
In order to follow this post, the following prerequisites are required:
Install and configure AWS Command Line Interface (AWS CLI)
An AWS account and appropriate permissions to interact with resources in your AWS account.
Amazon Virtual Private Cloud (Amazon VPC)
This solution can incur costs in your AWS Account. Refer to the RDS pricing page for more information. Make sure you remove the resources once you are done with the solution.
We strongly recommend that you set up Always On in a non-production instance and run end-to-end validations before you implement this solution in a production environment. It’s also recommended to follow the preceding high-level steps in the same order of sequence.
Create a primary and secondary replica
For this post, we create an Amazon Elastic Compute Cloud (Amazon EC2) SQL Server instance to represent the on-premises standalone primary replica (Node1).
Take note of your source IP address. In our case, Node1 uses the private IP 10.0.23.99.
Launch Node2, using the following AWS CLI script, and update the parameters accordingly. For more information about how to create an RDS Custom for SQL Server DB instance, refer to Creating and connecting to a DB instance for Amazon RDS Custom for SQL Server.
Take note of your destination IP address. In our case, Node2 uses the private IP 172.31.154.104.
Configure Windows firewall inbound rules and VPC security group rules
For successful Windows failover cluster creation and communication to happen, you must open the following ports at the Windows operating system level and VPC security group level.
TCP ports 1433, 1434, 4022, 5022, 5023, and 135
UDP ports 3343 and 137. For more information about creating inbound port rules in Windows, refer to Create an Inbound Port Rule. To learn more about controlling traffic through security groups, refer to Security group rules.
Set up connectivity from on-premises to the AWS cloud
It’s very important to establish a secure connection from on-premises to the AWS cloud so both can communicate with each other. You can adopt different methodologies to achieve this, for example using AWS Transit Gateway, AWS Direct Connect, or AWS VPN.
Configure a domain-independent Windows failover cluster
Now let’s configure our domain-independent Windows failover cluster. Run the commands in this section in Windows PowerShell 64-bit as an administrator. Note that multiple server restarts will occur as a part of the setup process.
Install the failover clustering feature in all replica servers
Run the following command on both nodes to install the Windows failover clustering feature:
Assign a primary DNS suffix to all replica servers
Run the following command on Node1. For this example, we assign the DNS suffix as “OnPremSource.com”.
Run the following command on Node2 . For this example, we assign the DNS suffix as “AWSDestination.com”.
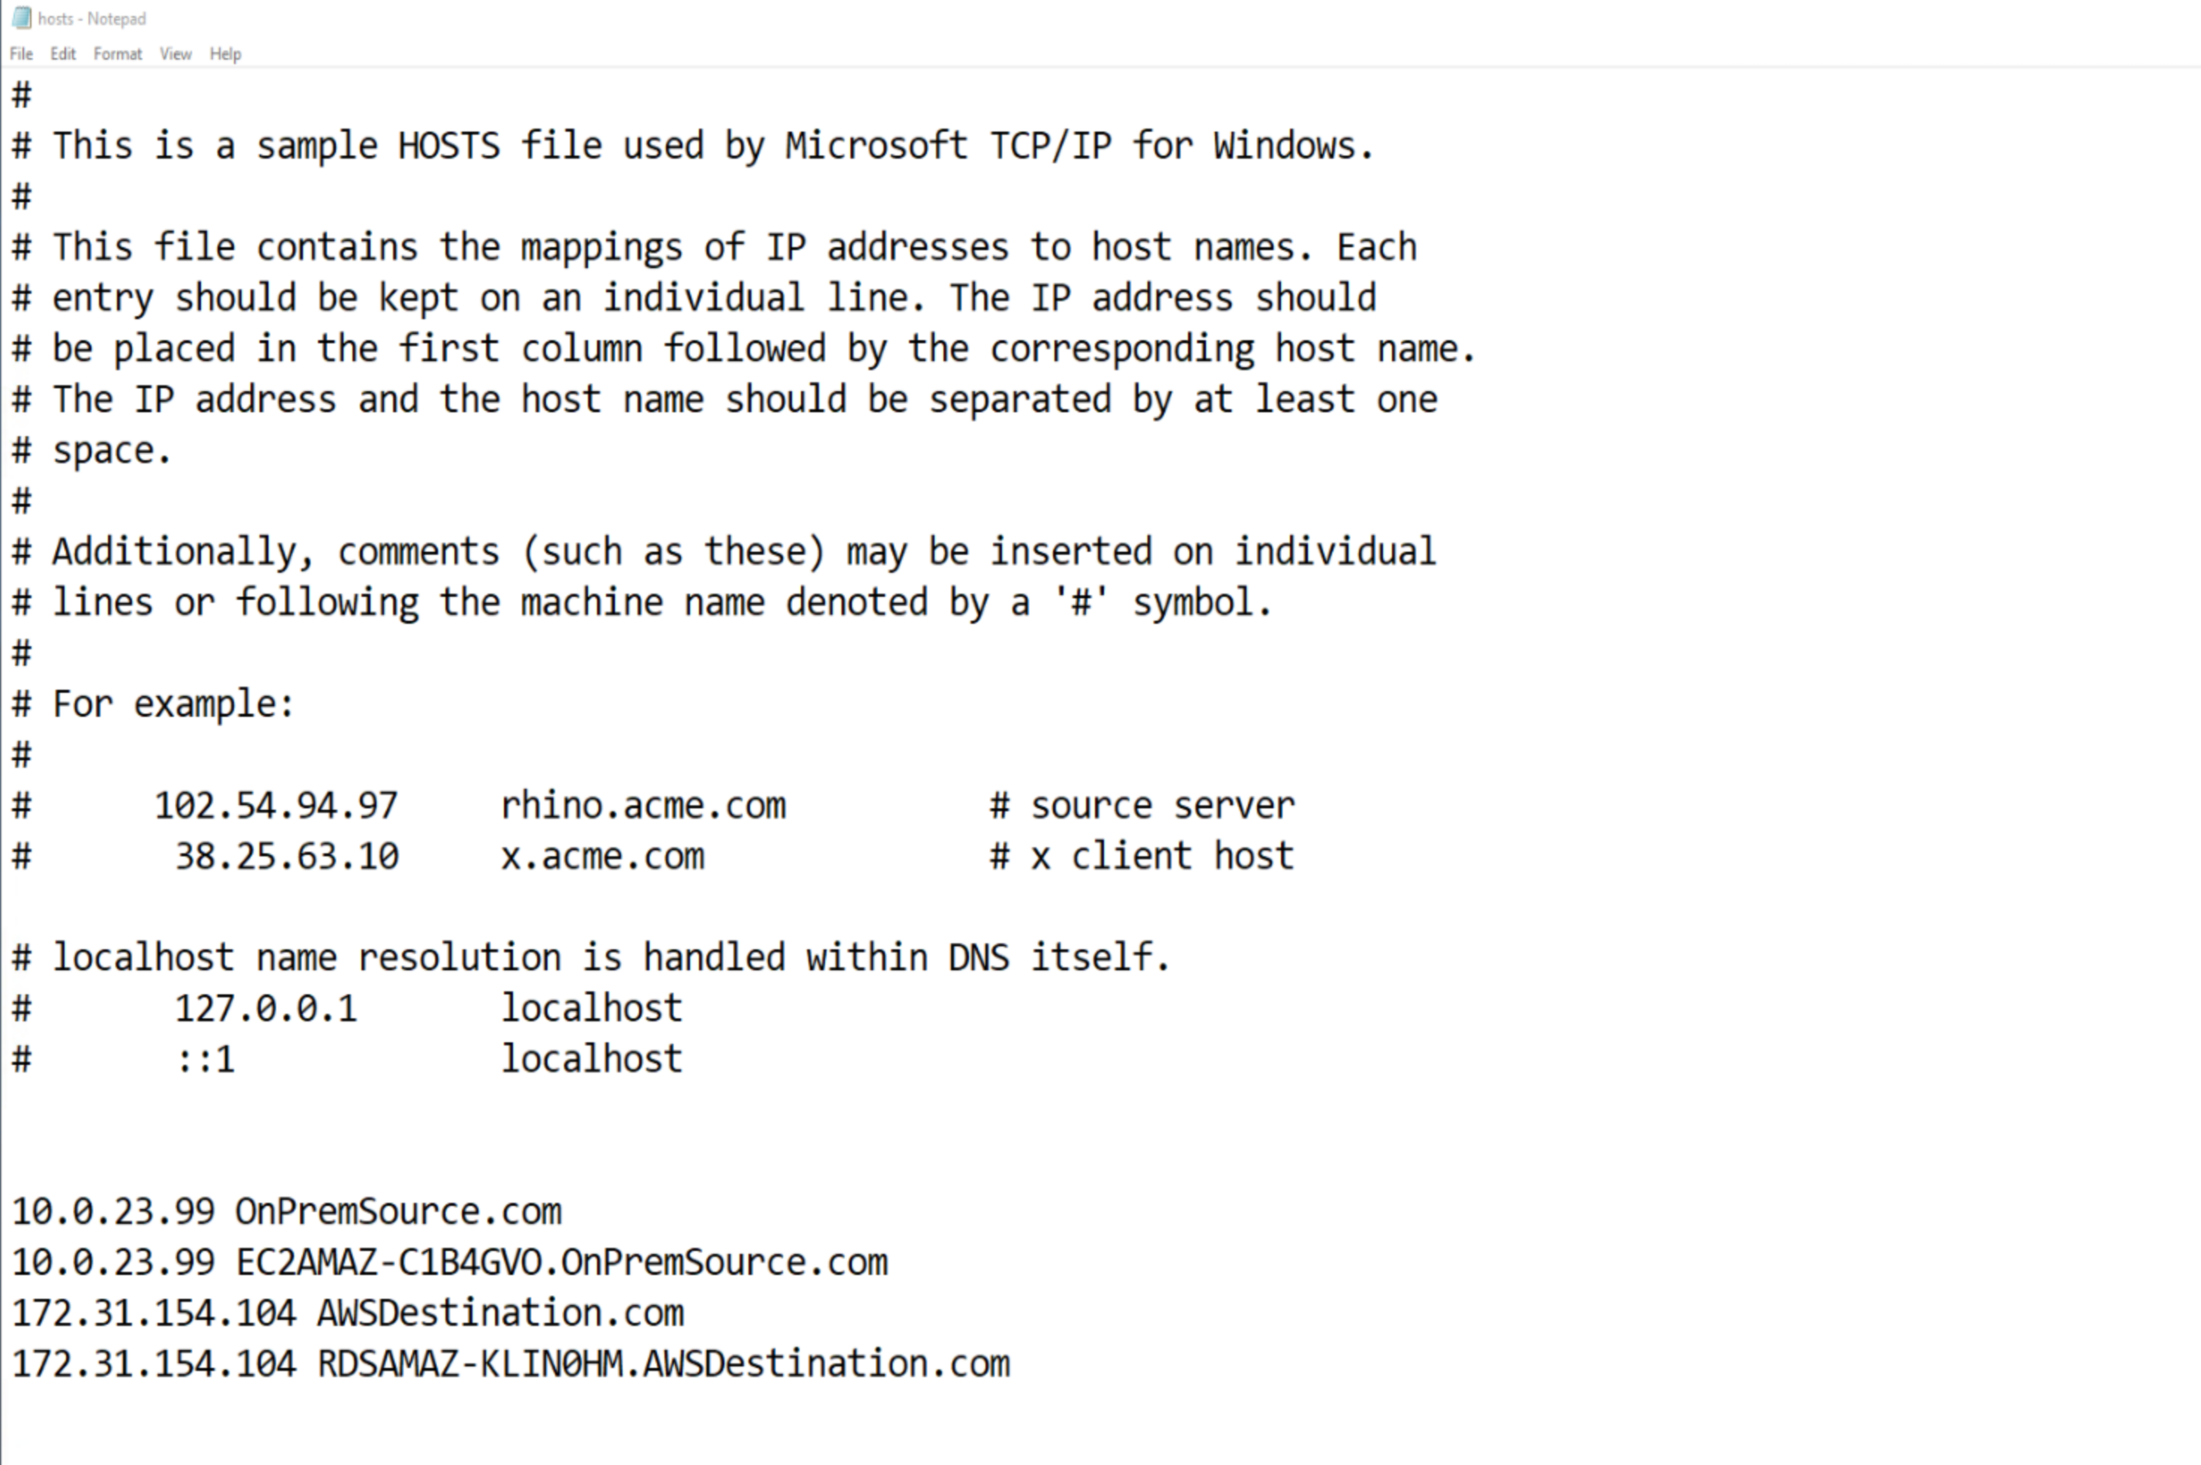
Update the host file on each replica servers
On both nodes, navigate to C:WindowsSystem32Drivesetchosts. Edit the Hosts file manually to add the IP address, host name, and FQDN entry at the end of the file. Restart the nodes for the changes to take effect.
The following table summarizes the parameter details.
.
Node_type
IP Address
Domain Name
Hostname
Fully Qualified Domain Name
Node1
Amazon EC2/
on-premises
10.0.23.99
OnPremSource.com
EC2AMAZ-C1B4GVO
EC2AMAZ-C1B4GVO.OnPremSource.com
Node2
RDS Custom for SQL Server
172.31.154.104
AWSDestination.com
RDSAMAZ-KLIN0HM
RDSAMAZ-KLIN0HM.AWSDestination.com
Use the following format:
<IP address of node1> <node1domainname>
<IP address of node1> <node1hostname.domainname>
<IP address of node2> <node2domainname>
<IP address of node2> <node2hostname.domainname>
The following screenshot is an example from Node1.
Alternatively, run the following PowerShell (change the parameters accordingly) to perform the same actions:
The following is an example command using our Node1 and Node2 configuration.
Now try to Test-NetConnection between the nodes on port 1433 to make sure both servers have network connectivity. If you encounter an issue, open the Windows firewall’s inbound and outbound rules and review your configuration.
Run the following command on Node1 to test port connectivity to Node2.
Run the following command on Node2 to test port connectivity to Node1.
Set up local admin user account on all replica servers
Create a local Windows user and add that user to the administrator’s group. Create a similar user on the other node with the same password. Run the following commands on both nodes:
Configure the LocalAccountTokenFilterPolicy registry setting
Run the following command on both nodes to configure the LocalAccountTokenFilterPolicy value to 1. This setting is required because we use a local user account during the failover cluster creation and not the domain account.
Configure the DNS suffix list
Run the following commands on both the nodes to append the existing DNS suffix list.
Configure a domain-independent Windows failover cluster
Run the following command on Node1 as the new user that you created to create a domain-independent Windows failover cluster. If possible, RDP as the new user and run the command.
Set up the prerequisites for an Always On availability group
Let’s configure our SQL Server Always On availability group, which is a robust high availability and disaster recovery solution in SQL Server.
Configure the SQL Server Log on as a service using a local admin user on both replica servers
Change the SQL Server service account’s log-on as a service to the local admin user you created in the preceding section on both nodes using the following PowerShell code (change the parameters accordingly). Note that this will restart the SQL services automatically. In this example, we use the testing user.
You can also do this in a graphical user interface using the services.msc console.
Enable the Always On availability group feature on both replica servers
Run the following commands on both nodes, changing the parameters accordingly. Note that the third command restarts SQL services:
Create the login, master key, certificate, and endpoint on both replica servers
Turn on SQL authentication on both instances and restart them if you haven’t already. For information about changing authentication mode, refer to Change server authentication mode. Run the following TSQL statements in SQL Server Management Studio on the corresponding node’s mentioned. Change the directory locations according to your environment.
On Node1, run the following code to set up the certificate:
On Node2, run the following code to set up the certificate:
Copy the certificates between nodes either manually or by running the following Windows PowerShell commands on Node1:
On Node1, run the following code:
On Node2, run the following code:
Create an Always On availability group
Run the following command on Node1 to create an Always On availability group. The file system directory structure of the database files that will be created on Node2 should be identical to Node1 in order for automatic seeding to work. If they’re different, you must manually prepare the secondary database. For more information, see Prepare a secondary database for an Always On availability group.
Note that all SQL Server database files are stored on the D: drive by default, in the D:rdsdbdataDATA directory.
If you create or alter the database file location to be anywhere other than the D: drive, then RDS Custom places the DB instance outside the support perimeter. For details, refer to Troubleshooting DB issues for Amazon RDS Custom.
Modify the availability group name, database name, replica value, and endpoint_url value according to your environment.
On Node2, run the following code :
An Always On availability group from on-premises to Amazon RDS Custom for SQL Server is successfully established.
The following screenshot shows Amazon EC2/on-premises replica as primary.
Migrate the on-premises database to Amazon RDS Custom for SQL Server
Up to this step, we have demonstrated the setup to replicate the database as is from on-premises to Amazon RDS Custom for SQL Server.
In a typical migration scenario, you set this up and let it run until your actual cutover day approaches. When you’re ready for the migration, complete the following steps:
Monitor the asynchronous data flow between Node 1 and Node2 using dynamic management views (DMVs). Query the DMV sys.dm_hadr_database_replica_states for last_commit_lsn and last_commit_time on both nodes to get an estimation of how far the destination is behind. For more information about monitoring performance, refer to Monitor performance for Always On availability groups.
Stop all incoming application traffic to Node 1 so no write activities are occurring.
Until now, the availability mode for the database was set to asynchronous commit to gain better performance. Switch that to synchronous commit to help avoid data loss by running the following TSQL on Node1:
Repeat step 1 to revalidate and make sure RTO and RPO is met. At this point, we’re ready to perform the actual migration.
Run the following TSQL on Node2 to migrate the database from on-premises to Amazon RDS Custom for SQL Server. This allows new read/write application connections to connect to the RDS Custom for SQL Server instance. Because we’re using domain-independent availability groups, force_failover_allow_data_loss is the only way to migrate the database.
Redirect your application, dependent services, traffic by modifying your connection string to use the RDS Custom for SQL Server instance so that the write activities can resume from this instance.
The following screenshot shows RDS Custom replica as primary.
Rollback plan
For any production change, it’s crucial to have a rollback plan. After the database migration from on-premises to Amazon RDS Custom for SQL Server is complete, data movement and synchronization will be suspended by default between the nodes. As a best practice, you should reestablish the synchronization back to on-premises by running the following TSQL on the on-premises node until you reach the cleanup phase so that you have an option to rollback if needed:
Remove the on-premises dependencies
You can monitor your application and database performance for a period of time to ensure stable performance. When you’re ready to run independently on Amazon RDS Custom for SQL Server, remove the on-premises dependencies by running the following TSQL statements
This removes the Always On database from the availability group. On Node2, run the following code:
On both nodes, run the following code to drop the availability group completely:
Decommission the on-premises servers
Now that you have removed the on-premises dependencies of your RDS Custom for SQL Server instance, you can decommission the on-premises database, instance, or server accordingly. If you want high availability with RDS Custom for SQL Server, refer to Configure high availability with Always On Availability Groups on Amazon RDS Custom for SQL Server.
Cleanup
To avoid incurring future charges, delete the resources you created as part of this post. You can clean up the following AWS resources:
Delete Amazon EC2 instance, refer to Terminate your instance
Delete DB instance, refer to Deleting a DB instance
Summary
SQL Server Always On availability groups provide a cost-effective high availability and disaster recovery feature. The domain-independent Always On availability group feature enables you to configure your SQL Server cluster without using Active Directory, which reduces the complexity during a hybrid cluster setup.
In this post, we demonstrated a solution for migrating your on-premises SQL Server workload to Amazon RDS Custom for SQL Server using a domain-independent Always On availability group, which makes the whole migration strategy more simple, secure and cost-effective.
Try out the solution and if you have any comments or questions, leave them in the comments section.
About the authors
Aravind Hariharaputran is Database Consultant with the Professional Services team at Amazon Web Services. He is passionate about databases in general with Microsoft SQL Server as his specialty. He helps build technical solutions that assist customers to migrate and optimize their on-premises database workload to the AWS Cloud. He enjoys spending time with family and playing cricket.
Alok Srivastava is Senior Database Consultant with Professional Services team at Amazon Web Services. He works as database specialist to help customers to architect and migrate their database solutions to AWS.
Read MoreAWS Database Blog