

In this post, we show you how to use AWS Glue to perform vertical partitioning of JSON documents when migrating document data from Amazon Simple Storage Service (Amazon S3) to Amazon DynamoDB. You can use this technique for other data sources, including relational and NoSQL databases. DynamoDB can store and retrieve any amount of data, but there is a limit of 400 KB on the individual item size. Some real world use-cases, such as document processing, require handling larger individual items.
You can use vertical partitioning to handle documents larger than 400 KB. Vertical partitioning helps unnest documents to make them more referenceable and indexable. Use vertical partitioning to scale data efficiently in Amazon DynamoDB explains vertical partitioning in detail.
DynamoDB is a fully managed, serverless, key-value NoSQL database designed to run high-performance applications at any scale. Because DynamoDB allows flexible schema, the set of data attributes apart from the key attributes for each item can be uniform or discrete. DynamoDB is best suited for online transactional processing (OLTP) workloads where most access patterns are known beforehand. There might be use cases where key schema or key attributes need to be changed, such as changes in access patterns over time or migration across databases.
AWS Glue is a serverless data integration service that offers you a comprehensive range of tools to perform ETL (extract, transform, and load) at the right scale for your application. You can use AWS Glue to perform DynamoDB data transformation and migration. AWS Glue supports a variety of relational and non-relational databases that are hosted on AWS or on-premises. It supports DynamoDB as a source as well as a destination for ETL pipelines.
Sample source Amazon S3 data schema
For our sample use case, order data is stored in JSON files in an S3 folder. Each order is uniquely identified with order_id and contains metadata attributes such as delivery_address, creation_timestamp, invoice_id, shipment_id, and is_cod, and a list of ordered products along with the metadata for each product. When storing data in an S3 bucket, follow the S3 security best practices guide.
The following snippet shows a couple of sample order records from a JSON file:
You can download this sample data to use in the solution described in this post.
Target DynamoDB key schema
A common access pattern for order data is to get product details for a product in an order or to look up different orders that include a particular product. The goal is to make the prod_code attribute indexable, which is part of the nested JSON structure. As a part of vertical partitioning, we can break down a single order document into multiple items, each corresponding to one product from the itemlist, and a single metadata item. The metadata item contains information specific to the order such as delivery_address, creation_timestamp, and more. We use the sort key attribute SK to model this one to many relationship. Using generic attribute names, such as SK, enables us to use the same attribute to store information about different entities. Therefore, the ideal target DynamoDB items for an order would look like those in Figure 1 that follows, where the order_id is the same for each entry, but each has a unique SK value.
Figure 1: Screenshot showing an example of vertically partitioned order data
Let’s see how you can achieve this using AWS Glue.
Solution overview
To migrate data from Amazon S3 to DynamoDB using AWS Glue, use the following steps:
Set up an AWS Glue crawler to read the S3 data.
Create an AWS Glue ETL job to perform the following functions:
Read data from S3.
Implement vertical partitioning as per the target schema.
Write data into the DynamoDB table.
Figure 2 that follows illustrates this architecture.
Figure 2: Architecture to migrate data from S3 to DynamoDB
Prerequisites
Make sure that you have an AWS Identity and Access Management (IAM) role with the appropriate permissions to attach to the AWS Glue crawler and ETL job. For more information, see Crawler prerequisites, Setting up IAM permissions for AWS Glue, Setting up encryption in AWS Glue, and Security best practices in AWS IAM. Also, make sure that you have your input data in an S3 bucket. You can use the downloaded sample data as input for this exercise.
Set up an AWS Glue crawler to read Amazon S3 data
AWS Glue crawlers populate the AWS Glue Data Catalog with tables, which are then used by AWS Glue ETL jobs as source and target. The source for this example is an S3 bucket.
To set up and run an AWS Glue crawler
On the AWS Management Console for AWS Glue, on the left-side menu, choose Crawlers.
On the Crawlers page, choose Create crawler. This starts a series of pages that prompt you for the crawler details.
In the Name field, enter a unique name, and choose Next.
On the Choose data sources and classifiers page, choose Add a data store and leave the default values for the remaining fields.
Now point the crawler to the S3 data. On the Add a data store page, select the Amazon S3 data store. This tutorial doesn’t use a connection, so leave the Connection field blank if it’s visible.
In the S3 path field, enter the path where the crawler can find the document data. Choose Add an S3 data source, and then choose Next.
Choose an existing IAM role that has permissions to access the data store and create objects in the Data Catalog, or choose Create a new IAM role.The IAM role name starts with AWSGlueServiceRole-, and you enter the last part of the role name in the field. Enter the role name, and then choose Next.
Note: To create an IAM role, your AWS user must have CreateRole, CreatePolicy, and AttachRolePolicy permissions.The wizard creates an IAM role named AWSGlueServiceRole-[Name], attaches the AWS managed policy AWSGlueServiceRole to this role, and adds an inline policy that allows read access to the S3 location provided in the crawler.
Select the newly created role from the dropdown, and then choose Next.
On the Set output and scheduling page, choose Add database to create a database. In the pop-up window, enter a name for the database, and then choose Create database. Come back to the crawler creation page and select the newly created database from the dropdown for Target database. For Frequency in the crawler schedule, choose On demand, use the default values for the rest of the options, and choose Next.
Verify the choices you made in the Review and create page. If you see any mistakes, you can choose Back to return to previous pages and make changes. After you have reviewed the information, choose Create crawler.
When the banner near the top of the crawlers page shows you that the crawler was created, choose Run crawler. The banner changes to show Crawler successfully starting and Running messages for your crawler.
After a few moments, you can choose the Refresh icon to see the current status of the crawler. When the crawler completes, a new banner appears that describes the changes made by the crawler.
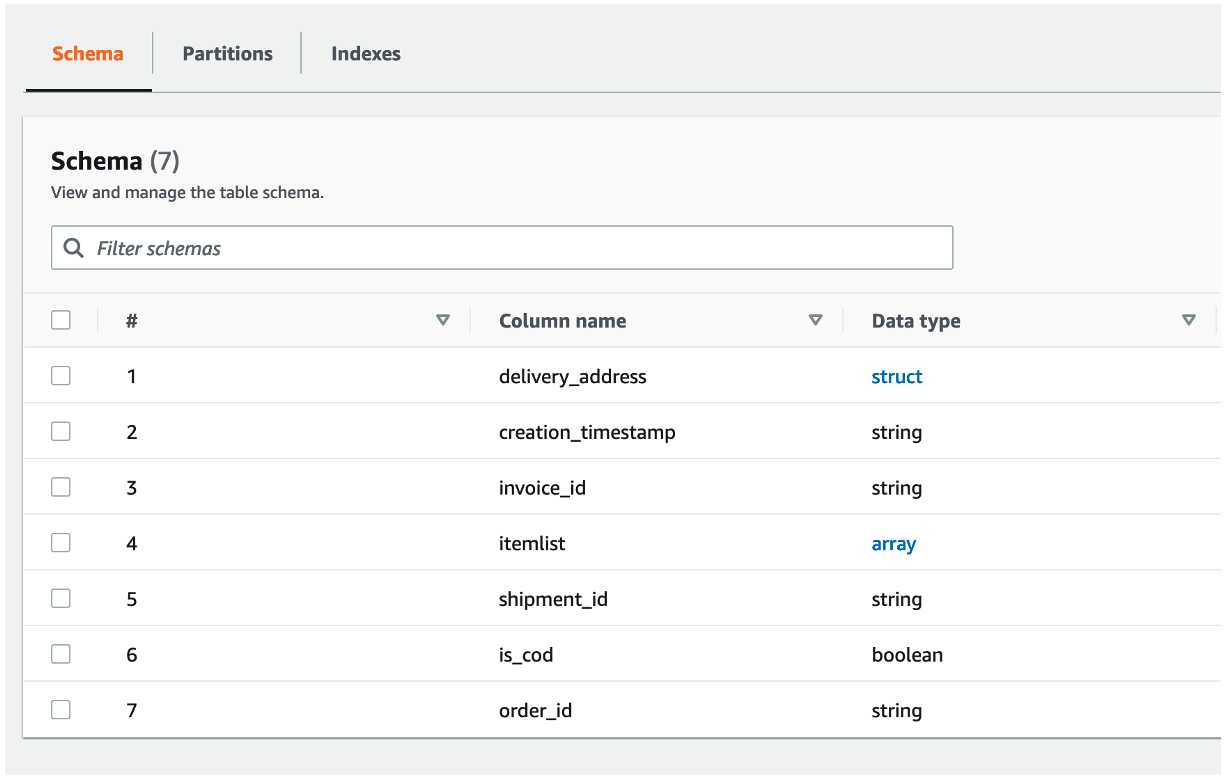
In the left-side navigation, under Data Catalog and below Databases, choose Tables. Here you can view the table created by the crawler. Select the table name to view the table settings, parameters, and properties. Scroll down in this view to see the schema, which is information about the columns and data types of the table.
The crawler for this post creates a table with the schema shown in figure 3 that follows.
Figure 3: Schema of table created by the crawler
You can also refer to this tutorial for creating a crawler. For more details on setting up a crawler, see to Working with crawlers on the AWS Glue console.
Create an AWS Glue ETL job
A Glue ETL job is used to implement vertical partitioning of document data and to write the data to DynamoDB with the target schema.
To create an AWS Glue ETL job
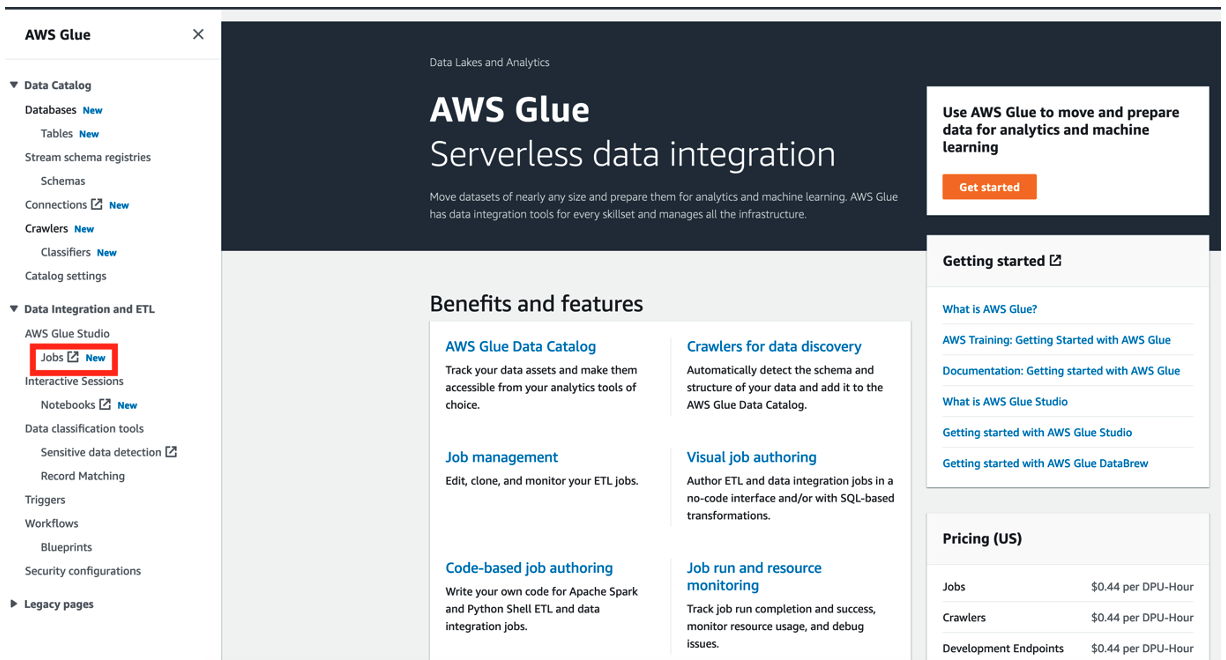
On the AWS Glue console, choose Jobs in the navigation pane.
Figure 4: Choose Jobs from the navigation pane
Select Spark script editor.
Choose Create.
Figure 5: Creating a Spark script
The following sections show how to build the script for the ETL job.
Read data from Amazon S3
Start with the following lines of code to read data from S3. Supply parameters like the database name and table name from the Data Catalog (the database and table were created by the Glue crawler in the previous steps). The following code creates a structure called DynamicFrame with the data from S3.
Implement vertical partitioning as per the identified target schema
For this example, you use a function called relationalize to implement vertical partitioning. The relationalize function flattens nested structures and breaks down the DynamicFrame into multiple DynamicFrames: one representing the root elements, and multiple frames representing one nested element each. The root elements and nested elements are separated after the relationalize transform. To associate the nested elements back with the root elements, you use Spark’s join function.
Note: The join function works on DataFrames, which is why code includes a conversion from DynamicFrame to DataFrame.
Additionally, you can introduce new attributes or columns in the DynamicFrame using custom Python functions. The data in this example, doesn’t have an SK attribute with the value metadata, which represents order metadata. So you can add a column for the SK attribute using a custom function called add_sort_key_col. You can also reformat the delivery_address attribute into a string.
Finally, use ApplyMapping to define the attributes in the target DynamoDB items.
Write data into the DynamoDB table
Create a new DynamoDB table called orders_vertically_partitioned where the sharded data will be written by the Glue ETL job. When storing data in Amazon DynamoDB, it’s recommended that you review DynamoDB security best practices.
The key schema for the table is:
Partition key: order_id (of type String)
Sort key: SK (a generic attribute name of type String)
In the Glue ETL job script, there are DynamicFrame structures with the intended target schema. Use the write_dynamic_frame function and provide the DynamoDB table name and write throughput threshold as parameters in the connection_options. The dynamodb.throughput.write.percent parameter limits the DynamoDB write capacity units consumed for this job.
Example script
The following code shows the complete script:
After the script runs successfully, you can verify that the data is vertically sharded in DynamoDB. The item collection for each order_id contains the order metadata and metadata of each product from the item list. The prod_code values can now be indexed by using the SK attribute.
Figure 6: Table showing data loaded and vertically partitioned
Performance considerations
The Glue ETL job, run time depends on the number and size of input documents and the number and type of job workers. For use cases where the input data volume changes significantly, it’s helpful to use AWS Glue Auto Scaling as it handles compute scaling depending on the parallelism at each stage in the job run. For workloads where Amazon S3 input data is received incrementally (for example, per day), consider using job bookmarks to process only the new, unprocessed data.
You can also configure the value of dynamodb.throughput.write.percent as per your requirements to control the amount of DynamoDB write capacity consumed by this ETL job. The default value for this property is 0.5. You can find more details about the DynamoDB parameters in the AWS Glue Developer Guide.
Clean up
If you don’t need the Amazon S3 data and DynamoDB table anymore, delete it after completing this exercise to avoid unnecessary costs. Also delete the Glue job and Crawler if not needed, although they don’t incur additional charges if not run.
Conclusion
In this post, you learned how to use AWS Glue to perform vertical partitioning of JSON document data to be stored in DynamoDB. You can use this technique to perform other transformations on data during migration before loading it into the target database, such as concatenating attributes or flattening nested attributes.
For additional resources, refer to the following:
How do I optimize my AWS Glue ETL workloads when reading from or writing to Amazon DynamoDB?
Using DynamoDB as a sink for Glue.
Simplify Querying Nested JSON with the AWS Glue Relationalize Transform
Monitoring AWS Glue jobs
Using auto scaling for AWS Glue
Introduction to AWS Glue Autoscaling
Leave a comment if you have questions or feedback.
About the authors
Juhi Patil is a London-based DynamoDB Specialist Solutions Architect with a background in big data technologies. In her current role, she helps customers design, evaluate, and optimize their DynamoDB-based solutions.
Mohammedfahim Pathan is a Bengaluru-based Senior Cloud Support Engineer. He has over 13 years of experience in analytics, data warehouse, and distributed systems. He is passionate to evaluate new technologies and help customers with innovative solutions.
Read MoreAWS Database Blog