
")
Amazon SageMaker Serverless Inference (Preview) was recently announced at re:Invent 2021 as a new model hosting feature that lets customers serve model predictions without having to explicitly provision compute instances or configure scaling policies to handle traffic variations. Serverless Inference is a new deployment capability that complements SageMaker’s existing options for deployment that include: SageMaker Real-Time Inference for workloads with low latency requirements in the order of milliseconds, SageMaker Batch Transform to run predictions on batches of data, and SageMaker Asynchronous Inference for inferences with large payload sizes or requiring long processing times.
Serverless Inference means that you don’t need to configure and manage the underlying infrastructure hosting your models. When you host your model on a Serverless Inference endpoint, simply select the memory and max concurrent invocations. Then, SageMaker will automatically provision, scale, and terminate compute capacity based on the inference request volume. SageMaker Serverless Inference also means that you only pay for the duration of running the inference code and the amount of data processed, not for idle time. Moreover, you can scale to zero to optimize your inference costs.
Serverless Inference is a great choice for customers that have intermittent or unpredictable prediction traffic. For example, a document processing service used to extract and analyze data on a periodic basis. Customers that choose Serverless Inference should make sure that their workloads can tolerate cold starts. A cold start can occur when your endpoint doesn’t receive traffic for a period of time. It can also occur when your concurrent requests exceed the current request usage. The cold start time will depend on your model size, how long it takes to download, and your container startup time.
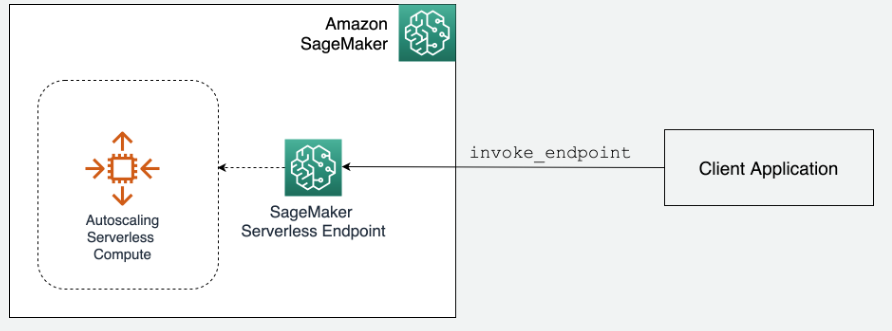
Let’s look at how it works from a high level view.
How it works
A Serverless Inference endpoint can be setup using the AWS Management Console, any standard AWS SDKs, or the AWS CLI. Because Serverless Inference uses the same APIs as SageMaker Hosting persistent endpoints to configure and deploy endpoints, the steps to create a Serverless Inference endpoint are identical. The only modification required is changes to configuration parameters that are setup on your endpoint configuration.
To create a Serverless Inference endpoint, you perform three basic steps:
Step 1: Create a SageMaker Model that packages your model artifacts for deployment on SageMaker using the CreateModel API. This step can also be done via AWS CloudFormation using the AWS::SageMaker::Model resource.
Step 2: Create an endpoint configuration using the CreateEndpointConfig API and the new configuration ServerlessConfig options, or selecting the serverless option in the AWS Management Console as shown in the following image. Note that this step can also be done via AWS CloudFormation using the AWS::SageMaker::EndpointConfig resource. You must specify the Memory Size which, at a minimum, should be as big as your runtime model object, and the Max Concurrency, which represents the max concurrent invocations for a single endpoint.
Step 3: Finally, using the endpoint configuration that you created in Step 2, create your endpoint using either the AWS Management Console, or programmatically using the CreateEndpoint API. This step can also be done via AWS CloudFormation using the AWS::SageMaker::Endpoint resource.
That’s it! Then, SageMaker creates an HTTPS URL that you can use to invoke your endpoint through your client applications using the existing runtime client and the invoke_endpoint request.
Deep Dive
Next, we’ll dive deeper into the high-level steps above by showcasing a detailed how-to for creating a new SageMaker Serverless Inference endpoint.
Setup and training
For preview the following regions are supported so make sure to create a SageMaker Notebook Instance or SageMaker Studio Notebook in one of these regions: us-east-1, us-east-2, us-west-2, eu-west-1, ap-northeast-1, and ap-southeast-2. For this example, we’ll be using the Amazon provided XGBoost Algorithm to solve a regression problem with the Abalone dataset. The notebook code can be found in the sagemaker-examples repository.
First, we must setup the appropriate SDK clients and retrieve the public dataset for model training. Note that an upgrade to the SDK may be required if you are running on an older version.
After setting up the clients and downloading the data that will be used to train the model, we can now prepare for model training using SageMaker Training Jobs. In the following, we are performing the steps to configure and fit our model that will be deployed to a serverless endpoint.
Model creation
Next, we must package our model for deployment on SageMaker. For the Model Creation step, we need two parameters: Image and ModelDataUrl.
Image points to the container image for inference. Because we are using a SageMaker managed container, we retrieved this for training under the variable image_uri, and we can use the same image for inference. If you are bringing your own custom container, then you must supply your own container image that is compatible for hosting on SageMaker as you would today for hosting a SageMaker Hosting persistent endpoint.
ModelDataUrl points to the Amazon Simple Storage Service (S3) URL for the trained model artifact that we will pull from the training estimator.
We can now use our created model to work with creating an Endpoint Configuration, which is where you will add a serverless configuration.
Endpoint configuration creation
Up until now, the steps look identical to if you were deploying a SageMaker Hosting endpoint. This next step is the same. However, you’ll take advantage of a new serverless configuration option in your endpoint configuration. There are two inputs required, and they can be configured to meet your use case:
MaxConcurrency: This can be set from 1 to 50.
Memory Size: This can be the following values: 1024 MB, 2048 MB, 3072 MB, 4096 MB, 5120 MB, or 6144 MB.
The configuration above indicates that this endpoint should be deployed as a serverless endpoint because we specified configuration options in ServerlessConfig.
Endpoint creation and invocation
Next, we use the Endpoint Configuration to create our endpoint using the create_endpoint function.
The following step should take a few minutes to deploy successfully.
The created endpoint should display the Serverless Configuration that you provided in the previous step.
Now we can invoke the endpoint with a sample data point from the Abalone dataset.
Monitoring
Serverless Inference emits metrics to Amazon CloudWatch. These metrics include the metrics that are emitted for SageMaker Hosting persistent endpoints, such as MemoryUtilization and Invocations, as well as a new metric called ModelSetupTime. This new metric tracks the time that it takes to launch new compute resources for your serverless endpoint.
Conclusion
In this post, we covered the high level steps for using Serverless Inference, as well as a deep dive on a specific example to help you get started with the new feature using the example provided in SageMaker examples on GitHub. Serverless Inference is currently launched in preview, so we don’t yet recommend it for production workloads. There are some features that Serverless Inference doesn’t support yet, such as SageMaker Model Monitor, Multi-Model Endpoints, and Serial Inference Pipelines.
Please check out the Feature Exclusions portion of the documentation for additional information. The SageMaker Serverless Inference Documentation is also a great resource for diving deeper into Serverless Inference capabilities, and we’re excited to start getting customer feedback!
About the Authors
Ram Vegiraju is a ML Architect with the SageMaker Service team. He focuses on helping customers build and optimize their AI/ML solutions on Amazon SageMaker. In his spare time, he loves traveling and writing.
Shelbee Eigenbrode is a Principal AI and Machine Learning Specialist Solutions Architect at Amazon Web Services (AWS). She holds six AWS certifications and has been in technology for 23 years spanning multiple industries, technologies, and roles. She is currently focusing on combining her DevOps and ML background to deliver and manage ML workloads at scale. With over 35 patents granted across various technology domains, she has a passion for continuous innovation and using data to drive business outcomes. Shelbee co-founded the Denver chapter of Women in Big Data.
Michael Pham is a Software Development Engineer in the Amazon SageMaker team. His current work focuses on helping developers efficiently host machine learning models. In his spare time he enjoys Olympic weightlifting, reading, and playing chess.
Rishabh Ray Chaudhury is a Senior Product Manager with Amazon SageMaker, focusing on Machine Learning inference. He is passionate about innovating and building new experiences for Machine Learning customers on AWS to help scale their workloads. In his spare time, he enjoys traveling and cooking. You can find him on LinkedIn.
Read MoreAWS Machine Learning Blog