

Organizations often choose from commonly used migration strategies for their on-premises to cloud migration. The choice depends on various factors, including target state goals and business outcomes (for more information, see Your cloud transformation journey).
In this post, we discuss a re-platforming strategy where you consolidate data from multiple on-premises SQL Server database servers to a single SQL Server database in Amazon Relational Database Service (Amazon RDS) for SQL Server using AWS Database Migration Service (AWS DMS).
Use case
In the context of a business-to-business (B2B) application, a single-tenant database server model provides each tenant (a served business) access to its own database server, isolated from other tenants. In a multi-tenant database server model, all your tenants share a single database server. You can manage data isolation in this model at two different levels:
Application level – Using mappings to retrieve data associated with a given tenant
Database level – Using mechanisms such as row- or column-level isolation, depending on the database engine
The advantages of using a single-tenant model are isolation, dedicated resource availability, and the ability to tailor the schema to individual tenant requirements. The advantages of using a multi-tenant model are simplicity, cost, and operational efficiency. The scalability of the cloud can mitigate some of the resource availability concerns of a multi-tenant model. The model that you choose for your target state depends on careful consideration of the advantages and disadvantages of either approach and thorough analysis before picking one.
We discuss a scenario where your current on-premises setup is a single-tenant model with several SQL Server database servers. As part of migrating your application to the cloud, you wish to consolidate all your database servers with identical schema to a single RDS for SQL Server (multi-tenant model) instance. We show how to use AWS DMS to accomplish this along with security setup so that each tenant cannot see the other tenant’s data.
Solution overview
We set up two SQL Server instances on premises as sources to AWS DMS tasks, and create an RDS for SQL Server instance as the target. We use AWS DMS transformation rules to add a tenant-id field to the table being migrated. This allows the application to distinguish between the various tenants it serves.
The following diagram illustrates the solution architecture:
This solution applies to SQL Server versions 2016, 2017, and 2019, but you can extend it to support other Amazon RDS databases.
The following diagram shows how AWS DMS tasks consolidate vehicle data from two database servers (tenants) into a single RDS for SQL Server database instance:
We walk you through the following high-level steps:
Configure the source and target databases.
Create AWS DMS source and target endpoints.
Create AWS DMS migration tasks.
Insert data into the source database tables.
Configure tenant isolation in a multi-tenant environment.
Prerequisites
To implement this solution, you must have the following:
An AWS DMS replication instance
Two or more similar source SQL database servers with permissions to create users and databases
Two or more databases with the same schema and objects
An RDS for SQL Server target instance with administrator access
The ability to use the SQL Server Row-Level Security feature to restrict access of data in target tables
The ability to perform planning on the target instance to accommodate your transactional workloads
Limitations of row-level security in SQL Server
The Row-Level Security feature of SQL Server has the following limitations:
You must create the predicate function SCHEMABINDING. If a function is created without SCHEMABINDING, and you try to bind it to a security policy, it throws an error.
You can’t create indexed views on a table on which row-level security is implemented.
In-memory tables are not supported for row-level security.
Full-text indexes are not supported.
For more information, refer to Row-Level Security.
Configure the source and target databases
Follow these steps to create users and enable change data capture (CDC) for tenants 1 and 2. This lets you migrate existing data and replicate ongoing changes using CDC.
Log in to the on-premises SQL Server from SSMS as an administrator and create a user for tenant 1:
Log in as tenant1 and create a database:
Create the table vehicle_info:
Enable CDC at the database level:
Verify that CDC is enabled at the database level:
You should see a value of 1 for column is_cdc_enabled.
Enable CDC for the vehicle_info table:
Verify that CDC is enabled at the table level:
You should see a value of 1 for column is_tracked_by_cdc.
Repeat steps 1–7 to configure tenant 2 on premises on SQL Server (use tenant2 as your login).
In your target RDS for SQL Server instance, create a database:
Create AWS DMS source and target endpoints
In this step, create AWS DMS source and target endpoints for both tenants on the on-premises SQL Server databases as well as the target in AWS. The following screenshot shows the endpoint configuration settings for one on-premises SQL Server database: tenant1. Use the same configuration to create another endpoint for the other SQL Server database as tenant2.
After the endpoints are configured , the connection status should be successful, as shown in the following screenshot.
Create AWS DMS migration tasks
Next, we create AWS DMS data migration tasks using the following steps:
On the AWS DMS console, create data migration tasks for tenants 1 and 2.
The following screenshot shows the configuration settings for tenant1.
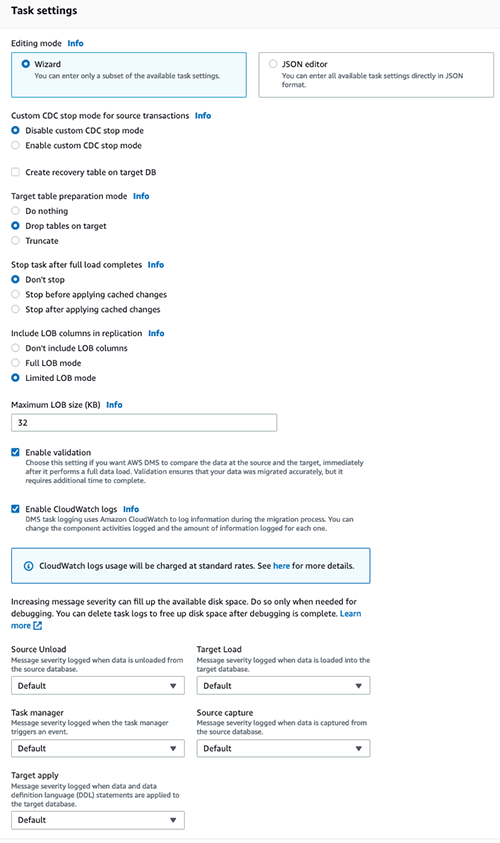
Under Table mappings, select JSON editor and enter the following code:
We define two transformation rules. The first rule instructs the AWS DMS task to include all tables with the name vehicle_info in any schema. The second rule is a transformation rule that lets the AWS DMS task add a column to any table being replicated to the target. The expression $AR_H_USER translates to a unique login configured for AWS DMS to use to connect to each of the source databases.
Choose Save.
For Start migration task, select Automatically on create.
Choose Create task.
Use the same steps to create a migration task for tenant 2 called tenant2.
After all the steps are completed, start both tasks.
Insert data into the source database tables
To test the solution, insert records in the vehicle_info table of tenant 1:
Insert records in the vehicle_info table of tenant 2:
Verify the data in the RDS for SQL Server target database table. The expression $AR_H_USER translates to a unique login for each of the source databases.
Configure tenant isolation in a multi-tenant environment
To allow tenants to have access to their data only, without permission to view other tenants’ data, you can use the row-level security feature in SQL Server.
A primary user may be able to view all the records in the table. However, when a specific user logs in, row-level security blocks the view of data based on the column UserName.
For example, when the user tenant1 logs in, they should only see records that belong to them. Similarly, when tenant2 logs in, they can only view data that is relevant to them.
To implement row-level security, connect to the RDS for SQL Server database and complete the following high-level steps:
Create specified users for each tenant who want to have access to the data. These users are granted access to the records based on their login context.
Create an inline table-valued function in SQL. This function contains the filter predicate for the table on which row-level security is to be implemented.
Create a security policy for the table and provide the inline table-valued function to it.
The security policies and table-valued functions are unique for each table on which row-level security is implemented. Therefore, to create multiple tables with row-level security, we need to create functions and security policies for each table separately.
Now that we know how to implement row-level security in SQL Server, let’s apply it to our vehicle database example:
Create a user that has access to all the data in the vehicle_info table. This is only for administration purposes and is not shared with application teams.
Log in as a multi-tenant user and create users for each of your tenants:
Create an inline table-valued function to perform row-level isolation:
Apply the security policy:
Test row-level security:
This user should be able to see all the records because they’re a primary user for the multi-tenant database.
Now impersonate tenant1:
Only tenant 1 data should be visible. As shown in the following screenshot, the records returned are only for the user tenant1. All other records from the table aren’t visible because they don’t belong to this user context.
Conclusion
In this post, you learned how to use AWS DMS to convert a single-tenant architecture to a multi-tenant pipeline. In a single-tenant architecture, each customer shares the same database and application. When compared to single-tenancy, multi-tenancy is cheaper, has more efficient resource usage, a lower maintenance cost, and a potentially larger computing capacity.
We also demonstrated how to refine each tenant’s data by using row-level security to provide secure access to the multi-tenant database.
For further details on multi-tenant processing, see Multi-tenant processing pipelines with AWS DMS, AWS Step Functions, and Apache Hudi on Amazon EMR. You can also review the best practices for working with AWS DMS.
About the Authors
Shirin Ali is a Database Consultant with the Professional Services team at Amazon Web Services. She works as database migration specialist to help Amazon customers to migrate their on-premises database environment to AWS cloud database solutions.
Kishore Dhamodaran is a Senior Cloud Consultant with Amazon Web Services Professional Services. Kishore helps customers with their cloud enterprise strategy and migration journey, leveraging his years of industry and cloud experience.
Read MoreAWS Database Blog