

Machine learning operations (MLOps) are key to effectively transition from an experimentation phase to production. The practice provides you the ability to create a repeatable mechanism to build, train, deploy, and manage machine learning models. To quickly adopt MLOps, you often require capabilities that use your existing toolsets and expertise. Projects in Amazon SageMaker give organizations the ability to easily set up and standardize developer environments for data scientists and CI/CD (continuous integration, continuous delivery) systems for MLOps engineers. With SageMaker projects, MLOps engineers or organization administrators can define templates that bootstrap the ML workflow with source version control, automated ML pipelines, and a set of code to quickly start iterating over ML use cases. With projects, dependency management, code repository management, build reproducibility, and artifact sharing and management become easy for organizations to set up. SageMaker projects are provisioned using AWS Service Catalog products. Your organization can use project templates to provision projects for each of your users.
In this post, you use a custom SageMaker project template to incorporate CI/CD practices with GitLab and GitLab pipelines. You automate building a model using Amazon SageMaker Pipelines for data preparation, model training, and model evaluation. SageMaker projects builds on Pipelines by implementing the model deployment steps and using SageMaker Model Registry, along with your existing CI/CD tooling, to automatically provision a CI/CD pipeline. In our use case, after the trained model is approved in the model registry, the model deployment pipeline is triggered via a GitLab pipeline.
Prerequisites
For this walkthrough, you should have the following prerequisites:
A GitLab account
An AWS account
An Amazon SageMaker Studio domain (with SageMaker projects enabled)
This post provides a detailed explanation of the SageMaker projects, GitLab, and GitLab pipelines integration. We review the code and discuss the components of the solution. To deploy the solution, reference the GitHub repo, which provides step-by-step instructions for implementing a MLOps workflow using a SageMaker project template with GitLab and GitLab pipelines.
Solution overview
The following diagram shows the architecture we build using a custom SageMaker project template.
Let’s review the components of this architecture to understand the end-to-end setup:
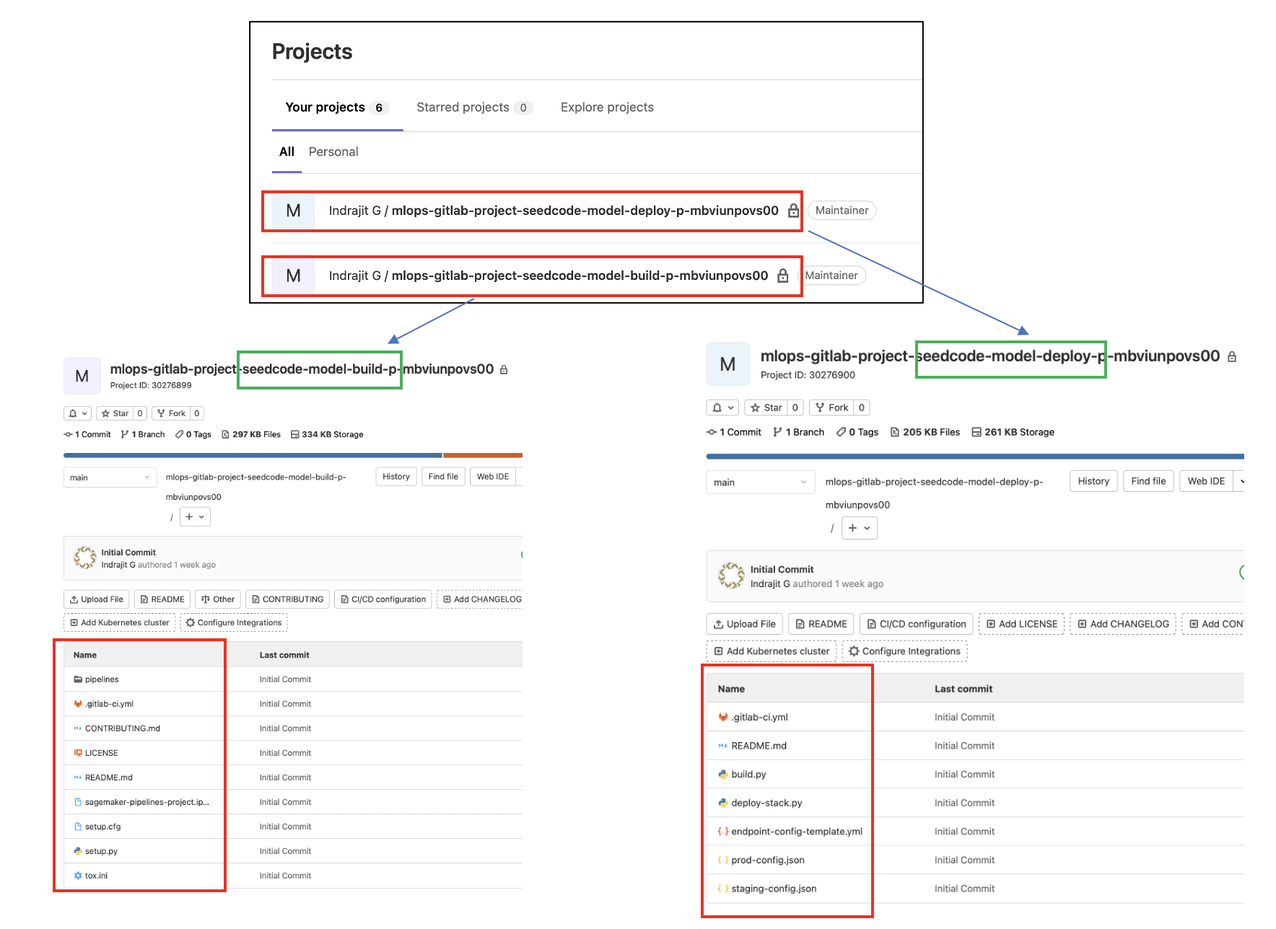
GitLab – Acts as our code repository and enables CI/CD using GitLab pipelines. The custom SageMaker project template creates two repositories (model build and model deploy) in your GitLab account.
The first repository (model build) provides code to create a multi-step model building pipeline. This includes steps for data processing, model training, model evaluation, and conditional model registration based on accuracy. It trains a linear regression model using the XGBoost algorithm on the well-known UCI Machine Learning Abalone dataset.
The second repository (model deploy) contains the code and configuration files for model deployment, as well as the test scripts required to pass the quality benchmark. These are code stubs that must be defined for your use case.
Each repository also has a GitLab CI pipeline. The model build pipeline automatically triggers and runs the pipeline from end to end whenever a new commit is made to the model build repository. The model deploy pipeline is triggered whenever a new model version is added to the model registry, and the model version status is marked as Approved.
SageMaker Pipelines – Contains the directed acyclic graph (DAG) that includes data preparation, model training, and model evaluation.
Amazon S3 – An Amazon Simple Storage Service (Amazon S3) bucket stores the output model artifacts that are generated from the pipeline.
AWS Lambda – Two AWS Lambda functions are created, which we review in more detail later in this post:
One function seeds the code into your two GitLab repositories.
One function triggers the model deployment pipeline after the new model is registered in the model registry.
SageMaker Model Registry – Tracks the model versions and respective artifacts, including the lineage and metadata. A model package group is created that contains the group of related model versions. The model registry also manages the approval status of the model version for downstream deployment.
Amazon EventBridge – Amazon EventBridge monitors all changes to the model registry. It also contains a rule that triggers the Lambda function for the model deploy pipeline, when the model package version state changes from PendingManualApproval to Approved in the model registry.
AWS CloudFormation – AWS CloudFormation deploys the model and creates the SageMaker endpoints when the model deploy pipeline is triggered by the approval of the trained model.
SageMaker hosting – Creates two HTTPS real-time endpoints to perform inference. The hosting option is configurable, for example, for batch transform or asynchronous inference. The staging endpoint is created when the model deploy pipeline is triggered by the approval of the trained model. This endpoint is used to evaluate the deployed model by confirming it’s generating predictions that meet our target accuracy requirements. When the model is ready to be deployed in production, a production endpoint is provisioned by manually starting the job in the GitLab model deploy pipeline.
Use the new MLOps project template with GitLab and GitLab pipelines
In this section, we review the parameters required for the MLOps project template (see the following screenshot). This template allows you to utilize GitLab pipelines as your orchestrator.
The template has the following parameters:
GitLab Server URL – The URL of the GitLab server in https:// format. The GitLab accounts under your organization may contain a different customized server URL (domain). The server URL is required to authorize access to the python-gitlab API. You use the personal access token you created to allow permission to the Lambda functions to push the seed code into your GitLab repositories. We discuss the Lambda function code in more detail in the next section.
Base URL for your GitLab Repositories – The URL for your GitLab account to create the model build and deploy repositories in the format of https://<gitlab server>/<username> or https://<gitlab server><group>/<project>. You must create a personal access token under your GitLab user account in order to authenticate with the GitLab API.
Model Build Repository Name – The name of the repository mlops-gitlab-project-seedcode-model-build of the model build and training seed code.
Model Deploy Repository Name – The name of the repository mlops-gitlab-project-seedcode-model-deploy of the model deploy seed code.
GitLab Group ID – GitLab groups are important for managing access and permissions for projects. Enter the ID of the group that repositories are created for. In this example, we enter None, because we’re using the root group.
GitLab Secret Name (Secrets Manager) – The secret in AWS Secrets Manager contains the value of the GitLab personal access token that is used by the Lambda function to populate the seed code in the repositories. Enter the name of the secret you created in Secrets Manager.
Lambda functions code overview
As discussed earlier, we create two Lambda functions. The first function seeds the code into your GitLab repositories. The second function triggers your model deployment. Let’s review these functions in more detail.
Seedcodecheckin Lambda function
This function helps create the GitLab projects and repositories and pushes the code files into these repositories. These files are needed to set up the ML CI/CD pipelines.
The Secrets Manager secret is created to allow the function to retrieve the stored GitLab personal access token. This token allows the function to communicate with GitLab to create repositories and push the seed code. It also allows the environment variables to be passed in through the project.yml file. See the following code:
The Secrets Manager secret was created when you ran the init.sh file earlier as part of the code repo prerequisites.
The deployment package for the function contains several libraries, including python-gitlab and cfn-response. Because our function’s source code is packaged as a .zip file and interacts with AWS CloudFormation, we use cfn-response. We use the python-gitlab API and the Amazon SDK for Python (Boto3) to download the seed code files and upload them to Amazon S3 to be pushed to our GitLab repositories. See the following code:
Two projects (repositories) are created in GitLab, and the seed code files are pushed into the repositories (model build and model deploy) using the python-gitlab API:
The following screenshot shows the successful run of the Lambda function pushing the required seed code files into both projects in your GitLab account.
gitlab-trigger Lambda function
This Lambda function is triggered by EventBridge. The project.yml CloudFormation template contains an EventBridge rule that triggers the function when the model package state changes in the SageMaker model registry. See the following code:
The following screenshot contains a subset of the function code that triggers the GitLab pipeline in the .gitlab-ci.yml file. It deploys the SageMaker model endpoints using the CloudFormation template endpoint-config-template.yml in your model deploy repository.
To better understand the solution, review the entire code for the functions as needed.
GitLab and GitLab pipelines overview
As described earlier, GitLab plays a key role as the source code repo and enabling CI/CD pipelines in this solution. Let’s look into our GitLab account to understand the components.
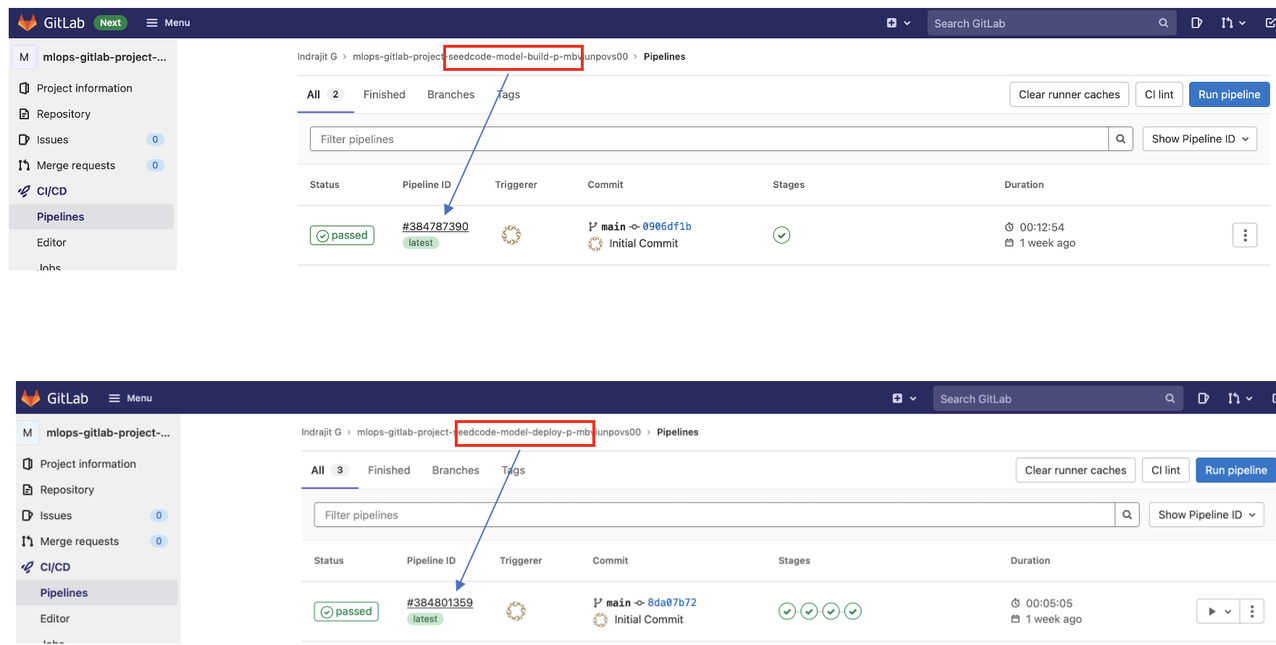
After the project is successfully created, using our custom template in SageMaker projects per the steps in the code repo, navigate to your GitLab account to see two new repositories. Each repository has a GitLab CI pipeline associated with it that runs as soon as the project is created.
The first run of each pipeline fails because GitLab doesn’t have the AWS credentials. For each repository, navigate to Settings, CI/CD, Variables. Create two new variables, AWS_ACCESS_KEY_ID and AWS_SECRET_ACCESS_KEY, with the associated information for your GitLab role.
Model build pipeline in GitLab
Let’s review the GitLab pipelines, starting with the model build pipeline. We define the pipelines in GitLab by creating the .gitlab-ci.yml file, where we define the various stages and related jobs. As shown in the following screenshot, this pipeline has only one stage (training) and the related script shows how a SageMaker pipeline file is triggered. (You can learn more about the SageMaker pipeline by exploring the pipeline.py file on GitHub.)
When this GitLab pipeline is triggered, it starts the Abalone SageMaker pipeline to build your model.
When the model build is complete, you can locate this model in the model registry in SageMaker Studio.
Use this template for your custom use case
The model build repository contains code for preprocessing, training, and evaluating the model for the UCI Abalone dataset. You need to modify the files to address your custom use case.
Navigate to the pipelines folder in your model build repository.
Upload your dataset to a S3 bucket. Replace the bucket URL in this section of your pipeline.py file.
Navigate to .gitlab-ci.yml and modify this section with the folder and file of your use case.
Model deployment pipeline in GitLab
When the SageMaker pipeline that trains the model is complete, a model is added to the SageMaker model registry. If that model is approved, the GitLab pipeline in the model deploy repository starts and the model deployment process begins.
To approve the model in the model registry, complete the following steps:
Choose the Components and registries icon.
Choose Model registry, and choose (right-click) the model version.
Choose Update model version status.
Change the status from Pending to Approved.
This triggers the deploy pipeline.
Now, let’s review the .gitlab-ci.yml file in the model deploy repository. As shown in the following screenshot, this model deploy pipeline has four stages: build, staging deploy, test staging, and production deploy. This pipeline uses AWS CloudFormation to deploy the model and create the SageMaker endpoints.
A manual step in the GitLab pipeline exists for model promotion from staging to production that creates an endpoint with the suffix -prod. If you choose manual, this job runs and upon completion deploys the SageMaker endpoint.
To verify that the endpoints were created, navigate to the Endpoints page on the SageMaker console. You should see two endpoints: <model_name>-staging and <model_name>-prod.
GitLab implementation patterns
In this section, we discuss two patterns for implementing GitLab: hosting with Amazon Virtual Private Cloud (Amazon VPC), or with two-factor authentication.
Hosting GitLab in an Amazon VPC
You may choose to deploy GitLab in an Amazon VPC to use a private network and provide access to AWS resources. In this scenario, the Lambda functions also must be deployed in a VPC to access the GitLab API. We accomplish this by updating the project.yml file and the AWS Identity and Access Management (IAM) role AmazonSageMakerServiceCatalogProductsUseRole.
The IAM user that you used to create the VPC requires the following user permissions for Lambda to verify network resources:
ec2:DescribeSecurityGroups
ec2:DescribeSubnets
ec2:DescribeVpcs
The Lambda functions’ execution role requires the following permissions to create and manage network interfaces:
ec2:CreateNetworkInterface
ec2:DescribeNetworkInterfaces
ec2:DeleteNetworkInterface
On the IAM console, search for AmazonSageMakerServiceCatalogProductsUseRole.
Choose Attach policies.
Search for the AWSLambdaVPCAccessExecutionRole managed policy.
Choose Attach policy.
Next, we update project.yml to configure the functions to deploy in a VPC by providing the VPC security groups and subnets.
Add the subnet IDs and security group IDs to the Parameters section, for example:
Add the VpcConfig information under Properties for the GitSeedCodeCheckinLambda and GitLabPipelineTriggerLambda functions, for example:
Two-factor authentication enabled
If you enabled two-factor authentication on your GitLab account, you need to use your personal access token to clone the repositories in SageMaker Studio. The token requires the read_repository and write_repository flags. To clone the model build and model deploy repositories, enter the following commands:
Read MoreAWS Machine Learning Blog