

In the financial services industry, efficient data lineage and audit capabilities are highly sought after. This is particularly true for database transaction processing that facilitates the movement of currency and management of sensitive customer account information. This is a challenge for customers because although all financial service providers generally have a means of moving money throughout their site, the experience is often inefficient for the user, and causes high fees for the provider due to the need to use multiple payment vendors and incorporate auditing and trailing capabilities that become slow and difficult to index and maintain over time.
Developers and administrators working with traditional databases (SQL or NoSQL) have tried to address this challenge by using techniques such as audit tables, metadata, and audit trails to help track data change history or by offering mechanisms for encrypting the entire database and locking it down. However, it still doesn’t prevent the possibility of data tampering in these databases with the right access key or hash.
Instead of having to build complex and custom audit mechanisms to ensure transaction and data integrity, financial institutes can use Amazon Quantum Ledger Database (Amazon QLDB) to easily store a permanent and complete record of all financial transactions. Amazon QLDB makes this easier by writing to an append-only journal and providing full transaction history with digital signatures for each transaction. Insert, update, and delete operations in Amazon QLDB are always appended, either adding a new version of an existing document or inserting a unique new document. This means that there is no write-in-place operation available in Amazon QLDB and, as a result, any change is tracked by a complete and immutable (can’t be altered) lineage of all changes to data. Furthermore, built-in cryptographic hashing and verification APIs allow you to mathematically prove that no change has been made to a given document or its history of revisions.
In this post, I show you how to perform CRUD (create, read, update, and delete) operations on Amazon QLDB. I also show you how you can view the review history of your transactions and cryptographically verify document (read transaction) revision. The CRUD operations in this post are implemented by using AWS Lambda functions. Amazon API Gateway provides the front-end API interface for the CRUD functions. The post also includes setting up Amazon Kinesis Data Streams, which you can use to set up consumers like Amazon Simple Storage Service (Amazon S3) and Amazon OpenSearch Service as future enhancements of the solution. Amazon DynamoDB is optionally included in the solution to store the user profile metadata.
What is Amazon QLDB?
Amazon QLDB is a purpose-built ledger database that provides a complete and cryptographically verifiable history of all changes made to your application data. In simple terms, Ledger databases add a layer of digital signatures for each transaction as a document so anyone can audit the list and see that it was constructed correctly. Think of this like adding and maintaining versions to each transaction and categorizing the unique state of it. Document versions (called revisions in Amazon QLDB) can’t be deleted or modified. Instead, all changes to an existing document are appended as new revisions of the existing document.
This capability makes Amazon QLDB a natural fit for system-of-record applications—those for which data integrity, completeness, and verifiability are critical, often driven by quality or regulations. For example, in the supply chain and logistics space, an application built on Amazon QLDB has the entire history of changes, such as movement between carriers and across borders, available for query and analysis. In finance, system-of-record applications track critical data, such as credit and debit transactions from banking or wallet accounts.
Solution overview
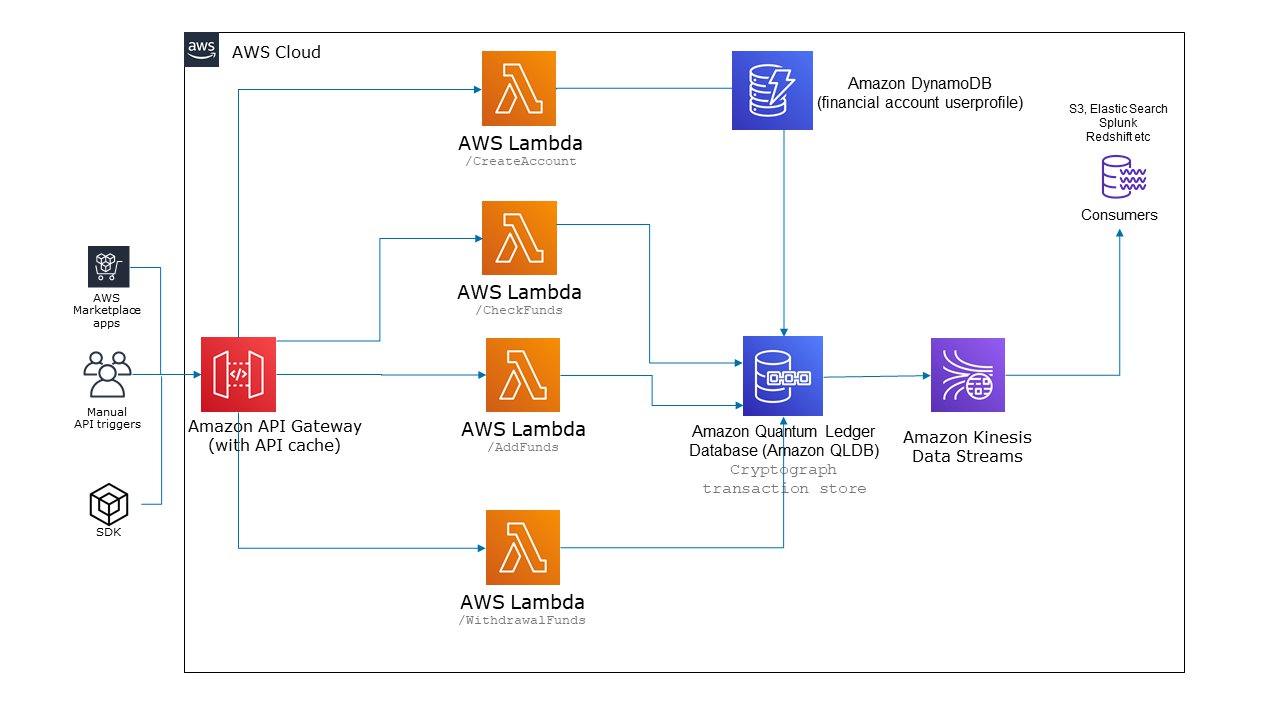
The following figure depicts a simple architecture of the solution.
The solution uses several AWS services in the architecture:
API Gateway – API Gateway provides the API interface for the solutions. The deployment of the solution generates several API endpoints that are served by API Gateway. The following are APIs backed by API Gateway deployed by the solution (we provide detailed instructions for testing the APIs later in this post):
CreateTable – As of this writing, AWS CloudFormation doesn’t support the creation of Amazon QLDB tables and indexes as resources. As a result, this API has been created to initiate creation of the financial wallet table.
Index – Because CloudFormation doesn’t support the creation of Amazon QLDB indexes and tables as resources, this API has been created to initiate creation of the index on the table. The index API must be triggered after the QLDBCreateTable API has created the table.
CreateAccount – This API creates a new account in Amazon QLDB. The function performs basic validation if an account already exists and creates a record in the database. The Amazon QLDB index is an {email} attribute. See the following example code:
CheckFunds – This API looks up the current value in the database for a user email and returns the balance funds for the account. API Gateway uses caching to speed the responses. See the following code:
AddFunds – This API adds funds to the wallet of the user account. When AddFunds and WithdrawFunds are successful, they return both the previous and the current balance on the account. See the following example code:
WithdrawFunds – This API starts a transaction on Amazon QLDB, selects the current amount in the financial account, and deducts the requested funds if they’re available. When performing a database operation, Amazon QLDB provides atomicity, consistency, isolation, and durability (ACID) properties. The ACID properties of transactions make it easy to write correct applications. For example, in a banking application, when $100 is being transferred or withdrawn from Account A to Account B, either the operation runs fully and consistently, where the money is debited from Account A and credited to Account B, or it doesn’t run at all. The transaction never runs in a partial and inconsistent manner, where the money is credited to Account B but not debited from Account A or vice-versa. See the following example code:
AWS Lambda – The compute logic behind the API endpoints are provided by the Lambda functions. The solution deploys six Lambda functions for different operations on Amazon QLDB. Lambda functions use Node.js as the runtime programming framework with the AWS SDK.
Amazon QLDB – The datastore of the financial wallet solution is provided by the ledger database, Amazon QLDB. Amazon QLDB is where all the systematic collection of financial wallet data is happening, including electronic storage and manipulation.
Amazon DynamoDB – DynamoDB acts as the key-value store for storing profile details for the user account.
Amazon Kinesis Data Streams – The transaction data within Amazon QLDB is raw. In production systems, such financial data generates massive real-time streams of transactions and stays in Amazon QLDB. The stream of data needs to be visualized and analyzed in milliseconds to enable real-time analytics use cases such as real-time dashboards, dynamic pricing, and more.
This capability is provided by Kinesis Data Streams. Kinesis Data Streams is configured to deliver data streams to the consumers like Amazon S3 or Amazon OpenSearch Service so that real-time anomaly detection can be identified.
Prerequisites
Complete the following prerequisites before deploying the solution:
Sign up for AWS account. Resources are consumed beyond the Free Tier. We provide cleanup steps later in this post to delete resources created by the CloudFormation stack.
Because AWS Serverless Application Model (AWS SAM) relies on Node.js runtime, install the latest Node.js version.
Verify and proceed when your version verification is complete with the following code:
Install the latest version of AWS Command Line Interface (AWS CLI).
Confirm the installation with the following code:
Configure your AWS credentials.
The solution creates IAMRoleStatements accordingly for creating the Amazon QLDB ledger database, Kinesis data streams, and an Identity and Access Management (IAM) role for Kinesis Data Streams and Lambda functions. The credentials need to have permissions to create an S3 bucket, create an IAM role and create, view, and delete CloudFormation stacks. See the following code:
Verify the installation:
Install git (to download the application stack).
Verify the installation:
AWS SAM deployment
If you have already deployed this blog post stack, we recommend cleaning it up before deploying it again. To remove a previous AWS SAM deployment of this stack, run the following command, providing the Region and stack name you used to create the stack earlier:
This step is only required if you deployed the solution earlier.
Now you’re ready for your AWS SAM deployment.
Create a directory in your local machine.
Clone the code repo with the following command:
You should have git installed as a prerequisite.
Your file tree structure should look like the following in the current directory:
Run the following command from the location of template.yaml:
Run the following command from the location of template.yaml after the build succeeds:
The guided deployment starts, and you’re prompted for confirmation to a set of questions.
Choose y for all.
When prompted for the deployment, enter y and proceed.
Deployment takes approximately 5–6 minutes to complete. This generates a set of outputs like the following:
Verify the deployed resources
You can now verify the deployed resources from the stack. Make sure to change your Region as needed (the default deploys to us-east-1).
Amazon QLDB ledger – captable1
Kinesis data stream – captable1-kinesis-stream
DynamoDB table – captable1
IAM role for Amazon QLDB data stream – captableStream-accountid–region
IAM role for Lambda function – capmywallet-west2-1148-funds-region-lambdaRole
Test your virtual financial wallet API
Because the application stack builds the APIs and resources needed for the service, certain resources like the Amazon QLDB tables and indexes can’t be created using the AWS SAM framework as of this writing.
The sequence of running the API is important for the first successful testing to ensure that the Amazon QLDB table is set up and the index is created.
After the first sequential run of the API, you can test the application APIs CreateAccount, CheckFunds, AddFunds, and WithdrawFunds in any sequence.
We use curl (download instructions here) for the following code examples (make sure to change the API endpoint generated in the outputs section after running sam deploy). You can change your JSON input values as required. Similarly, you can also run these tests from the Postman GUI.
Create a table:
You get the following response:
Create an index on the table:
You get the following response:
Create a wallet account for a user:
You get the following response:
Check funds for a user’s account:
You get the following response:
Add funds to a user’s account:
You get the following response:
Withdraw funds for a user:
You get the following response:
Query your data from the Amazon QLDB table
Now that the table is created and some data has been loaded, you’re ready to run test queries to review the data that you just inserted. Amazon QLDB uses PartiQL as its query language and Amazon Ion as its document-oriented data model.
PartiQL is an open source, SQL-compatible query language that has been extended to work with Ion. With PartiQL, you can insert, query, and manage your data with familiar SQL operators. Ion is a superset of JSON. It’s an open-source, document-based data format that gives you the flexibility of storing and processing structured, semi-structured, and nested data.
To query the table you created in the previous section, complete the following steps:
On the Amazon QLDB console, choose Query editor in the navigation pane.
Choose the captable1 ledger.
In the query editor, enter the following statement to query the wallettable table for a particular user account that you added to the ledger:
Choose Run.
A row of data is displayed as your result.
View the revision history of your transactions
The history function in Amazon QLDB is a PartiQL extension that returns revisions from the committed view of the table, which includes both your application data and the associated metadata. The metadata shows exactly when each revision was made, in what order, and which transaction committed them.
On the Amazon QLDB console, choose Query editor in the navigation pane.
Choose the captable1 ledger.
To query the history of a document, start by finding its unique ID.
In addition to querying the committed view, another way of getting a document ID is to use the BY keyword in the table’s default user view.
In the query editor, enter the following statement:
Choose Run.
Copy the value w_uniqueid without the quotes.
Use this w_uniqueid value to query the history function in the following syntax (replace h.metadata.id value with the w_uniqueid you copied in the last step)
You should see all revision history.
Cryptographically verify your transaction revision
With Amazon QLDB, you can efficiently verify the integrity of a document in your ledger’s journal by using cryptographic hashing with SHA-256.
In this example, you verify a document revision in the captable1 ledger. First, you request a digest, which is returned as an output file and acts as a signature of your ledger’s entire change history. Then, you request a proof for the revision relative to that digest. With this proof, the integrity of your revision is verified if all validation checks pass.
Request a digest
To request a digest, complete the following steps:
On the Amazon QLDB console, in the navigation pane, choose Ledgers.
Select the captable1 ledger.
Choose Get digest.
The Get digest dialog box displays the following digest details:
Digest – The SHA-256 hash value of the digest that you requested.
Digest tip address – The latest block location in the journal covered by the digest that you requested. An address has the following two fields:
strandId – The unique ID of the journal strand that contains the block.
sequenceNo – The index number that specifies the location of the block within the strand.
Ledger – The ledger name for which you requested a digest.
Date – The timestamp when you requested the digest.
Review the digest information, then choose Save.
You can keep the default file name, or enter a new name.
This step saves a plaintext file with contents in Ion format. The file has a file name extension of .ion.txt and contains all the digest information that was listed in the preceding dialog box. The following is an example of a digest file’s contents. The order of the fields can vary depending on your browser.
Save this file where you can access it later.
In the following steps, you use this file to verify a document revision against.
After you have a ledger digest saved, you can start the process of verifying a document revision against that digest.
Verify document revision
Complete the following steps to verify a document revision:
Query your ledger for the id and blockAddress of the document revision that you want to verify.
These fields are included in the document’s metadata, which you can query in the committed view. The document id is a system-assigned unique ID string. The blockAddress is an Ion structure that specifies the block location where the revision was committed.
In the navigation pane of the Amazon QLDB console, choose Query editor.
Choose the captable1 ledger.
In the query editor window, enter the following statement:
Choose Run.
Copy and save the id and blockAddress values that your query returns.
Be sure to omit the double quotes for the id field. In Ion, string data types are delimited with double quotes.
Now that you have a document revision selected, you can start the process of verifying it.
In the navigation pane, choose Verification.
Under Specify the document that you want to verify, enter the following input parameters:
Ledger – Choose captable1.
Document ID – The id value returned by your query.
Block address – The blockAddress value returned by your query.
Under Specify the digest to use for verification, select the digest that you previously saved by choosing Choose digest.
If the file is valid, this auto-populates all the digest fields on your console. Or, you can manually enter the following values directly from your digest file:
Digest – The digest value from your digest file
Digest tip address – The digestTipAddress value from your digest file
Review your document and digest input parameters, then choose Verify.
The console automates two steps for you:
Requests a proof from Amazon QLDB for your specified document
Uses the proof returned by Amazon QLDB to call a client-side API, which verifies your document revision against the provided digest
The console displays the results of your request in the Verification results section.
To test the verification logic, repeat these steps, but change a single character in the Digest input string.
This should cause your verification request to fail with an appropriate error message.
For more information about data verification, see Data verification in Amazon QLDB.
Test your data stream from Amazon QLDB
Data streaming lets you use Amazon QLDB as a single, verifiable source of truth while integrating your journal’s financial data with other services. The following are use cases for streaming financial data:
Build integrated applications in an event-driven architecture style – For example, a bank can use Lambda functions to implement a notification system that alerts customers when their account balance drops below a threshold. In such a system, the account balances are recorded in an Amazon QLDB ledger and transactions recorded in the journal. The Lambda function can trigger the notification logic upon consuming a balance update event streamed to a Kinesis data stream.
Historical analytics of financial data – You can replay the historical event data for financial transactions. For example, an ecommerce website can run ad hoc analytics to generate past sales metrics that weren’t previously captured or money transactions that were recorded in Amazon QLDB but aren’t reflected on the ecommerce website as orders placed.
To test your data stream configuration, open the stream captable1-qldb-stream on the Kinesis Data Streams console. On the Monitoring tab, you can verify stream metrics like record latency, throttled records, and throughput average.
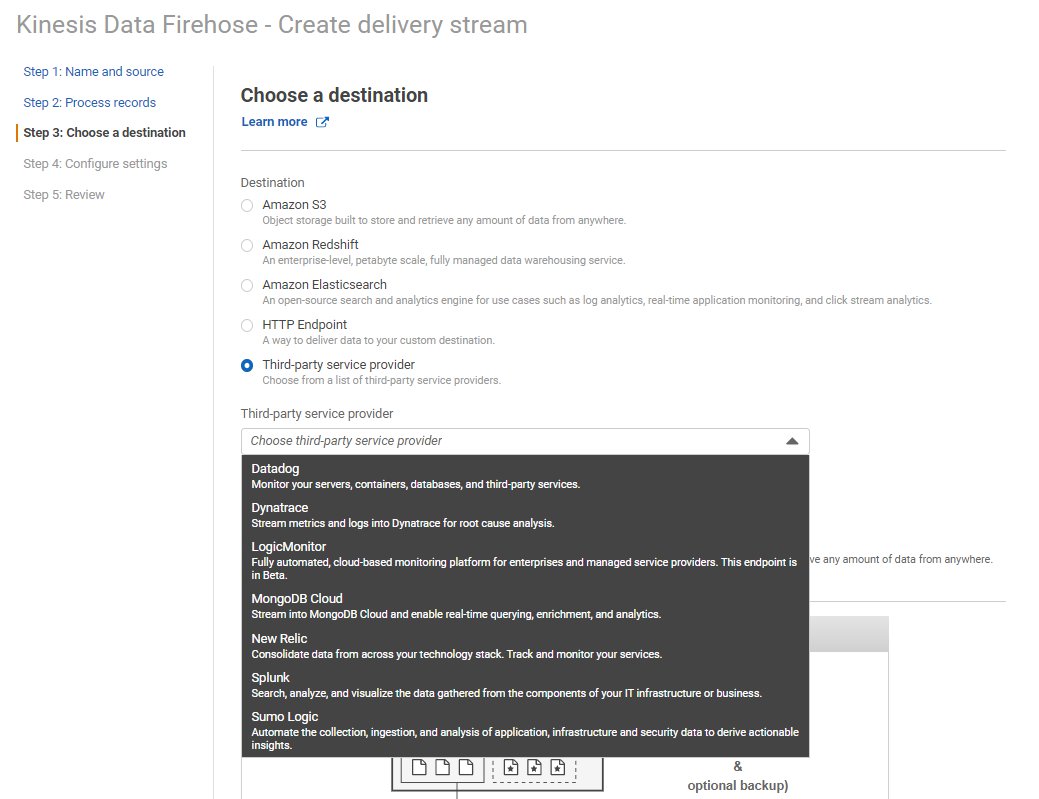
captable1-qldb-stream has a stream of real-time data being received from Amazon QLDB. This real-time streaming data can be delivered automatically and continuously to consumers such as Amazon S3, Amazon Redshift, Amazon OpenSearch Service, Splunk, and any custom HTTP endpoint or HTTP endpoints owned by supported third-party services like Datadog, Dynatrace, LogicMonitor, MongoDB, New Relic, and Sumo Logic. This enables consumers to perform analytics on real-time data.
Clean up
If you no longer need to use the captable1 ledger after completing your testing, from your directory in the shell (the same directory where you ran the sam deploy command), run the following command:
The command doesn’t provide any output. You can sign in to the AWS CloudFormation console to monitor the stack deletion.
Conclusion
In this post, we looked at how to build a simple API interface for CRUD operations and data streams on Amazon QLDB using Kinesis Data Streams. We also looked at how you can query data using the Amazon QLDB query editor, view the revision history of transactions, and cryptographically verify a document revision in the ledger.
If you’re new to Amazon QLDB or ledger databases in general, check out the following resources to get started:
What is Amazon Quantum Ledger Database
Building System of Record Applications with Amazon QLDB
Amazon QLDB Resources
Building a Serverless Wallet Service for In-Game Currency
Feel free to leave feedback, comments and suggestions for improvement.
About the Authors
Anurag Jain is a Global Solutions Architect at Amazon Web Services based out of Palo Alto, CA. He has 2 decades of wide technology experience in Innovation & Prototyping solutions with core expertise in AWS Cloud platform & Architecting Microservices. He primarily drives Cloud transformation journey, Build Cloud Center of Excellence practice and accelerate the adoption of AWS Cloud with World Wide High Tech customers & System Integrators.
Read MoreAWS Database Blog