

In Part 1 of this series, we provided a high-level introduction to the AWS Nitro System and explained why Nitro is well suited for flexible and secure blockchain key management workloads.
In this post, we guide you through the steps to configure aspects like AWS Key Management Service (AWS KMS) key policies and how to sign your first Ethereum EIP-1559 transaction inside AWS Nitro Enclaves.
In Part 3, we do a deep dive into Nitro Enclaves and explain features like cryptographic attestation and the general architecture of a Nitro Enclaves-based Ethereum signing application.
Solution overview
The following diagram depicts the architecture of our Nitro Enclaves-based blockchain application, which we deploy and configure in this post using the provided AWS Cloud Development Kit (AWS CDK) sources. A detailed explanation of the different components is available in the solution overview of Part 1.
The scope of the provided AWS CDK source is limited to the area marked in red.
Prerequisites
For this walkthrough, you must have the following prerequisites:
An AWS account
An AWS Identity and Access Management (IAM) user with administrator access
Configured AWS credentials
Docker, Node.js, Python 3, pip, and jq installed on the workstation that you plan to deploy the solution from
Deploy the solution with AWS CDK
AWS CDK is an open-source framework for defining and provisioning cloud application resources. It uses common programming languages such as JavaScript, C#, and Python.
The AWS CDK Command Line Interface (AWS CLI) allows you to interact with AWS CDK applications. It provides features like synthesizing AWS CloudFormation templates, confirming the security changes, and deploying applications.
This section shows how to prepare the environment for running AWS CDK and the sample code.
When working with Python, it’s good practice to use venv to create project-specific virtual environments. The use of venv also reflects AWS CDK standard behavior. You can find out more in the workshop Activating the virtualenv.
To install the sample application, complete the following steps:
Install the AWS CDK and test the AWS CDK CLI:
Download the code from the GitHub repo and change to the new directory:
Change to the aws-nitro-enclave-blockchain-wallet repository:
Install the dependencies using the Python package manager:
Build the required binaries for Nitro Enclaves. This step requires a valid local Docker environment.
After you run this step, a new folder (application/eth1/enclave/kms) is available that contains the required Nitro Enclaves artifacts.
If you encounter a problem with the build_kmstool_enclave_cli.sh step, such as a network connectivity issue, you can turn on the debug output of the script by changing set +x to set -x inside the script.
For additional information, refer to the GitHub repo.
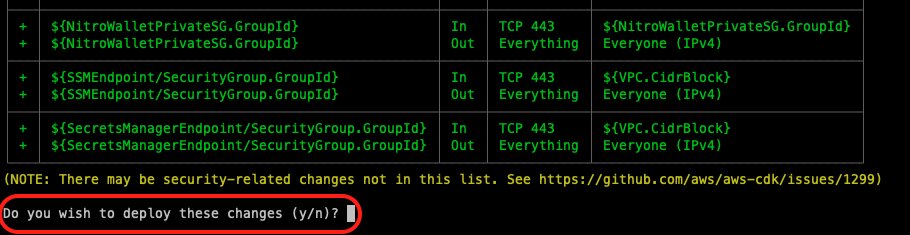
Deploy the sample code with the AWS CDK CLI:
AWS CDK asks for an additional confirmation to deploy the solution, as shown in the following screenshot.
Enter y to confirm.
This deploys the CloudFormation template to the AWS account you specified. You can see additional details about the deployment process and the stack (configuration and resources) by navigating to the AWS CloudFormation console and choosing the devNitroWalletEth stack.
Depending on your internet connection speed, the deployment can take up to 20 minutes.
After the deployment is complete, the terminal shows us the Auto Scaling group name, Amazon Elastic Compute Cloud (Amazon EC2) instance role ARN, and AWS Lambda execution role ARN.
In the next step, the four displayed values are required:
devNitroWalletEth.ASGGroupName
devNitroWalletEth.EC2InstanceRoleARN
devNitroWalletEth.KMSKeyID
devNitroWalletEth.LambdaExecutionRoleARN
Save the terminal printout in a separate text file or open a new terminal instance to continue with the next step.
Configure a KMS key policy for cryptographic attestation
Now that we’ve set up our components, let’s configure the KMS key policy to support Nitro Enclaves.
In this section, we explain the following:
The unique Nitro Enclaves identifier (hash), also referred to as PCR_0
How to extract the PCR_0 value
How to set up a KMS key policy to limit access to Nitro Enclaves
Along with the EC2 instances and the entire network configuration depicted in the architecture diagram, a symmetric KMS key and an empty AWS Secrets Manager secret have been created. To showcase the power of cryptographic attestation in combination with an Ethereum private key, we need to complete a few more setup operations.
In short, cryptographic attestation allows us to restrict KMS decrypt operations to enclaves running on selected EC2 instances. These enclaves are identified based on their unique hash value, also referred to as PCR_0.
These values need to be fetched from the EC2 instance after the deployment is complete and after the user data script has run successfully.
To fetch the PCR_0 value, you first must identify the EC2 instance ID. You can do this by opening the AWS Management Console, navigating to the Auto Scaling group whose name was printed out after the AWS CDK deployment (devNitroWalletEth.ASGGroupName), and looking at the instances.
Alternatively, you can run the following script that has been provided along with the AWS CDK. The script requires the AWS command line utility and sufficient permissions on the AWS account. You have to provide the devNitroWalletEth.ASGGroupName parameter from the previous deployment step, as done with devNitroWalletEth-NitroEC2AutoScalingGroup-O2E0S66IG7YC in the following example.
When run, it returns the instance IDs of the associated EC2 instances:
Now you can pick one of these EC2 instance IDs and run another script, which also wraps the AWS command line utility and runs an AWS Systems Manager Run Command on the EC2 instance. Also, this script requires jq to be available on the local terminal.
The command fetches the PCR_0 value from the enclave file and returns it if successful:
Save the returned PCR_0 value to use in a configuration step later. This value represents the unique hash value of the enclave container. For more information, refer to A unique feature on Nitro Enclaves.
The next step is to configure the KMS key policy so that only Nitro Enclaves is allowed to run decrypt operations on it. Replace the devNitroWalletEth.EC2InstanceRoleARN, PCR0_VALUE_FROM_EIF_BUILD, and devNitroWalletEth.LambdaExecutionRoleARNvalues in the enclave key policy template with the parameters collected from the previous deployment steps.
A valid LambdaExecutionRoleARN value looks similar to the string arn:aws:iam::012345678912:role/devNitroWalletEth-NitroInvokeLambdaServiceRoleEF77-QW90G10NIZ8E, whereas a valid EC2InstanceRoleARN value looks similar to arn:aws:iam:: 012345678912:role/devNitroWalletEth-InstanceSSMCBFA3CF0-G6PQG3QMN45Q.
Replace the value for KMS_ADMINISTRATOR_ROLE_ARN with the role ARN that is allowed to administer the KMS key. It defaults to arn:aws:iam::111122223333:root, where 11112222333 is your AWS account number. See the following code:
For additional information about the KMS key policy in the context of Nitro Enclaves, refer to Set up KMS.
To showcase the cryptographic attestation feature in a production context, in this walkthrough we don’t use Nitro Enclaves debug capabilities. Therefore, if you plan to set up a KMS key policy for non-production use cases and you’re planning to run the enclaves in debug mode, PCR0_VALUE_FROM_EIF_BUILD needs to be set to 000000000000000000000000000000000000000000000000000000000000000000000000000000000000000000000000. Otherwise, AWS KMS rejects all requests. For additional information, refer to Set up KMS.
After you update the preceding KMS key policy template with the values from your AWS CDK deployment, make sure that the modified document has a valid JSON syntax.
To use the prepared KMS key policy, open the AWS KMS console and navigate to the KMS customer managed key that was created along with the other components. The key ID was printed out at the end of the deployment step devNitroWalletEth.KMKKeyID.
On the Key policy tab, choose Edit.
Copy the prepared enclave key policy JSON document and replace the standard KMS key policy, then choose Save changes.
Now that the KMS key policy has been configured, only the enclave container running on the EC2 instance is able to run the decrypt operation using this KMS key.
Sign an Ethereum EIP-1559 transaction using Nitro Enclaves
Now that we have configured the KMS key policy to work with cryptographic attestation, let’s generate an Ethereum private key to use for testing. Then we encrypt and store the key in Secrets Manager, and use the key to sign an Ethereum EIP-1559 transaction using Nitro Enclaves.
We can generate a private key using OpenSSL or export it from an existing wallet like MetaMask.
OpenSSL allows you to generate a compatible Ethereum private key by running the following commands:
The created or exported key must be represented as a 64-character hex string and should look similar to d515ea40c3b6192d7ab1fdfe604e421b9615f1f41bac4c4301b9d68a3e98b42b.
Depending on your terminal configuration, the hex string might have a % sign attached at the end, which must be ignored.
Save the key to use later in this section.
For additional information on how to calculate the associated Ethereum public address for the key, refer to Use Key Management Service (AWS KMS) to securely manage Ethereum accounts: Part 2.
Now that we have created or exported our test Ethereum private key, we have to use the provided Lambda function to encrypt the key and store it in Secrets Manager. According to the KMS key policy that we set up in the previous section, the Lambda function is only allowed to run encrypt on the KMS key.
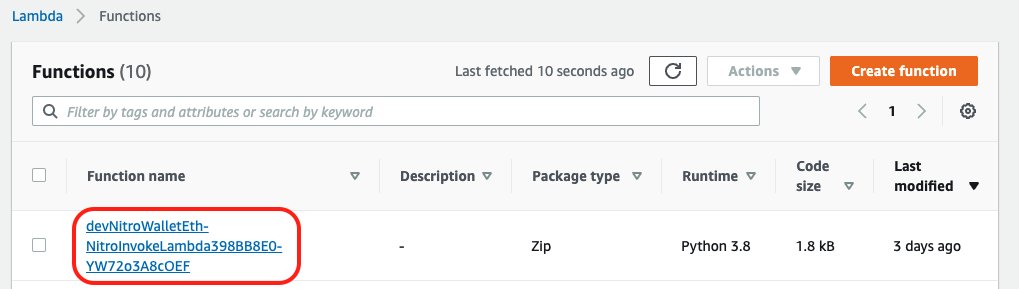
AWS CDK attached a random suffix to all deployed resources to avoid conflicts. That’s why the resource names and prefixes shown in the code examples and screenshots don’t exactly match the names you see in your AWS account.
On the Lambda console, choose the newly created Lambda function starting with the name devNitroWalletEth-NitroInvokeLambdaXXXXXXX-XXXXXXX.
After you choose the function, choose the Test tab.
To encrypt the Ethereum key and persist the encrypted key in Secrets Manager, invoke the Lambda function via a test, passing in the following JSON snippet as the payload. eth_key is the Ethereum private key represented as a hex string that we generated at the beginning of this section.
Note that this post showcases how to run secure blockchain operations inside Nitro Enclaves. Mismanagement of the private key hex string can result in loss of funds or the entire wallet.
Choose Save, then choose Test.
As shown in the following figure, the set_key operation encrypts the eth_key payload using the KMS key instance. The ciphertext is then stored in Secrets Manager. There it is encrypted one more time with a different KMS key.
To create and sign an Ethereum EIP-1559 transaction with the given AWS KMS-based address, run the Lambda function using the following JSON snippet:
The preceding snippet is a simple transaction that sends 0.01 ether to the specified to address. The code includes the following information:
value – The amount of ether to send
to – The Ethereum destination address
nonce – The current number of transactions on the sending address
type – The transaction type (here 2 refers to EIP-1559 transactions)
chainId – The destination network; it also and represents a simple replay attack protection (EIP-155)
gas – The max gas that can be spent on the transaction
maxPriorityFeePerGas – The amount of gas directly being paid to the miner (optional)
maxFeePerGas – The max gas that you’re willing to pay to get your transaction included in a block, including baseFeePerGas and maxPriorityFeePerGas
For a detailed explanation of all the transaction parameters, refer to How to sign Ethereum EIP-1559 transactions using AWS KMS.
Choose Test.
Assuming the AWS KMS-based address has never been used, the nonce value must be 0 for the first transaction. If the account has been used before, the Ethereum eth_get_TransactionCount RPC method must be used with the AWS KMS-based Ethereum address as input to determine the right value for nonce.
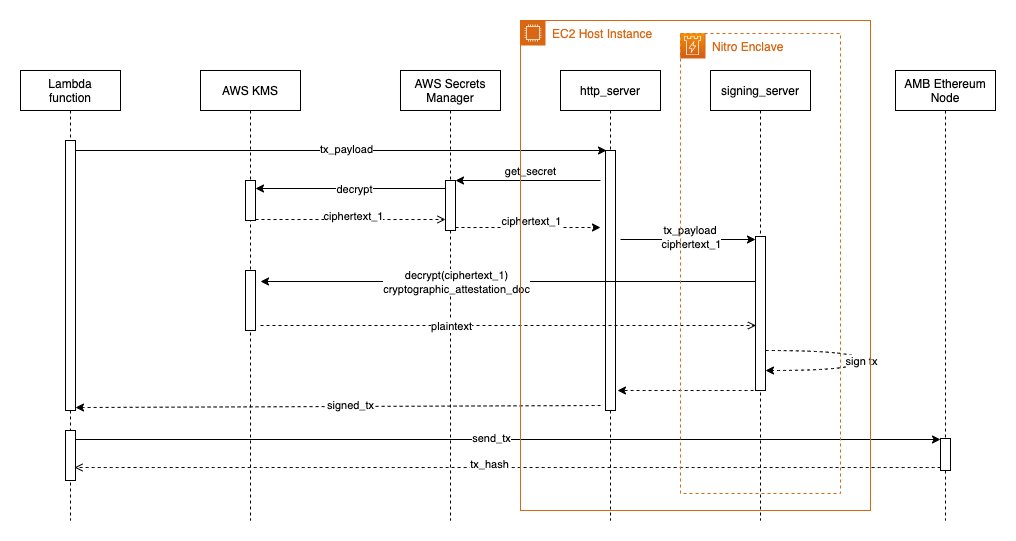
As depicted in the following figure, the following five steps are run with the submission of the test request:
The sign_transaction operation sends a request consisting of the transaction_payload data to the EC2 parent instance of Nitro Enclaves.
The EC2 instance downloads the encrypted Ethereum key from Secrets Manager. During this download, the double encrypted key is decrypted the first time based on the EC2 instance role.
The still encrypted key is then passed to Nitro Enclaves together with transaction_payload.
Nitro Enclaves uses the cryptographic attestation feature to decrypt the Ethereum key to get access to the plaintext version. Due to the cryptographic attestation feature and our customized KMS key policy, we can run the last decryption step from within the enclave. No other component (such as the EC2 instance) can get access to the plaintext version of the key.
Inside the enclave, the key is then used to sign an Ethereum transaction.
If the signing_operation explained previously is successful, the transaction is returned and available on the Lambda console.
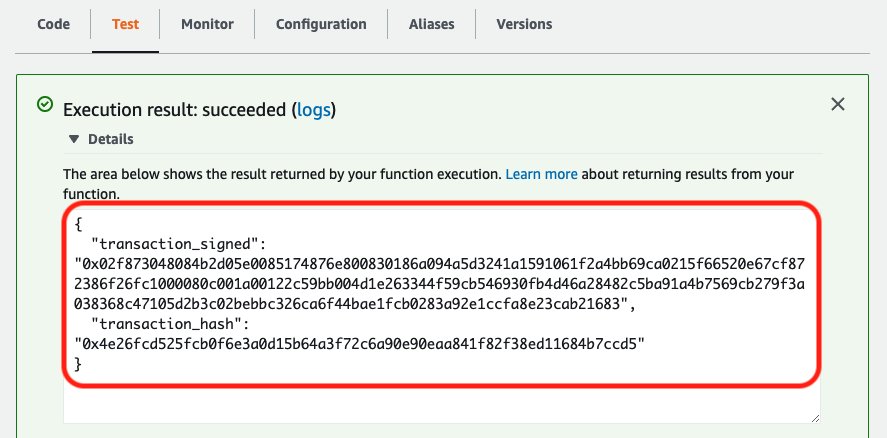
Congratulations! You have created your first Nitro Enclaves-based Ethereum EIP-1559 transaction.
For instructions on sending off the transaction via an Amazon Managed Blockchain Ethereum node, see Deploy an Ethereum Node on Amazon Managed Blockchain. The newly created Lambda function from the referenced post authenticates with your dedicated Managed Blockchain Ethereum node using Signature Version 4 authentication. You have to provide the hex-encoded Ethereum transaction as an input parameter to the Ethereum client Lambda function, as shown in the following Node.JS example:
After you send it to the Ethereum Rinkeby test network, the web3 library returns the transaction hash (tx_id) of the transaction. You can use this value to track the state of the transaction, for example via Etherscan for the Ethereum Rinkeby network.
Clean up
To avoid incurring future charges, delete the resources using the AWS CDK with the following command:
You can also delete the stacks deployed by the AWS CDK via the AWS CloudFormation console.
Conclusion
In this post, we presented a walkthrough of the configuration aspects like KMS key policies and how to sign your first Ethereum EIP-1559 transaction inside Nitro Enclaves.
In Part 3 of this post, we conduct a technical deep dive into Nitro Enclaves and explain features like cryptographic attestation. We also explain the general architecture of a Nitro Enclaves-based Ethereum signing application, and discuss the steps for Nitro setup, configuration, and deployment using AWS CDK and Amazon EC2 user data.
Now go read Part 3 of the post and customize the provided AWS CDK!
About the Author
David Dornseifer is a Blockchain Architect with the Amazon ProServe Blockchain team. He focuses on helping customers design, deploy and scale end-to-end Blockchain solutions.
Read MoreAWS Database Blog