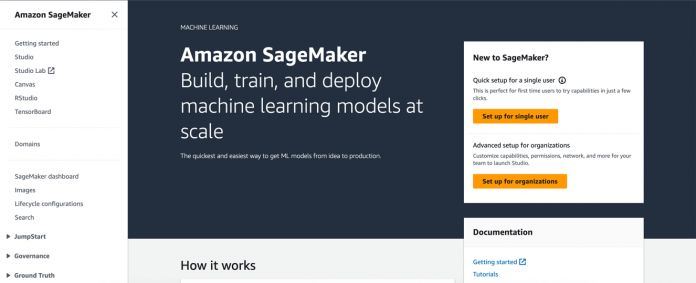
Today, we are excited to announce the simplified Quick setup experience in Amazon SageMaker. With this new capability, individual users can launch Amazon SageMaker Studio with default presets in minutes.
SageMaker Studio is an integrated development environment (IDE) for machine learning (ML). ML practitioners can perform all ML development steps—from preparing their data to building, training, and deploying ML models—within a single, integrated visual interface. You also get access to a large collection of models and pre-built solutions that you can deploy with a few clicks.
To use SageMaker Studio or other personal apps such as Amazon SageMaker Canvas, or to collaborate in shared spaces, AWS customers need to first set up a SageMaker domain. A SageMaker domain consists of an associated Amazon Elastic File System (Amazon EFS) volume, a list of authorized users, and a variety of security, application, policy, and Amazon Virtual Private Cloud (Amazon VPC) configurations. When a user is onboarded to a SageMaker domain, they are assigned a user profile that they can use to launch their apps. User authentication can be via AWS IAM Identity Center (successor to AWS Single Sign-On) or AWS Identity and Access Management (IAM).
Setting up a SageMaker domain and associated user profiles requires understanding the concepts of IAM roles, domains, authentication, and VPCs, and going through a number of configuration steps. To complete these configuration steps, data scientists and developers typically work with their IT admin teams who provision SageMaker Studio and set up the right guardrails.
Customers told us that the onboarding process can sometimes be time consuming, delaying data scientists and ML teams from getting started with SageMaker Studio. We listened and simplified the onboarding experience!
Introducing the simplified Quick Studio setup
The new Quick Studio setup experience for SageMaker provides a new onboarding and administration experience that makes it easy for individual users to set up and manage SageMaker Studio. Data scientists and ML admins can set up SageMaker Studio in minutes with a single click. SageMaker takes care of provisioning the SageMaker domain with default presets, including setting up the IAM role, IAM authentication, and public internet mode. ML admins can alter SageMaker Studio settings for the created domain and customize the UI further at any time. Let’s take a look at how it works.
Prerequisites
To use the Quick Studio setup, you need the following:
An AWS account
An IAM role with permissions to create the resources needed to set up a SageMaker domain
Use the Quick Studio setup option
Let’s discuss a scenario where a new user wants to access SageMaker Studio. The user experience includes the following steps:
In your AWS account, navigate to the SageMaker console and choose Set up for single user.
SageMaker starts preparing the SageMaker domain. This process typically takes a few minutes. The new domain’s name is prefixed with QuickSetupDomain-.
As soon as the SageMaker domain is ready, a notification appears on the screen stating “The SageMaker Domain is ready” and the user profile under the domain is also created successfully.
Choose Launch next to the created user profile and choose Studio.
Because it’s the first time SageMaker Studio is getting launched for this user profile, SageMaker creates a new JupyterServer app, which takes a few minutes.
A few minutes later, the Studio IDE loads and you’re presented with the SageMaker Studio Home page.
Components of the Quick Studio setup
When using the Quick Studio setup, SageMaker creates the following resources:
A new IAM role with the appropriate permissions for using SageMaker Studio, Amazon Simple Storage Service (Amazon S3), and SageMaker Canvas. You can modify the permissions of the created IAM role at any time based on your use case or persona-specific requirements.
Another IAM role prefixed with AmazonSagemakerCanvasForecastRole-, which enables permissions for the SageMaker Canvas time series forecasting feature.
A SageMaker Studio domain and a user profile for the domain with unique names. IAM is used as the authentication mode. The IAM role created is used as the default SageMaker execution role for the domain and user profile. You can launch any of the personal apps available, such as SageMaker Studio and SageMaker Canvas, which are enabled by default.
An EFS volume, which serves as the file system for SageMaker Studio. Apart from Amazon EFS, a new S3 bucket with prefix sagemaker-studio- is created for notebook sharing.
SageMaker Studio also uses the default VPC and its associated subnets. If there is no default VPC, or if the default VPC has no subnets, then it selects one of the existing VPCs that has associated subnets. If there is no VPC, it will prompt the user to create one on the Amazon VPC console. The VPC with all subnets under it are used to set up Amazon EFS.
Conclusion
Now, a single click is all it takes to get started with SageMaker Studio. The Quick Studio setup for individual users is available in all AWS commercial Regions where SageMaker is currently available.
Try out this new feature on the SageMaker console and let us know what you think. We always look forward to your feedback! You can send it through your usual AWS Support contacts or post it on the AWS Forum for SageMaker.
About the authors
Vikesh Pandey is a Machine Learning Specialist Solutions Architect at AWS, helping customers from financial industries design and build solutions on generative AI and ML. Outside of work, Vikesh enjoys trying out different cuisines and playing outdoor sports.
Anastasia Tzeveleka is a Machine Learning and AI Specialist Solutions Architect at AWS. She works with customers in EMEA and helps them architect machine learning solutions at scale using AWS services. She has worked on projects in different domains including natural language processing (NLP), MLOps, and low-code/no-code tools.
Read MoreAWS Machine Learning Blog


