

Amazon SageMaker Studio is the first fully integrated development environment (IDE) for machine learning. It provides a single, web-based visual interface where you can perform all ML development steps required to build, train, and deploy models. You can quickly upload data, create new notebooks, train and tune models, move back and forth between steps to adjust experiments, compare results, and deploy models to production all in one place, making you much more productive.
To share a Studio notebook, you can create a presigned URL for granting access to your Studio domain to users in your organization. The URL expires in 5 minutes by default, and you can reduce this to as low as 5 seconds. Customers need a mechanism to access the presigned URL for a Studio Notebook from their corporate network without using public DNS to resolve the presigned URL. The use of public DNS for presigned URLs has an associated threat vector of undesired exposure, and this needs a solution when highly sensitive data is accessed on SageMaker.
Studio runs in its own AWS account. You can securely access the Studio notebook over Amazon’s private network using an Amazon Virtual Private Cloud (Amazon VPC) endpoint. Studio users can access their notebook from the Amazon SageMaker console. Alternatively, they can access their notebook from a presigned URL that is generated using the AWS Command Line Interface (AWS CLI). When accessing SageMaker Studio from within the VPC boundary, the DNS resolution happens over a VPC DNS resolver. This is because Studio VPC endpoint IPs have a corresponding DNS entry injected into a VPC DNS resolver during the setup of that endpoint for each VPC subnet. Therefore, traffic doesn’t traverse the public internet for DNS resolution. However, when a presigned URL is accessed from outside the VPC boundary, DNS lookup does traverse the internet and is resolved using public DNS.
The objective of this post is to demonstrate how to access a Studio notebook from a corporate network without traversing the internet to resolve the presigned URL domain name. An example of this would be from an on-premises corporate network or from another VPC.
Architecture overview
The following diagram illustrates our solution architecture.
To use Studio over a private network, you must set up three VPC endpoints for each VPC subnet: Studio, SageMaker API, and SageMaker Runtime. For more information regarding interface endpoints, see Connect to SageMaker Through a VPC Interface Endpoint. When a Studio notebook is accessed with a presigned URL, SageMaker uses a managed elastic network interface created in your VPC subnet. To access the Studio notebook presigned URL from outside the VPC network, you can set up an Amazon Route 53 inbound resolver to forward the Studio DNS query from your network to the VPC network. If you’re operating multiple Studio domains across Regions or accounts, you must fully qualify your DNS resolution using a Studio domain. To do so, you must add a private hosted zone record.
The preceding diagram includes the following steps:
A corporate user connects to a user-specific Studio presigned URL that has been generated and served via a widget from the application server.
The application server sends the DNS query to the DNS server. The DNS server zone configuration is set up to forward the presigned URL DNS resolution to the Route 53 inbound resolver.
The presigned URL DNS query is forwarded to the Route 53 inbound resolver VPC subnet IPs.
The VPC Amazon Provided DNS resolver looks up private hosted zone for resolving the DNS query with the domain prefix and resolves it to the Studio VPC endpoint IPs.
The Studio VPC endpoint routes the query via the Amazon private network to the Studio domain running in the service account.
When the presigned URL is valid, the Studio domain returns the notebook to the VPC subnet.
The Studio notebook elastic network interface is injected into each VPC subnet attached to the Studio VPC endpoint.
The Studio notebook is returned to the corporate user.
Solution overview
The following sections walk you through how to implement this architecture to resolve the domain name of the presigned URL. We demonstrate a complete implementation by showing the following steps for a simulated on-premises stack:
Set up an AWS CloudFormation stack for accessing Studio over a corporate network.
Set a simulated on-premises CloudFormation stack for accessing Studio over a corporate network.
Set up connectivity between the AWS and simulated stacks.
Set up a Route 53 inbound resolver.
Set up an on-premises DNS server to forward DNS queries to the Route 53 inbound resolver.
Set up an on-premises application server to use the on-premises DNS server.
Set up a private hosted zone for the Studio domain.
You can adapt this setup for your corporate network environment.
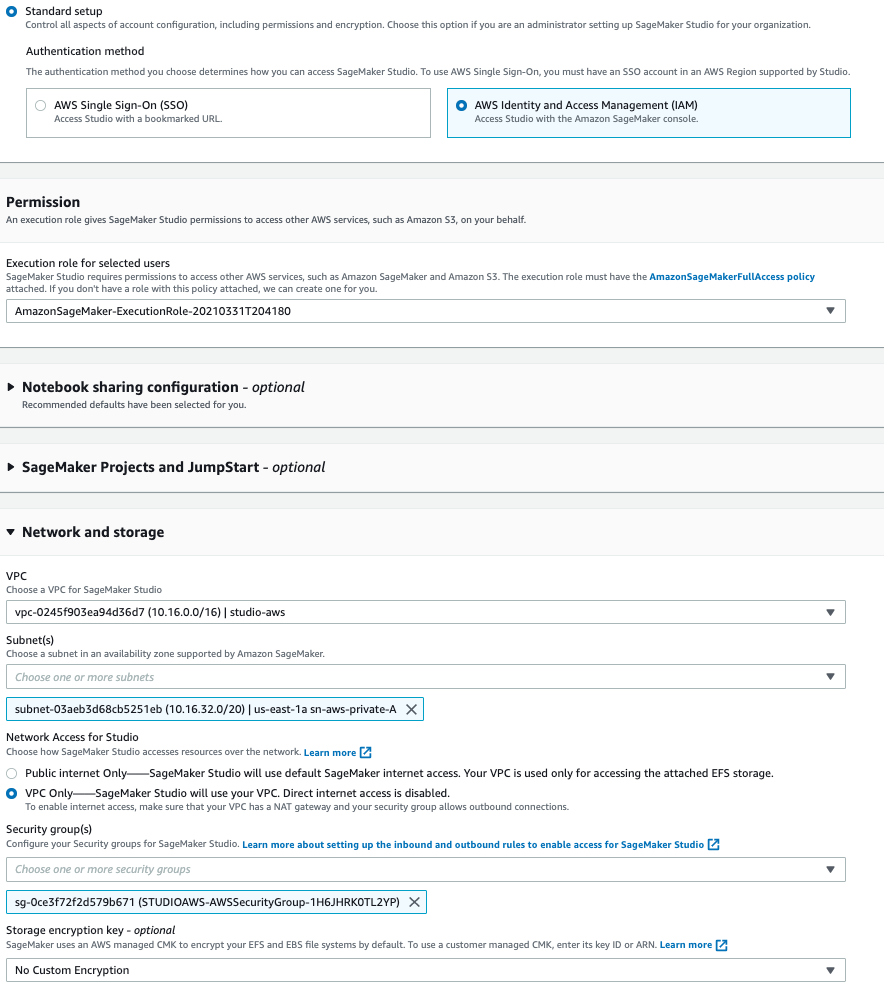
Set up a CloudFormation stack for accessing Studio over a corporate network
For this post, we use the us-east-1 Region.
On the AWS CloudFormation console, provision a stack for accessing Studio over the corporate network using the following template.
Provision the Studio domain in the VPC Studio-aws and subnets sn-aws-private-A and sn-aws-private-B with security group STUDIOAWS-AWSSecurityGroup and a new execution role.
Add the user demouser1 to the domain with the preceding execution role.
Open Studio for demouser1 and copy its DNS (for example, d-sq9djt5lr5pc.studio.us-east-1.sagemaker.aws) to your clipboard.
On the Amazon Elastic Compute Cloud (Amazon EC2 console), connect to the Studio-AWS-EC2-A instance via AWS Systems Manager Session Manager (using the pre-installed agent).
Run the command dig to run a DNS query on the domain name of the presigned URL.
This should resolve the Studio instance domain name over AmazonProviderDNS using the Studio VPC endpoint without traversing the internet. See the following code:
The Studio domain resolves using the Amazon Provided DNS or +2 resolver to the private IP for the VPC endpoint without traversing the internet. This happens because [1] when Studio is launched in “VPC Only” mode that drops an elastic network interface in each private subnet [2] when creating a VPC endpoint for Studio that creates an elastic network interface in VPC for routing Studio URL access requests. When a VPC endpoint is created, it injects private DNS entries into the +2 resolver DNS.
Set up a simulated on-premises CloudFormation stack
In this step, we provision a simulated on-premises CloudFormation stack for accessing Studio over a corporate network.
On the AWS CloudFormation console, provision your stack with the following template.
Copy the private IP for the EC2 instance Studio-AWS-EC2-A to your clipboard.
Choose the instance Studio-ONPREM-APP and connect via Session Manager.
Run the command ping <private ip> using the private IP you copied.
The command fails because there is no network connectivity between AWS and the on-premises stack.
Set up connectivity between AWS and the simulated on-premises stack
The AWS and on-premises stacks run in different VPCs. For this post, we connect them using VPC peering; however, in a real-world use case, this connectivity should be either DX or VPN.
On the Amazon VPC console, choose Peering connections.
With Studio-aws as requestor and Studio-onprem as acceptor, create the peering connection and accept the connection request.
Choose the route table Studio-AWS-RT and add the route to destination 192.168.10.0/24 with the peering connection as target.
Choose the route table Studio-ONPREM-RT and add the route to destination 10.16.0.0/16 with the peering connection as target.
Run the same ping command as you did earlier.
The command should succeed this time because both networks are connected.
Set up a Route 53 inbound resolver
To resolve the DNS within a VPC, the traffic must originate from within that VPC. To resolve a VPC DNS query outside that VPC, you must either use a DNS forwarder (bind) server or Route 53 inbound resolver. The Route 53 resolver is the Amazon DNS server (also sometimes referred to as AmazonProvidedDNS or the +2 resolver) that is available by default in all Amazon VPCs.
We use Route 53 for this post, because it’s a managed service and easy to set up and maintain.
On the Route 53 console, choose Resolver.
Choose Configure endpoints.
Choose Inbound only.
Choose the Studio-aws VPC and security group SMSTUDIOAWS-AWSSecurityGroup.
For the first IP address, use the Availability Zone us-east-1a and subnet sn-private-A.
For the second IP address, use Availability Zone us-east-1b and subnet sn-private-B.
After you create your endpoint, copy the IP addresses for the endpoint.
You need these IPs to update your on-premises DNS server zone record to forward the query.
Set up the on-premises DNS server
In this step, we set up the on-premises DNS server to forward DNS queries to the Route 53 inbound resolver.
On the Amazon EC2 console, connect to STUDIO-ONPREM-DNSA with Session Manager.
Open the file /etc/named.conf for editing.
Append the following lines, replacing d-xx with your Studio domain and INBOUND_ENDPOINT_IP1; INBOUND_ENDPOINT_IP2 with your inbound resolver IPs:
If you don’t need to resolve the Studio DNS in more than one AWS account, you can use the wildcard qualifier (*.studio.us-east-1.sagemaker.aws).
Run the sudo service named restart.
Set up the on-premises application server
In this step, we set up the on-premises application server to use the on-premises DNS server.
On the Amazon EC2 console, connect to STUDIO-ONPREM-APP with Session Manager.
Run the command nslookup d-xx.Studio.us-east-1.sagemaker.aws and replace d-xx with our domain name.
This resolves via the public DNS and returns three public IPs:
Open the file /etc/sysconfig/network-scripts/ifcfg-eth0 and append the line DNS1=<privateIP of STUDIO-ONPREM-DNSA>, where the privateIP prefix is 192.
Run the command sudo reboot to restart the application server.
Connect again to the server via Session Manager after a few minutes.
Run Step 2 again.
This time it should resolve via the inbound resolver to the Studio VPC endpoint IPs:
Set up a private hosted zone for the Studio domain
If you’re not using FQDN for DNS resolution (d-xx.studio.us-east-1.sagemaker.aws), you may see the NXDomain error for the preceding nslookup command. This is because the Studio VPC endpoint DNS resolves without the Studio domain prefix by default. However, you can override that setting by adding a private hosted zone record for the Studio VPC endpoint in your VPC.
On the Route 53 console, choose Hosted Zone.
Choose Private Hosted Zone.
For the domain name, add the full qualified Studio domain DNS name (d-xx.Studio.us-east-1.sagemaker.aws).
Choose the Region us-east-1 and VPC Studio-aws to create your hosted zone.
Choose the created hosted zone and add a record for d-xx.Studio.us-east-1.sagemaker.aws with the IPs as Studio VPC endpoint IPs.
Now that you have fully qualified DNS with your Studio domain, you should be able to resolve your Studio domains across Regions and accounts.
Clean up
To avoid incurring ongoing charges, delete the CloudFormation stacks you created.
Conclusion
In this post, we demonstrated how to access a Studio notebook from a corporate network without traversing the internet to resolve the presigned URL domain name. Try out this solution and leave us your feedback in the comments!
About the Author
Ram Vittal is an enterprise solutions architect at AWS. He has over 20+ years of experience architecting and building distributed, hybrid and cloud applications. He is passionate about building secure and scalable AI/ML and Big Data solutions to help enterprise customers with their cloud adoption and optimization journey to improve their business outcomes. In his spare time, he enjoys tennis, photography, and action movies.
Ruchir Tewari is a Senior Solutions Architect specializing in security and is a member of the ML TFC. For several years he has helped customers build secure architectures for a variety of hybrid, big data and AI/ML applications. He enjoys spending time with family, music and hikes in nature.
Read MoreAWS Machine Learning Blog