

Building the backend for a fast-paced competitive multiplayer game is a complex task. There are many moving parts to coordinate, and the product and solution landscape is practically endless. There are a myriad of managed products, supporting open source solutions and more that need to be evaluated, experimented with and implemented, and the path to using all of them in conjunction with one another is often not clear.
To solve this problem, and kickstart your journey on building your own multiplayer game, a multidisciplinary team of Google Cloud for Games experts banded together to create a global scale, integrated demo of a fast paced multiplayer game. The aim of this demo is to show the technologies and techniques we at Google Cloud have seen work in production to host, scale and orchestrate game backends for multiplayer games – from services and data storage all the way through to dedicated game servers.
This includes:
Game Engine
Unreal Engine 5 for the game client and dedicated server code.
A custom Go game launcher for client side authentication.
Open Source
Terraform, for infrastructure as code.
Agones for hosting and scaling dedicated game servers.
Open Match for match making our global player base.
Google Cloud
Cloud Build and Cloud Deploy for Continuous Integration and Deployment.
GKE Autopilot for hosting the backend microservices.
Globally distributed GKE Autopilot and Standard clusters running for hosting Agones orchestrated Unreal dedicated game servers
Anthos Service Mesh for cross cluster service discovery and communication.
Cloud Spanner for storing the player in-game data.
We’ll also share some tips and tricks the team of people working on this project learnt along the way so you can turbocharge your development journey even more!
Droidshooter
We deliberately built a very simple multiplayer game called “Droidshooter” to highlight and make easily discoverable the server side technologies and techniques we took advantage of during the development of this demo.
In this game you fly a small spaceship against another two players, while attempting to get their health to zero by firing bursts of energy against the other ships. For each successful destruction of a rival spaceship, you receive a point. The player with the most number of points at the end of thirty seconds wins the round!
Architecture overview
Before we jump into the details of each component, let’s look at an architecture overview:
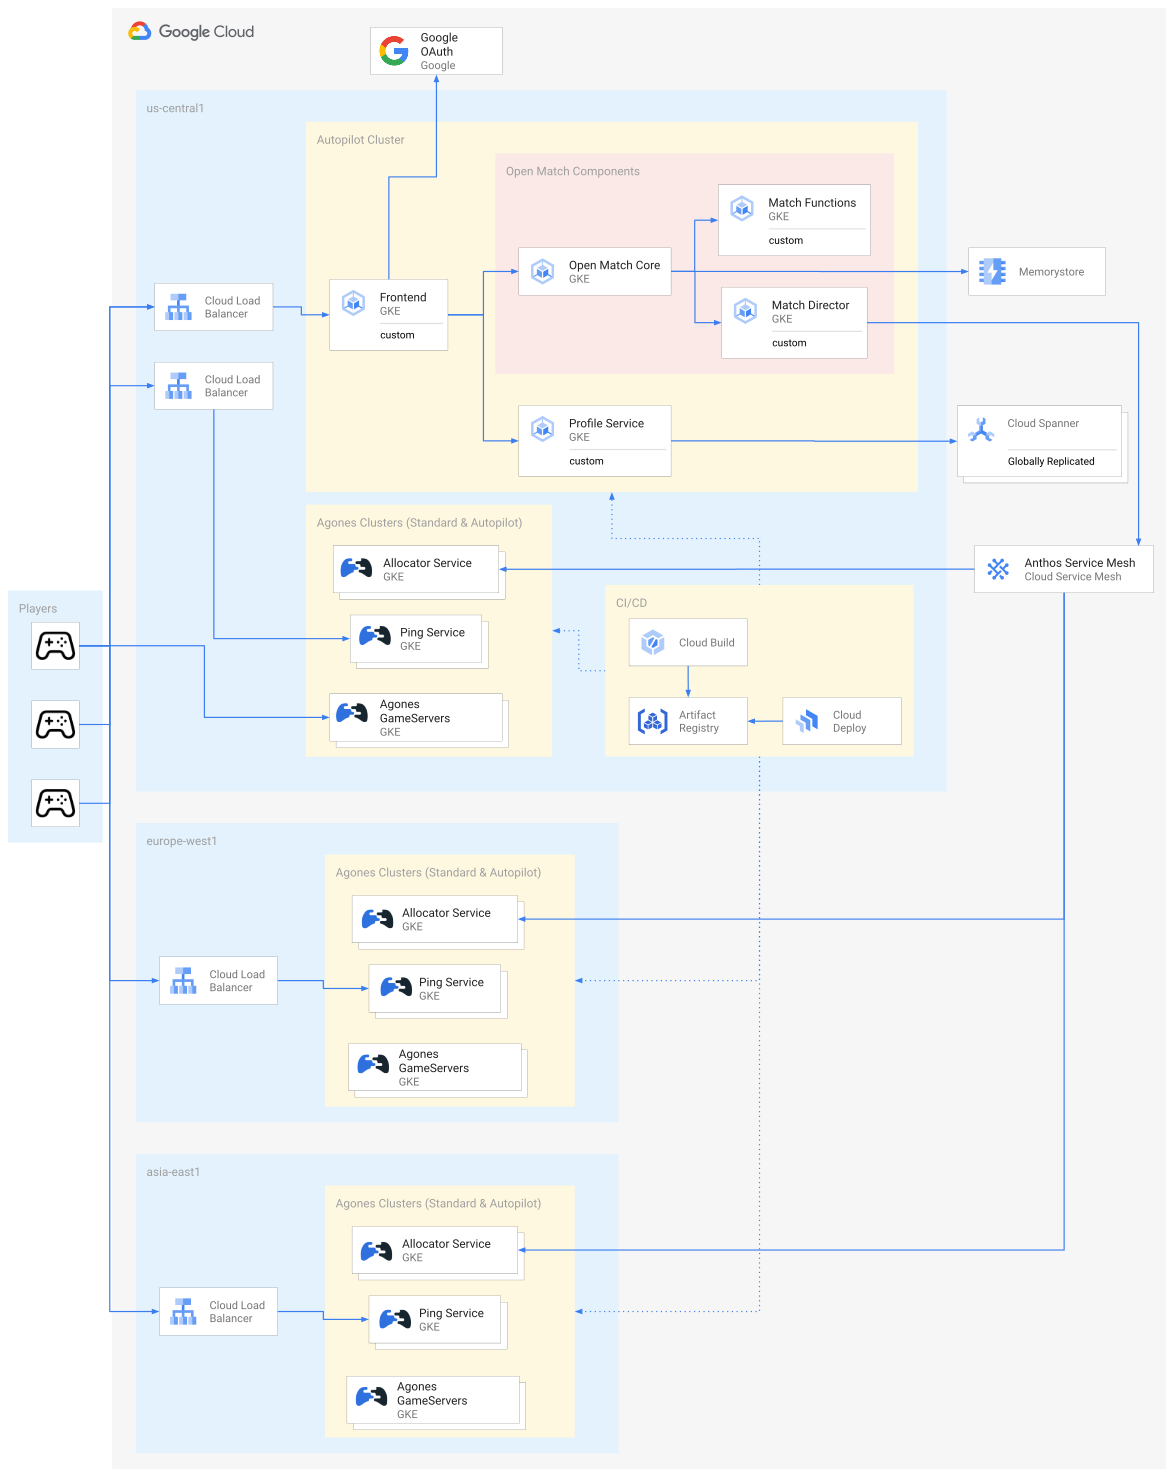
Since this is a game that is targeted at a global audience, we also have a global infrastructure footprint.
Our general backend services for our game are hosted in us-central1, since they aren’t latency sensitive, and consolidating them into a single region and cluster makes managing them much easier. Since player connection to the multiplayer, dedicated game servers are latency sensitive, we have them on multiple Kubernetes clusters in multiple regions around the world to ensure that they are close to our players locations.
Game state flow
Launching the game client
In the above architecture, each player will start an instance of the Game Launcher. This provides authentication via Google login, as well as options for launching the game.
At log in, a profile record is created if it doesn’t exist in the database. From there, the profile information is retrieved from the profile service and displayed here in the launcher (That’s one of our names above!) as well as in the game client.
Clicking “Open Droidshooter” will start the game client, which will request a game through the frontend service, providing an authenticated endpoint for almost all communications to hosted backend services for the game client, as well as the previously mentioned launcher.
Match making
From here, the client will need to request the global set of “ping locations” in each of the regions that our game servers will be hosted in, since our game requires low latency for an optimal, real time experience. Therefore we need to actively measure ping latencies from each region from the player’s location, so that they can be matched to players of similar latency from where they are situated, and ignore regions where latency is too high. Unfortunately, you can’t just send players to only the closest region to them, as that splits your player base, and results in an inability to match players that would otherwise be able to play a game together.
Once the game client has utilized each of the latency measurement endpoints in each region and recorded the player’s latency to each region, it sends this data to the matchmaking system (through the authenticated frontend) requesting to be grouped with other players so they can play a game! In Droidshooter, we have a very simple matchmaking system, where our matchmaker looks to match three players together that have the closest latency to each other.
Allocating a game server
Once a group is formed to play a game, the matchmaker requests a dedicated game server from the game server orchestration system in the region in which it has determined the best place to place these players. Since all these players need to have the same experience, the dedicated game server’s job is to simulate the game world state, and communicate this information to all connected players in real time, so they can all enjoy the fun experience of playing Droidshooter.
Therefore the matchmaker passes back to the game clients (through the frontend) the address and port each client will need to connect directly to, since the game state is an in-memory simulation, and then, they play Droidshooter!
Final cleanup
Once the game is complete, the game server shuts itself down, and thanks to our game server fleet management system, a new one is spun up right away for new players to play on.
Ecosystem breakdown
Let’s look at each of the products and open source projects we used to implement the above flow, and why we chose each of them:
Terraform
When getting started with this project, the first thing we did was decide that we wanted to have an infrastructure as code set up for automating the creation of the infrastructure we would be running the backend for our game on. We decided on Terraform, an open-source infrastructure as code software tool that enables you to safely and predictably create, change, and improve infrastructure through a declarative configuration language.
We chose this tool, as it is widely adopted and meant that each of the people developing on the project would have the same infrastructure setup as each other, our final end users could easily spin up the same infrastructure themselves using tools they were already likely familiar with.
Tips and Tricks
Make liberal use of Terraform variables throughout your code! Thanks to our set of configurable variables, end users could choose to spin up a full global configuration of the project, or aim for a much smaller, and cheaper to run, configuration, possibly for development purposes.
GKE Autopilot and Standard
GKE Autopilot is a fully managed Kubernetes experience where you only pay for the Pods you run, and don’t have to worry about the underlying infrastructure that hosts it. It was a perfect fit for all our services, such as custom ones like our profile and front end service as well as the Open Match platform services (more on that later). The truly delightful thing about developing on Autopilot was that as a team we never had to worry about new services that were being built and if there was capacity on the GKE cluster that they were going to run on – we could just deploy knowing that Autopilot would take care of the infrastructure.
We actually host our game server containers on both GKE Standard and Autopilot in this demo. While you probably would want to settle on a single platform in production, we wanted to highlight that if the ease of use of Autopilot fits your requirements for your game server workloads then it works perfectly with this entire stack, but if your game server requires very specific tuning of the underlying GKE standard nodes – then GKE standard is also a great solution.
Tips and tricks
Start with Autopilot and only move over to GKE standard if you need to. If you don’t have a reason to move to GKE standard, the ease of use of Autopilot can save you a lot of time. Since it’s all Kubernetes underneath, migration between platforms is very straightforward.
Agones
Agones is an open-source game server orchestration platform originally co-created by Ubisoft and Google Cloud, but now with over 200 contributors from a variety of game studios. Built recognizing that Kubernetes needed game-specific optimizations, it teaches Kubernetes about the lifecycle of game server workloads, and ensures that player experiences aren’t interrupted while players are playing on them. Therefore our decision to use Agones was pretty straightforward as this meant we didn’t have to worry about game server lifecycle management or infrastructure usage optimisation – Agones would take care of all that for us.
Agones also provides us with a set of APIs and SDKs that make it easy to integrate our demo with the platform. This includes features like game state management and player management, which significantly decreases the time needed to implement these features from scratch.
Tips and tricks
Take advantage of the Terraform modules Agones comes with for you to use to create both GKE standard and autopilot clusters. You could create your own from the cluster creation instructions – but why go to all that effort?
Open Match
Open Match is another open-source tool for multiplayer games that was originally developed in collaboration between Google Cloud and Unity Technologies. It is a matchmaking framework that helps game developers build scalable and extensible matchmaking systems. It provides a set of tools and APIs that game developers can use to create their own matchmaking logic, while Open Match handles the underlying infrastructure to support a global player base.
We primarily chose this platform because it allowed us to have full customization over our match making logic, but also provided us with the ability to scale to whatever traffic we want to drive this multiplayer game demo to handle.
Tips and Tricks
While Open Match bundles a version of Redis hosted within the same Kubernetes cluster it is deployed on, take advantage of MemoryStore for Redis for a managed Redis offering on Google Cloud that includes high availability, failover, patching, and monitoring.
We recommend hosting Open Match on GKE Autopilot, since you only pay for the Pods you are running, and no longer have to concern yourself with node infrastructure – making Open Match much easier to manage and maintain.
Unreal Engine 5
Unreal Engine is a great choice for building multiplayer games, as it has a long history of use within the industry, provides fantastic networking tools and also is used by many developers in production for their multiplayer games! So since we were looking to match production workloads with this sample, it seemed like an easy decision.
One of the many benefits of using Unreal Engine 5 is its seamless integration with Agones, which can be achieved both via C++ and Blueprints. With the Agones SDK integrated into Unreal Engine 5, developers can easily manage the game server’s lifecycle, configuration, metadata and player tracking. You can download the source and build the plugin directly from here: https://github.com/googleforgames/agones/tree/release-1.30.0/sdks/unreal/Agones
Tips and tricks
To query the latency times to each region we are hosting game servers in, our Unreal Engine 5 based client also needs to send some UDP packets to Agones’ Latency Testing Services.. This can be a little tricky to find the documentation for, but to achieve that, we can use Unreal’s FUDPPing API, to send an ICMP Ping packet over UDP, like so: FUDPPing::UDPEcho()
The Unreal Engine container ecosystem for interacting with the engine in the cloud – particularly building container images of dedicated game servers, is really well implemented and has a very smooth developer experience – strongly recommend taking it for a spin if you haven’t!
Cloud Build and Cloud Deploy
Cloud Build and Cloud Deploy are two managed Google Cloud Platform products that can be used together to automate the Continuous Integration and Continuous Deployment of applications that also have strong integration with GKE standard and Autopilot. For the Global Scale Game Demo, we are using them for both creating the artifacts and images for the backend services as well for the Unreal Engine 5 dedicated game servers, using the aforementioned Unreal Engine container system.
Cloud Deploy was also particularly chosen because of its ability to arbitrarily group multiple clusters together as deployment targets. This means we can group our clusters per region, and do regional rollouts of our clusters.
This means we can do test deployments in smaller population areas, such as Australia, and assuming all things go to plan, move out to large and large population sets.
Tips and Tricks
If the generated YAML that is being applied to your cluster through Cloud Deploy results in more than 262144 bytes, use the –server-side kubectl flag, and you may also want to combine it with –force-conflicts flag to handle any Kubernetes server side apply ownership issues.
If you have a Deployment that may fail several times before coming to a healthy state, take advantage of the tolerateFailuresUntilDeadline feature of Cloud Deploy, which allows the system to tolerate failures up until the specified deadline. This is particularly useful for Istio and/or Anthos Service Mesh, which is covered in later sections.
Artifact Registry
The artifacts that are built and deployed by Cloud Build and Cloud Deploy are stored in an Artifact Registry container repository, which gives us the added benefit of faster spin up times for our backend service and dedicated game server images via image streaming, as well as vulnerability scanning and more.
Anthos Service Mesh
To build a full global scale game we needed a way to communicate between our set of GKE clusters that are distributed around the world. This included our backend services clusters as well as our Agones clusters. This is particularly important to our Open Match based matchmaker, as it needs to route requests to allocate game servers from Agones powered GKE clusters in specific regions around the world.
Thankfully, Google Cloud comes with Anthos Service Mesh, a managed Service Mesh offering based on the open source project Istio. This provides us both with DNS based service discovery within clusters as well as the ability to facilitate multi-cluster communications – which made it a perfect fit for our needs.
The ability to use Istio’s VirtualService was key, as it allowed us to have a single DNS entry for all Agones Allocation REST endpoints in our backend service cluster, and provide routing to specific regions using a custom region HTTP header in the request, while also managing access control and security through Workload Identity. This solved a lot of problems for us in one go!
Tips and Tricks
You may need to use Cloud Build to do some Anthos Fleet Management via gcloud, since some operations are not yet supported via Terraform.
If the expected multicluster Service DNS entry is not found within the cluster that needs it, make sure to ensure the namespace and matching Service are also created in that cluster as well. It doesn’t need the implementation, but it does need both the matching namespace and Service to create the DNS entry.
Cloud Spanner
The classic problem with game launches is that you are never sure how much traffic you are going to get. At the same time launches are critically important because if they go badly, it’s extremely hard to recover your player base from the peak you would receive at launch.
To solve those very problems, we chose Spanner for our data storage platform. Since Spanner has both high availability, with a 99.999% uptime SLA for Multi-Region instances, horizontally scalability to match any demand a launch can throw at it, and also strong consistency globally, so you always know that players are seeing accurate in-game information.
Tips and Tricks
It is important to place the GKE clusters as geographically close to Spanner as defined by the instance configuration to reduce request latencies for writes and consistent reads. In this example, we put Spanner in us-central1 because the backend services are also in us-central1.
Liquibase is a great tool for managing your Spanner schema changes and updates, through a yaml configuration file.
Configuring Workload Identity to enable your application connectivity to Spanner has multiple steps, and can be tricky to get right. To solve this we generated the Cloud Deploy yaml files from the Terraform created IAM configuration to ensure both our infrastructure setup and our continuous deployment configuration aligned without manual intervention.
Conclusion
Choosing a set of products to build a multiplayer game out of the myriad of open source tools and products can be overwhelming and time consuming. The aim of the Global Scale Multiplayer Demo is to provide some guidelines, architecture patterns and building blocks that you can use to build your next global scale, production multiplayer game!
We’re excited for the future of the Global Scale Multiplayer Demo. We have big plans for the future to continue to grow and extend this project to show you all the ways you can use Google Cloud to host and scale your game.
If you want to get involved or just have a look at the project:
Cloud BlogRead More