

This is the second of a two-part post. In Part 1, we discussed various approaches to upgrade Amazon Relational Database Service (Amazon RDS) for PostgreSQL and Amazon Aurora PostgreSQL-Compatible Edition databases and explained the high-level steps in these approaches. In this post, we demonstrate how to upgrade an RDS for PostgreSQL database using the pglogical extension with minimal downtime.
Solution overview
To implement this solution, we complete the following steps:
Create the target database.
Configure the WAL parameters.
Create the pglogical extension.
Create the source (provider) node.
Create the source tables.
Create the replication set.
Prepare the target node for replication.
Create a subscription node on the target database.
Create the tables on the target database.
Create the pglogical subscription.
Verify the subscription is active.
Add more transactions.
Verify the data replication is running.
Cut over the application to the target database and stop the old database.
Drop the subscription to the target database.
We highly recommend testing this upgrade process in non-production DB instances before you upgrade your production database.
In this post, we demonstrate this approach in Amazon RDS for PostgreSQL, but you can also use Aurora PostgreSQL.
The code snippets in this post use the following values:
Database name – postgres
Database username – postgres
Database port – 5432
Replication table schema – dms_sample (schema used by pre-packaged code on GitHub)
Source DB instance name – pg-96
Target DB instance name – pg125
Warning: Launching new resources in your AWS account will incur additional costs.
Prerequisites
To complete the PostgreSQL upgrade using pglogical, you must complete the following prerequisites:
Create and activate an AWS account.
Make sure you have appropriate privileges to enable the pglogical extension on the RDS for PostgreSQL instance.
Have an RDS for PostgreSQL instance version 9.6.11 or higher.
Enable the pglogical extension on both the provider (source) and subscriber (target) nodes.
Make sure the tables on the provider and subscriber have the same names, are in the same schema, and have the same columns with the same data types in each column.
Make sure the source database is at version 9.6.11 or higher. In Amazon RDS for PostgreSQL, the pglogical extension isn’t supported any version below this. If you’re on a lower version, you have to perform a minor version upgrade to 9.6.11 prior to upgrading the database using pglogical extension.
You can check the database version using the AWS Command Line Interface (AWS CLI) with the following code:
The following screenshot shows our response.
Alternatively, you can use the psql command:
The following screenshot shows our response.
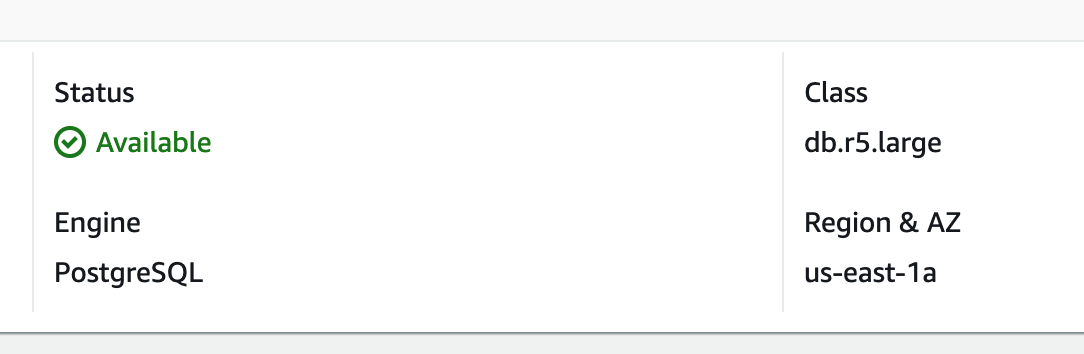
Step 1: Create the target database
You should create the target database using the AWS Management Console or AWS CLI in your desired target version. This is the current version of PostgreSQL database that we upgrade.
Step 2: Configure the WAL parameters
In PostgreSQL, logical replication is based on Write-Ahead Logging (WAL). WAL is the log of changes made to the database cluster, which the replication cluster uses to replay the changes to replicate the database changes. The default parameter group doesn’t have the required parameter setting to enable pglogical replication. To make logical replication work and allow read-only queries on the replica cluster, you have to make these parameter changes by modifying the parameter group in Amazon RDS. These parameter changes enable the logical replication feature and set the related worker processes at the PostgreSQL cluster level.
On the current source database, make sure the following settings are configured. If not already enabled, you can configure these parameters in a new parameter group and make your database point to this parameter group, which requires a database reboot.
On the Amazon RDS console, choose Parameter groups in the navigation pane.
Choose Create a new parameter group.
Modify the following parameters:
wal_level – The wal_level parameter determines how much information is written to the WAL. The default value is minimal, which writes only the information needed to recover from a crash or immediate shutdown. The replica adds logging required for WAL archiving as well as information required to run read-only queries on a standby server. Setting this parameter to logical enables the replica database to be in read-only mode. For this post, we set rds.logical_replication=1 to achieve wal_level=logical. This way, the same information is logged as with replica, plus information needed to allow extracting logical change sets from the WAL. The logical setting also adds information necessary to support logical decoding.
max_replication_slots – Setting this parameter ensures the primary database cluster retains enough WAL segments for replicas to receive them and the primary only recycles the transaction logs after it has been consumed by all the replicas. The advantage is that a replica can never fall behind so much that a re-sync is needed. This parameter must be set to at least the number of subscriptions expected to connect, plus some reserve for table synchronization.
max_worker_processes – This parameter sets the maximum number of background processes that the database can support. It creates enough worker processes to serve each replica that corresponds to the WAL sender and handles other background processes the database system is running. The best practice is to set this to the number of CPUs you want to share for PostgreSQL exclusively. Generally, one per database is needed on the provider node and one per database is needed on the subscriber node in addition to the background processes.
max_wal_senders – This parameter sets the maximum number of concurrent connections from replication databases (the maximum number of simultaneously running WAL sender processes). The default is zero, meaning replication is disabled. If starting with one replica, you must set this to 3. For every replica, you can add two WAL senders.
To use the AWS CLI to complete these steps, enter the following commands to set the parameters at the parameter group:
You can verify the parameter changes on the Amazon RDS console. In the following screenshot, I check that rds.logical_replication=1 is set.
After the parameter settings in the parameter group are modified, you need to reboot the cluster for the changes to take effect, which causes an outage.
Apply the parameter group to the database instance.
The following screenshot demonstrates modifying the parameter group setting of your source database cluster.
To use the AWS CLI, enter the following commands to apply the parameter group to the database instance:
The database change requires reboot for the parameter group changes to take effect.
You should reboot your source database during your maintenance window if in production. When you reboot the database instance, it’s unavailable, which causes an outage.
To reboot with the AWS CLI, enter the following code:
After the database is rebooted, the parameter group status changes to Available.
To verify the changes are applied to the database, connect to the database and query the parameters:
The following screenshot shows our response.
Keep in mind the following about replication slots:
An orphan replication slot can cause unbounded disk growth due to piled up WAL files from the primary.
Replica nodes placed under long maintenance (such as days or weeks) and that are tied to a replication slot have unbounded disk growth due to piled up WAL files from the primary. You can monitor this by querying pg_replication_slots to determine the slots that aren’t used.
You can drop a replication slot using following command:
You can monitor a replication slot using following command:
Step 3: Create the pglogical extension
On the source (provider) database, connect with the RDS Admin account and run the following to create the pglogical extension.
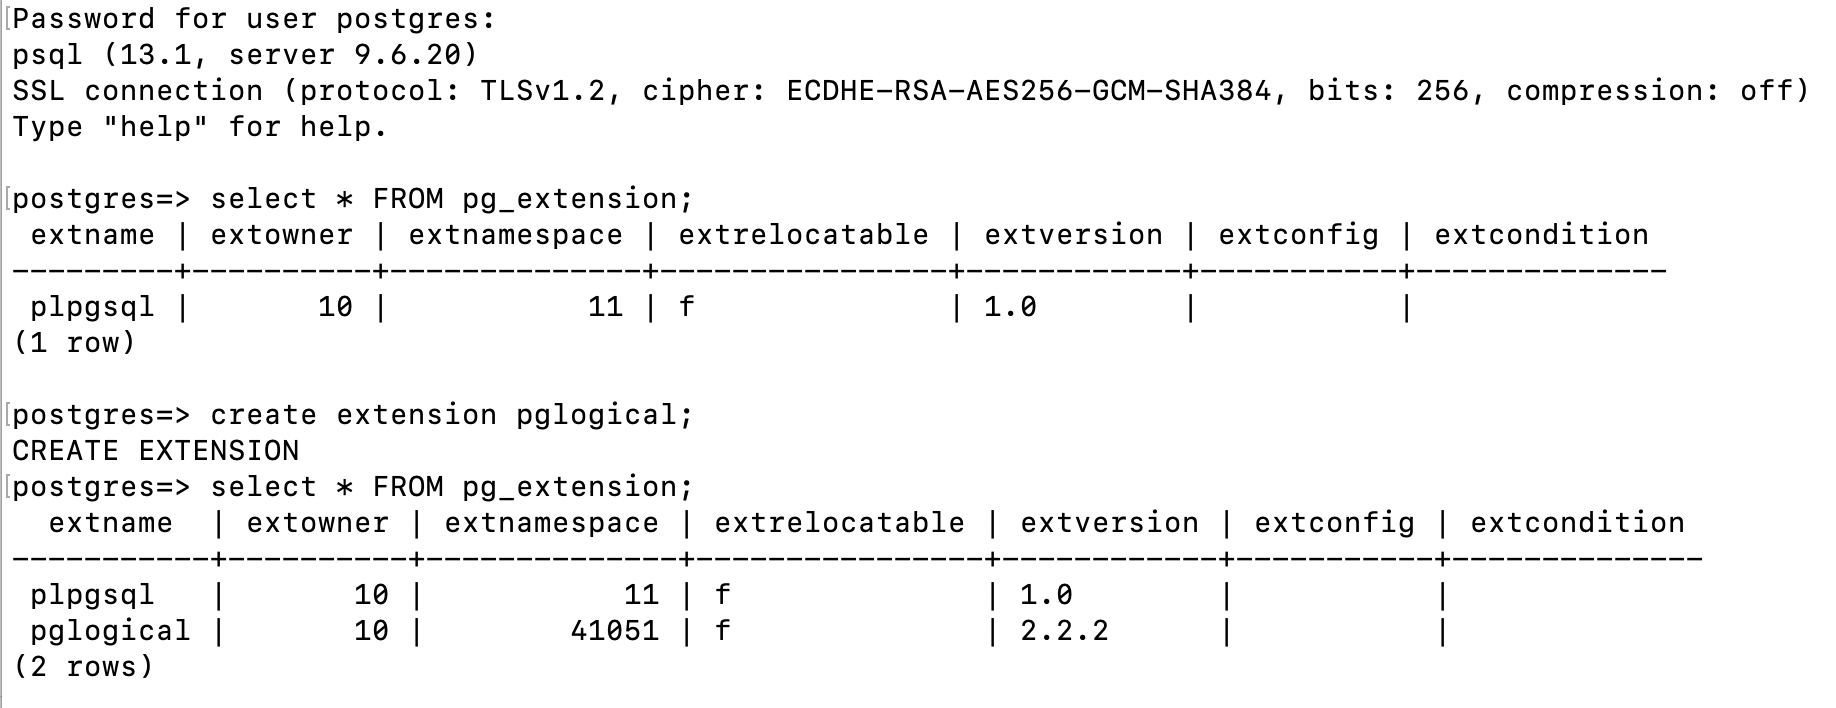
Connect to the source database with psql:
Create the pglogical extension with the following code:
Step 4: Create the source (provider) node
This step creates the provider node on the source database. The provider node is later referred by the subscriber node to replicate the data. To create the provider node, you need to pass the following parameters:
node_name – This is the logical name given to the node. Because we are creating a provider type node, we call it provider for easy understanding.
DSN – The data source name that contains the complete URL of the database, which includes the following:
host – Host name or RDS endpoint
port – Port number of the source database
user – Database user
password – Database user password
dbname – PostgreSQL DB name (for this post, postgres)
Use the following syntax:
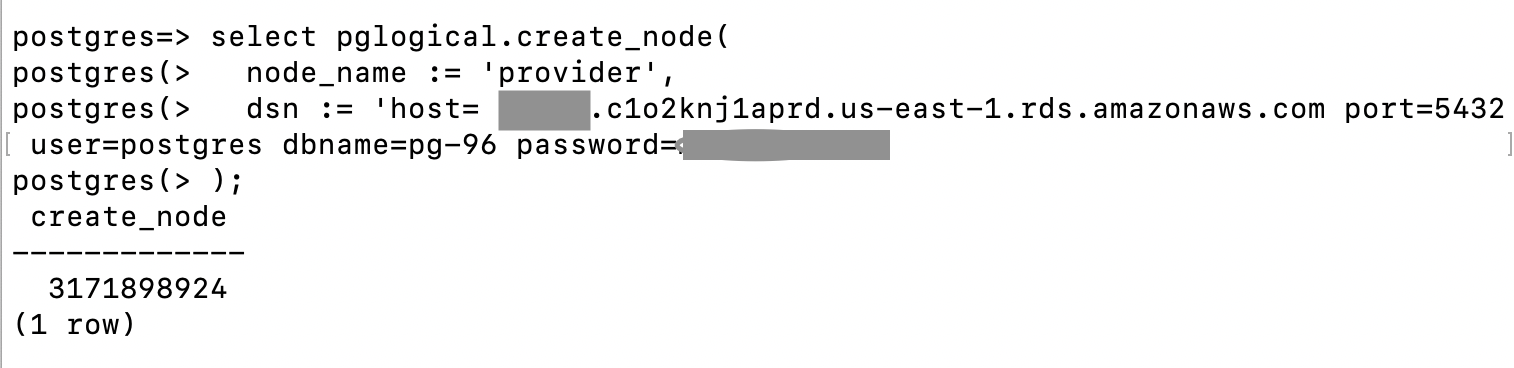
Step 5: Create the source tables
Next, we create the sample tables in the source database to observe the data getting replicated as part of this exercise. Creating this sample table is optional. If you already have tables with data in your source database that can be replicated, you can skip this step.
For this example, we use a GitHub repository to create the user, tables, and indexes. The main script install-postgresql.sql creates the objects with seed data.
The script creates 16 tables and additional objects like procedures and sequences. In this exercise, I’m only interested in replicating these 16 tables. However, four tables in this set don’t have primary keys. I want to replicate all the changes happening on these tables. In order to replicate the UPDATE and DELETE operations along with INSERT operations, the tables must have a primary key.
Use the following statements to create the primary key for those tables:
Step 6: Create the replication set
Now that we have the tables in the source database, we create the replication set and add a schema or tables to the replication set. A replication set is a collection of tables to be replicated. We have three predefined replication sets: default, default_insert_only, and ddl_sql. The default replication set is defined to replicate all changes to tables in. In this section, we show how to replicate all the DML changes with the default replication set.
You can create the replication set with the following command running on the source database:
Next, we add the tables to the replication set default, which means these tables replicate all the DML changes. You can add individual tables or all the tables in a schema to the replication set. To add an entire schema, run the following command. You can modify the schema name to a schema that has tables to be replicated. If you have multiple schemas to replicate, you can repeat this statement for each schema.
We add all the tables under the schema dms_sample to the replication set default:
If you have a use case where you can’t add a primary key or unique key constraint to the table, you can use the REPLICA IDENTITY feature, which replicates the INSERT only changes. You need to create a replication set of default_insert_only type and add the tables without primary keys to this replication set.
To replicate INSERT only operations on a table using REPLICA IDENTITY, enable REPLICA IDENTITY at the table level:
Add the table to a default_insert_only type replication set:
The following screenshot shows an example of adding an INSERT ONLY table to a replication set.
Step 7: Prepare the target node for replication
In this step, we connect to the target (subscriber database) with the Amazon RDS admin account.
On the Amazon RDS console, choose Parameter groups in the navigation pane.
Create a new parameter group.
Modify the parameter group the same way that you did with the source database.
To make these changes in the AWS CLI, use the following code:
Assign the parameter group to the source database.
You can verity the parameter changes on the Amazon RDS console. The following screenshot shows that rds.logical_replication=1 is set.
The database requires a reboot for the parameter group changes to take effect.
Because the target database is not in production use, you can reboot immediately using the Amazon RDS console or the AWS CLI:
After the database is rebooted, the parameter group status changes to (in-sync) and reflects the latest changes.
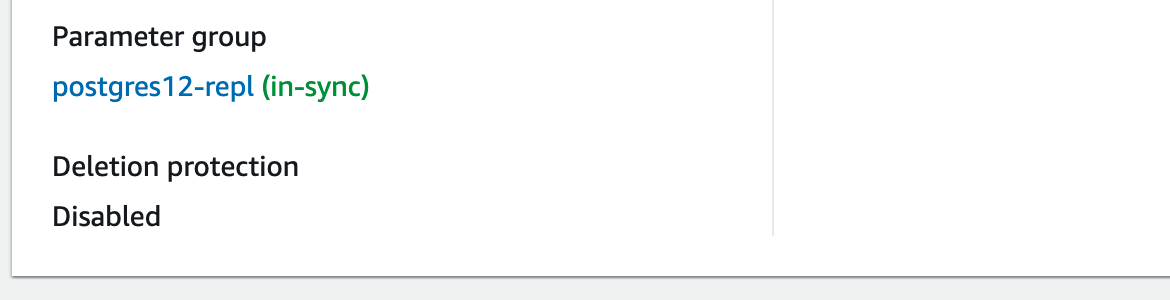
Step 8: Create the subscription node on the target database
In this step, we connect to the target database and create the pglogical subscription with following command:
Step 9: Create the tables on the target database
One way to get the table metadata SQL file is using pg_dump on the source database with the — schema-only option to generate DDL statements and restore the dump on the target database to create the table structure.
Extract the DDL from the source database with the following code:
Create the tables on the target database with the following code:
Step 10: Create the pglogical subscription
On the target database, we now create the pglogical subscription to replicate the data from the source replication set.
To create a subscription, you need to provide the following parameters:
subscription_name – This is the logical name assigned to the subscription, which we call subscription for easy understanding
DSN – The data source name that contains the complete URL of the source database, which includes the following:
host – Host name or RDS endpoint
port – Port number of target database
user – Database username
password – Database user password
dbname – PostgreSQL DB name (for this post, postgres)
We use the following syntax:
Step 11: Verify the subscription is active
To check the subscription status of the replication, you can run the pglogical.show_subscription_status() statement:
You should see the status as shown in the following screenshot with status replicating.
If you the status is down, the replication isn’t working and needs troubleshooting (which we discuss more later in this post). Most of the time, the issue could be with the network, security group, incorrect database name, or user ID and password provided in the subscription. Make sure you have security groups in place that allow the target database endpoint to connect to the source database on the correct port number. For more information, see Security groups for your VPC.
When the source database isn’t active, compare the row count of the tables on the target database with the source database to make sure that the INSERT and DELETE operations are getting synced up. The test database we use in this post isn’t continuously active. In this case, the source and target databases match in terms of row count. For a detailed data validation, you have to compare the content of the tables. Also, you may need to get help from the application and business team to validate the data replication. On a busy database, especially online transaction processing (OLTP) databases, for the data to be fully in sync, you need to make sure that no changes are happening on the source database by taking a downtime. After the data change on the source database is stopped, you can wait for the target database to catch up and cut over to the new database and start using the new target database.
To make things easier for getting the row count for the tables, we created the following function called count_rows. This function returns a row count for a given schema and table name.
Then we use the following SQL to call this function and get the row counts for the tables in descending order. This SQL query uses the information_schema view.
You can also use the alternate version of the SQL using the pg_tables view:
Step 12: Add more transactions
To demonstrate the ongoing replication is working, I add more data to the source database and check the data is replicating to the target database. Running the generateticketactivity procedure simulates selling 1,000 tickets in successive purchases. Tickets are sold in random groups of 1–6 to random people for a random price. A record of each transaction is recorded in the ticket_purchase_hist table.
Step 13: Verify the data replication is running
After you make sure no active transactions or data changes are happening on the source database, you can check the status of the replication by running the following statement on the source database and observing that the WAL locations are the same for the sent_location, write_location, and replay_location, which indicates that the target database is at the same LSN position as the source database:
This example depicts the ideal scenario where the source database isn’t actively accepting transactions. In an active OLTP database, you have a gap between the source and the target. However, stopping the transactional activity on the source database makes sure the target database is in sync with the source.
We created a SQL script file with the preceding SELECT statement and ran it from the psql command line:
To confirm that the target database is staying current with the source database, you can compare the row count of all the tables that are being replicated. A quick row count can confirm this. In the following screenshots, the row count of source database is on the left, and the target database is on the right. The status of the replication is replicating.
Step 14: Cut over the application to the target database stop the old database
When the data is in sync between the source database and replica database, you can switch your application to point to the new database (replica). Switching the application might involve updating your application configuration with the new database endpoint. After this cutover, you can stop or decommission the old database.
Step 15: Drop the subscription in the target database
After the cutover, to avoid any accidental data replication from the old source database, you should drop the subscription in the target database:
Troubleshooting
If the replication status is down, you may need to adjust the security group setting for the target database to connect to the source database on the PostgreSQL port for the replication to succeed.
If you see the replication is in down status rather than replicating, you should make sure the security group is configured to allow the connection from the target instance to the PostgreSQL port on the source DB instance and recreate the subscription on the target. For more information, see Security groups for your VPC.
The following screenshot shows the inbound rules for the source database security group where I allow the incoming connection to PostgreSQL port 5432 from the target database security group.
If pglogical replication stops after few days, this may be because you’re making DDL changes on the source tables, like adding a new column to one of the replicated tables while replication is in progress.
Automatic DDL replication is not supported. You’re responsible for managing DDL so that the provider and subscriber databases remain compatible.
pglogical provides the pglogical.replicate_ddl_command function to allow DDL to be run on the provider and subscriber at a consistent point.
In such scenarios, use the function to replicate the DDL change:
Run this locally and then send the specified command to the replication queue to run on the subscribers, which are subscribed to one of the specified replication_sets. Use the following parameters:
command – The DDL query to run
replication_sets – An array of replication sets, which this command should be associated with; the default is “{ddl_sql}”
Cleaning up
As part of this upgrade, you have deployed resources in your AWS account to replicate data. These resources will incur costs as long as they are in use. Be sure to remove all unwanted resources and clean up your work when you have finished with the migration.
Conclusion
In this post, we demonstrated how to upgrade Amazon RDS for PostgreSQL from 9.6 to a newer version using the pglogical extension. This approach is helpful to minimize the downtime of an upgrade, and you can cut over the application when your target database is fully in sync with the old database.
You can use this same technique for Aurora PostgreSQL. pglogical is supported for Aurora PostgreSQL release 2.6.x or higher (compatible with PostgreSQL 10.13 or higher), Aurora PostgreSQL release 3.3.x or higher (compatible with PostgreSQL 11.8 or higher), and Aurora PostgreSQL release 4.0 or higher (compatible with PostgreSQL 12.4 or higher). For more information about Aurora PostgreSQL versions, see Amazon Aurora PostgreSQL releases and engine versions and Extension versions for Amazon Aurora PostgreSQL
Please try this walkthrough for yourself, and leave any comments in the comments section.
About the Author
Arumugam Petchimuthu (aru) is a Senior Solutions Architect in AWS specializing on Databases. Aru has 25 years of IT experience in the Information Technology industry. Aru holds a master’s degree in Computer and Software Applications and Certified professional in Relational and NoSQL database and cloud technologies including AWS, Oracle, and Cassandra.
Read MoreAWS Database Blog