

If you have large mission-critical workloads running on an on-premises Microsoft SQL Server database, you may be looking for ways to migrate to AWS with minimal to near-zero downtime. In this post, we show you a solution for migrating your on-premises SQL Server database to Amazon Relational Database (Amazon RDS) for SQL Server using the SQL Server native backup and restore method in combination with transactional replication to minimize downtime. This method is useful when you have to migrate all the database objects including views, stored procedures, and functions as part of the database migration. This solution is beneficial when the size of the SQL Server database is large. Furthermore, this approach helps you move data to Amazon RDS for SQL Server and allows you to take advantage of native tools using existing infrastructure.
In Part 1 and Part 2 of this series, we showed you how to configure transactional replication from on-premises Microsoft SQL Server or SQL Server on an Amazon Elastic Compute Cloud (Amazon EC2) instance to Amazon RDS for SQL Server. As mentioned in these posts, by default, a subscription to a transactional publication is initialized with a snapshot generated by the Snapshot Agent that contains database objects along with the data.
In scenarios where the size of the source database is large, you should initialize a subscription without using a snapshot. Instead, use the SQL Server native backup and restore feature to perform the initial sync.
Solution overview
The solution uses an EC2 instance with SQL Server database engine installation as the on-premises source database and Amazon RDS for SQL Server as the target database for migration.
To minimize downtime, we take a two-stage approach for database migration, as described in the following diagram. The initial stage uses SQL Server full and transaction log backup to restore the Amazon RDS database. This restores the database to a point in time, meaning that you won’t have data from transactions that happened after the source backup was taken. The second stage uses SQL Server transactional replication to replicate ongoing data changes from the on-premises database to Amazon RDS.
Prerequisites
To get started, you must have the following prerequisites:
An on-premises instance of SQL Server 2019 or an instance of SQL Server 2019 on Windows Server 2016 running on an Amazon EC2 host. We call this setup the “source SQL Server” for the rest of the post.
An RDS for SQL Server DB instance.
Connectivity between the source SQL Server and Amazon RDS for SQL Server.
A login on the source SQL Server that is part of a sysadmin fixed server role to configure a distributor on the source SQL Server.
Familiarity with SQL Server Management Studio (SSMS).
Configure distribution database on the source SQL Server
You can skip this section if the distribution is already configured on the source SQL Server. Complete the following steps to enable distribution:
Log in to the source SQL Server using a login that is part of the sysadmin server role.
In SQL Server Management Studio, navigate to the replication node.
Choose the replication node (right-click) and choose Configure distribution.
Follow the instructions in the section Configuring distribution referenced in the post Migrating to Amazon RDS for SQL Server using transactional replication: Part 2.
Configure publication on the source server
Your next step is to create a publication and include all the objects that you want to migrate to the Amazon RDS environment.
Log in to the source SQL Server using SQL Server Management Studio.
Open the context menu (right-click) for Local Publications under the replication node, then choose New Publication.
Choose the database.
In the following screenshot, we chose the source database dms_sample.
Choose Next.
For Publication Type, choose Transactional publication.
Choose all the objects you want to replicate and choose Next.
Choose Next to skip filtering table rows.
In the snapshot window, do not select any of the check boxes.
We don’t use Snapshot Agent to perform the initial data sync. Instead, we perform native backup and restore as shown in the subsequent steps.
Choose Next.
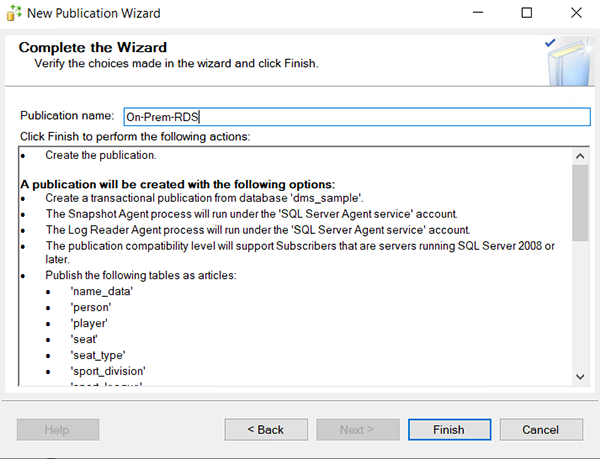
Configure the Snapshot Agent and log reader agent security as needed and create a publication.
Create the publication and provide a publication name.
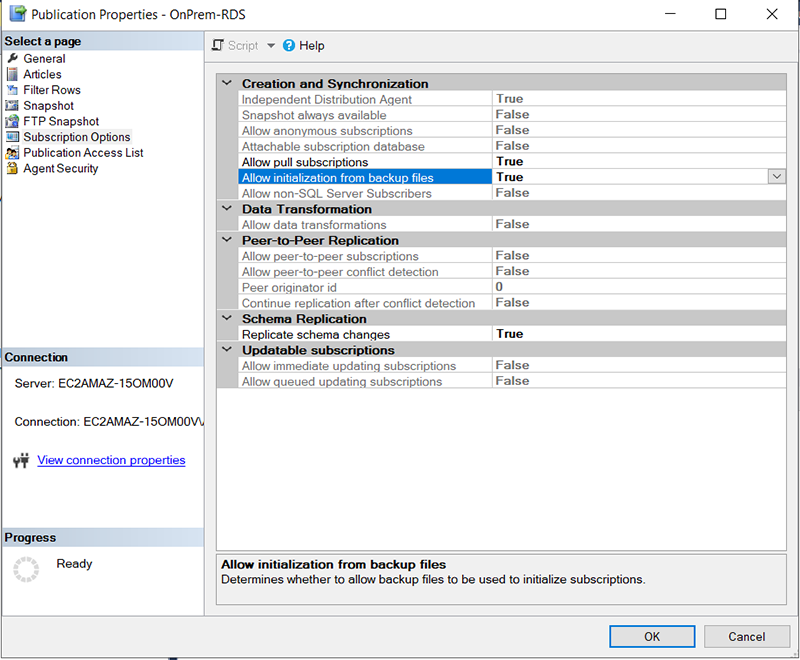
After creating the publication, you need to run the following script to set the Allow_Initialize_From_Backup parameter to true at the publisher. You can either do this using T-SQL or SSMS. See the following code:
Configure your RDS for SQL Server instance with native backup and restore
To set up your RDS for SQL Server instance for native backup and restore, you need three components:
An Amazon Simple Storage Service (Amazon S3) bucket to store your backup files
An AWS Identity and Access Management (IAM) role to access the bucket
The SQLSERVER_BACKUP_RESTORE option added to an option group on your DB instance
Take a full backup of the user database from your source SQL Server:
Copy the backup to the S3 bucket. To perform this copy, you can either use the AWS Command Line Interface (AWS CLI), as shown in the following screenshot, or the Amazon S3 console.
On the Amazon RDS instance, restore the full backup with no recovery:
Take a log backup of the user database from your source SQL Server:
This saves time in the sync process when the replication is being initialized.
Copy the log backup over to the S3 bucket. To perform this copy, you can either use the AWS CLI, as shown in the following screenshot, or the Amazon S3 console.
On the Amazon RDS instance, restore the log backup with recovery to bring the database online:
If a row is inserted by a user at the publisher and that insert satisfies a constraint on the table, it might not be required to enforce the same constraint when the row is inserted by a replication agent at the subscriber. The same is applicable for triggers.
Disable all triggers and constraints on the subscriber database in Amazon RDS for SQL Server:
We can’t use the GUI to create the subscription because we’re initializing from backup and these options aren’t available in SSMS. Instead, we need to use T-SQL.
Create a push subscription on the publisher by running the following query on the source SQL Server instance:
Monitor the replication status using the replication monitor at the publisher.
Additionally, you can view undistributed commands using the following query:
Cut over to Amazon RDS for SQL Server
When the source and target databases are in sync, stop activity on your source SQL Server and ensure that replication is complete (there are no undistributed commands in the distribution database). Then you can cut over your production workloads to the RDS for SQL Server instance. You can use the following code to clean up replication and enable the constraints and triggers that were previously disabled:
Summary
In this post, we showed you how to configure transactional replication with native backup and restore that replicates data from an on-premises SQL Server or SQL Server on an EC2 instance. You can use this strategy to migrate your large mission-critical workloads to an RDS for SQL Server instance with minimal to near-zero downtime.
If you have any comments or questions, please share them in the comments section.
About the Author
Sid Vantair is a Cloud Support Engineer with Amazon Web Services. In his spare time, he loves to spend time with his family and exploring new travel destinations.
Read MoreAWS Database Blog