

Customers running their business-critical workloads on SAP Adaptive Server Enterprise (Sybase ASE) databases can modernize them by migrating to Amazon Relational Database Service (Amazon RDS) for SQL Server and be able to keep Transact-SQL (T-SQL) as their preferred database programming language and Tabular Data Stream (TDS) as their communication protocol, which accelerates the migration and helps reduce costs. Amazon RDS for SQL Server makes it simple to set up and operate SQL Server deployments in the cloud by managing time-consuming database administration tasks, including provisioning, backups, software patching, monitoring, and hardware scaling.
In the post Migrate your SAP ASE (Sybase ASE) database to Amazon RDS for SQL Server, I presented a solution to migrate your Sybase ASE database schema and data to Amazon RDS for SQL Server using SQL Server Migration Assistant (SSMA) for Sybase, which is a free tool from Microsoft.
As of this writing, SSMA for Sybase supports one-time migration of the data and doesn’t support continuous replication.
Customers with business-critical applications and stringent Recovery Time Objective (RTO) requirements can’t afford long outages often required by the SSMA tool for large databases. Our customers have asked how to migrate their large databases in near-real time.
In this post, we examine a use case in which you migrate your Sybase ASE database schema using SSMA for Sybase and data to Amazon RDS for SQL Server using AWS Database Migration Service (AWS DMS) in near-real time.
Solution overview
The SSMA and AWS DMS-based migration solution has the following major components:
SQL Server Migration Assistant (SSMA) for Sybase – SSMA is a free tool from Microsoft, used to migrate schema objects from Sybase ASE to Amazon RDS for SQL Server
Amazon Elastic Compute Cloud (Amazon EC2) – A Microsoft Windows Server 2016 Base AMI is used to support the SSMA tool
AWS Direct Connect – Direct Connect is recommended to establish a dedicated network connection between your on-premises data centers and AWS
AWS Database Migration Service (AWS DMS) – AWS DMS is used to continuously replicate data with low latency from the Sybase ASE source to Amazon RDS for SQL Server target
The following diagram illustrates the solution architecture.
For our use case, our Sybase ASE database is running on Amazon EC2, and we continuously replicate data from Sybase ASE to Amazon RDS for SQL Server using AWS DMS. The following diagram illustrates our architecture.
This solution has the following characteristics:
Sybase ASE is installed and configured to run on an Amazon EC2 server, which we refer to as the source database
An AWS DMS replication instance is created, which we refer to as the replication instance
Amazon RDS for SQL Server is our target database
To perform the full load and set up continuous replication from Sybase ASE to Amazon RDS for SQL Server, you must complete the following high-level steps:
Check Replication Agent configuration
Optionally, disable the RepAgent thread
Establish a Log Transfer Manager (LTM) truncation point
Enable replication
Create a replication instance
Create a source endpoint
Create a target endpoint
Create a database migration task
Start the migration task
Prerequisites
To test this scenario, you must have the following prerequisites:
An AWS account
An EC2 instance with Sybase ASE installed and a user database (pubs2) created with tables and procedures
The Sybase ASE account, which we use to replicate the data, created and granted the required permissions
An RDS for SQL Server instance created
As outlined in Migrate your SAP ASE (Sybase ASE) database to Amazon RDS for SQL Server, only the schema is migrated using SSMA for Sybase (refer to the Migrate the schema section)
DBeaver or a similar tool installed to connect to the Sybase ASE server
Source database, replication instance, and target database created in the same VPC
Check Replication Agent configuration
Find out if your database is configured to use Replication Agent by running the following command:
If your database isn’t configured to use Replication Agent, you can skip to the Establish an LTM truncation point step.
(Optional) Disable the RepAgent thread
Disabling the RepAgent thread allows the Mirror Replication Agent to reserve the logscan context in the primary database. Complete the following steps:
Connect to the Sybase ASE server, open a new query window, and run the following command to stop the RepAgent thread:
To disable the RepAgent thread in the source database, run the following command:
Establish an LTM truncation point
To establish an LTM truncation point, connect to the Sybase ASE server, open a new query window, and run the following command:
Enable replication
To enable replication, complete the following steps:
To display the replication status for all the tables in the source database, run the following command:
To enable replication on all the tables in the source database, run the output of the following command:
For example:
To validate replication is enabled, run the following command:
Create a replication instance
To set up continuous replication, create an AWS DMS replication instance following these steps:
On the AWS DMS console, choose Replication instances in the navigation pane.
Choose Create replication instance.
Enter a name and description.
Choose an instance class.
For Engine version, we recommend choosing the latest AWS DMS engine version.
The default setting for Allocated storage is 50 GB; you can change it as needed.
For VPC, choose your VPC.
For Multi AZ, choose between a production workload (Multi-AZ) and dev or test workload (Single-AZ) setup based on your requirement.
Review the settings for Advanced security and network configuration, Maintenance, and Tags.
Choose Create.
Create a source endpoint
Next, you need to create the source endpoint and test the connection using the replication instance you created in the previous step.
On the AWS DMS console, choose Endpoints in the navigation pane.
Choose Create endpoint.
For Endpoint type, choose Source endpoint.
For Endpoint identifier, enter a name for your endpoint.
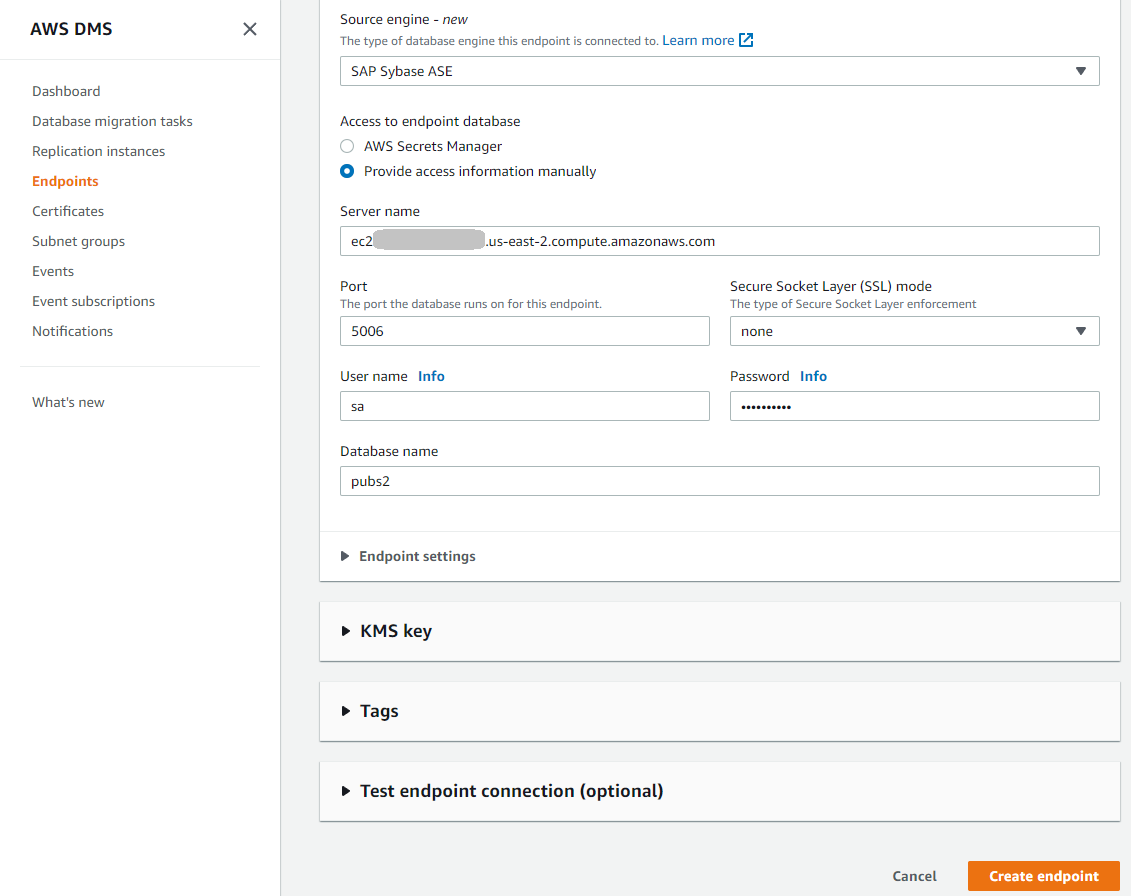
For Source engine, choose SAP Sybase ASE.
For Access to endpoint database options, select Provide access information manually.
For Server name, enter the source database server name.
Enter the port, user name, password, and database name for the source database server.
Choose Create endpoint.
After you create the endpoint, select it and on the Actions menu, choose Test Connection to make sure it’s successful.
Create a target endpoint
Next, you create the target endpoint and test the connection using the replication instance you created in the previous step.
On the AWS DMS console, choose Endpoints in the navigation pane.
Choose Create endpoint.
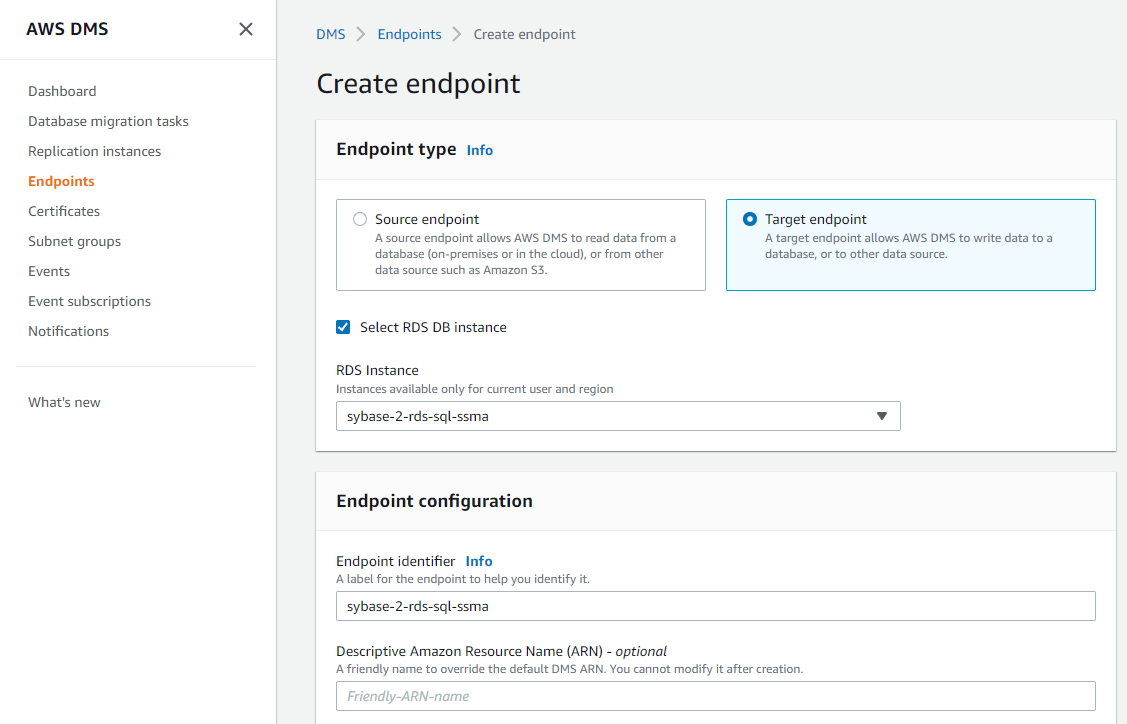
For Endpoint type, select Target endpoint.
Select RDS DB instance and choose the RDS for SQL Server instance.
For Endpoint identifier, enter a name for your endpoint.
For Target engine, choose Microsoft SQL Server.
For Access to endpoint database, select Provide access information manually or AWS Secrets Manager depending on your preference.
For Server name, enter the target database server name.
Enter the port, user name, password, and database name for the target database server.
Choose Create endpoint.
After you create the endpoint, select it, and on the Actions menu, choose Test Connection to make sure it’s successful.
Create a database migration task
To create the database migration task using the replication instance and source and target endpoints, complete the following steps:
On the AWS DMS console, choose Database migration tasks in the navigation pane.
Choose Create task.
For Task identifier, enter a unique name.
Choose your replication instance, source database endpoint, and target database endpoint.
For Migration type, choose Migrate existing data and replicate ongoing changes.
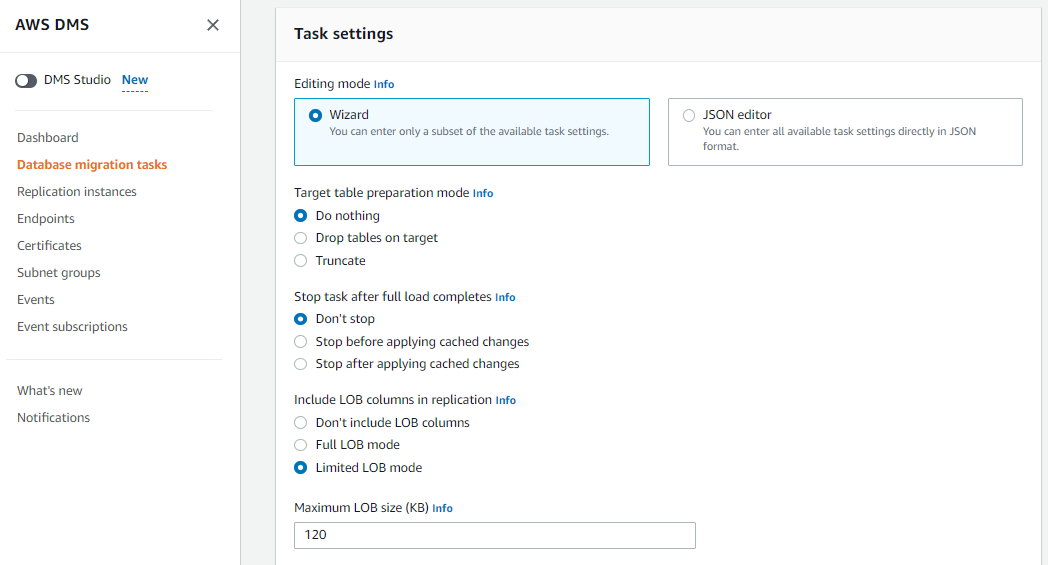
For Target table preparation mode, select Do nothing.
For Stop task after full load completes, select Don’t stop.
For Include LOB columns in replication, select Limited LOB mode.
Find out the maximum LOB size (KB) using the Best practices section later in this post.
Skip the Enable validation option because it’s not supported (as of this writing) for the Sybase endpoint.
Select Enable CloudWatch logs to gain insights during the migration process from Amazon CloudWatch.
Review the Advanced task settings options and enter values as needed.
In the Table mappings section, under Selection rule, choose Add new selection rule.
Enter % for Schema name and Table name to include all the schemas and tables from the source database.
For Start migration task, select Manually later.
Choose Create task.
Start the migration task
Before you start the migration task, make sure you have disabled the foreign key constraints and triggers at the target database migrated using SSMA for Sybase.
For a database with a large number of triggers, you can run the output of the following commands from SQL Server Management Studio (SSMS):
For a database with a large number of foreign keys, you can run the output of the following commands from SSMS:
To start the migration task, complete the following steps:
On the AWS DMS console, choose Database migration tasks in the navigation pane.
Select the task you created.
On the Actions menu, choose Restart/Resume.
Validate the migration
To validate the schema migration, follow the instructions in Testing Migrated Database Objects (SybaseToSQL).
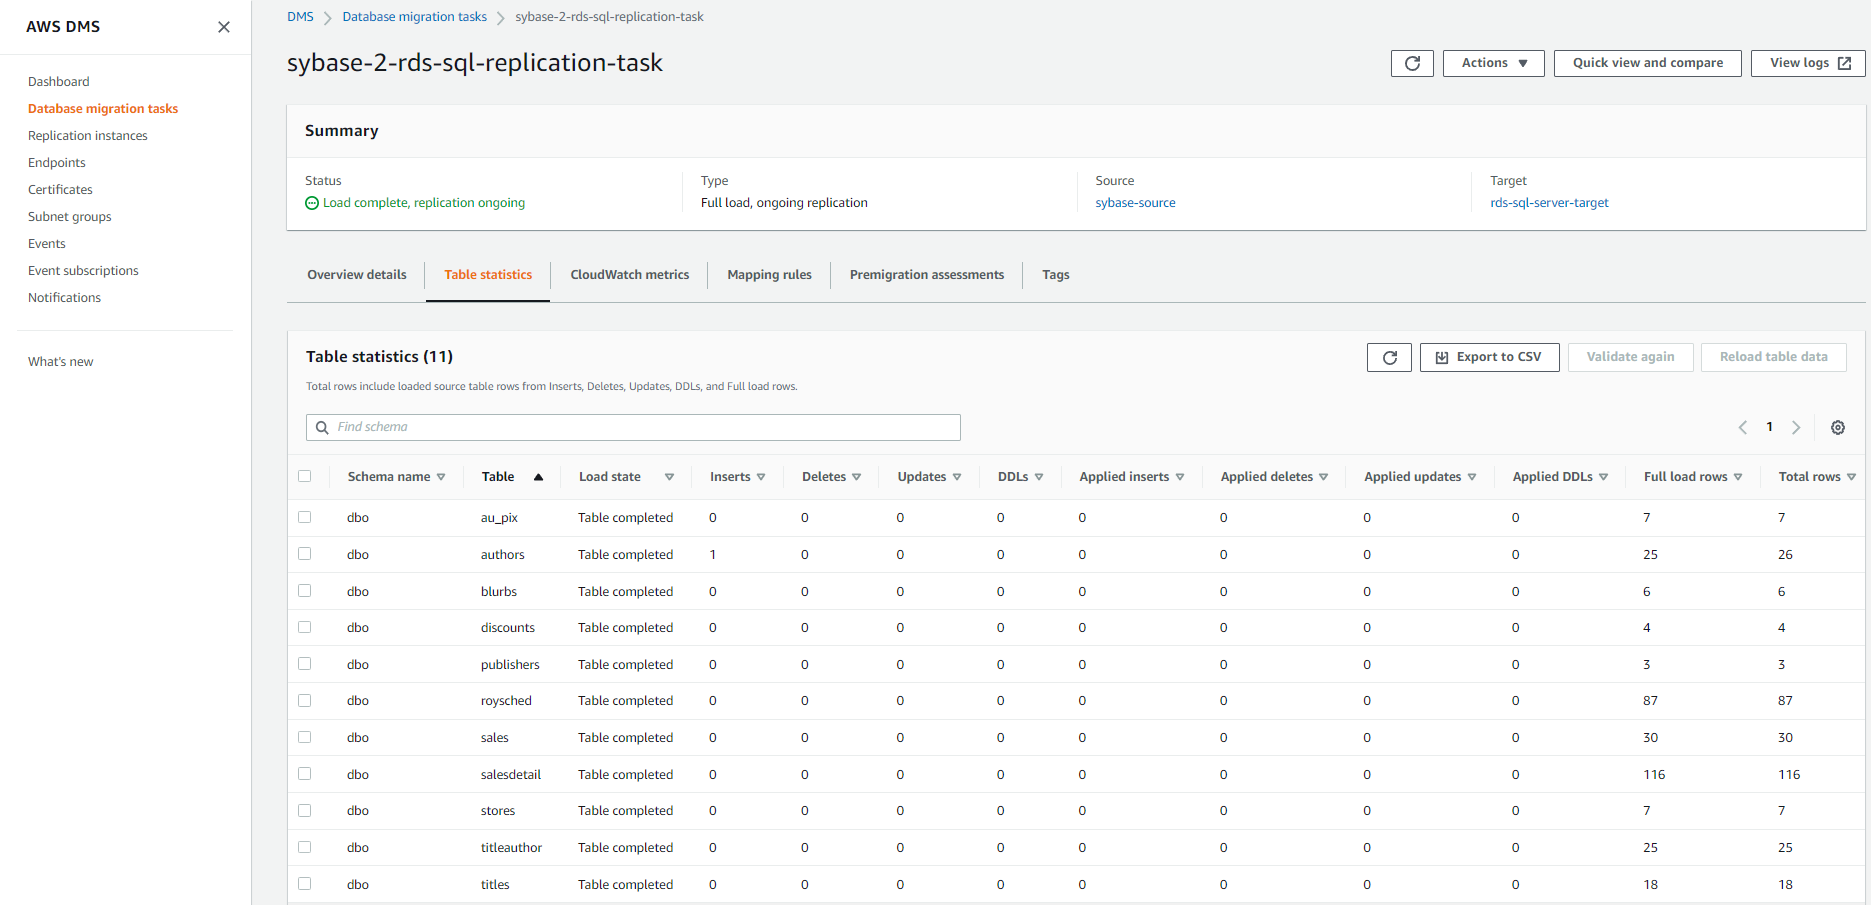
On the AWS DMS console, choose Database migration tasks in the navigation pane.
Choose the database migration task.
On the Table statistics tab, review the Full load rows, Inserts, Updates, and Deletes columns.
To view the CloudWatch logs, choose View logs.
On the CloudWatch Logs console, you can download the logs in CSV format from the Actions menu.
Perform the cutover
To complete the cutover, follow these steps:
Find and download the latest Microsoft ODBC and Microsoft JDBC drivers to use in the application.
Find an approved outage window for the application and stop the application.
Verify the target database is in sync with the source database.
On the AWS DMS console, choose Database migration tasks in the navigation pane.
Select the migration task and on the Actions menu, choose Stop.
Enable the triggers at the target database.For a database with a large number of triggers, you can run the output of the following commands from SSMS:
Enable the foreign keys at the target database.
For a database with a large number of foreign keys, you can run the output of the following commands from SSMS:
Deploy application changes related to this migration.
Start the application.
Best practices
The following best practices are recommended:
Create the AWS DMS replication instance in the same AWS Region and Availability Zone as Amazon RDS for SQL Server to have minimum network latency between them.
Right-size the AWS DMS replication instance in terms of CPU, memory, and storage based on your database size and data types in the database.
Consider changing the default values via the AWS DMS Database migration tasks page when creating the task to optimize the full load.
Identify the tables with LOB data to improve the speed of an AWS DMS task using the following code:
Identify the maximum LOB size by running the output of the following code:
Identify large tables using the following code:
Choose the right Amazon RDS for SQL Server collation by identifying the character set of the source Sybase ASE database using the following code:
Clean up
To remove all the components created by this solution and avoid future charges, complete the following steps:
Sign in to the AWS Management Console
Choose the Region where your EC2 instance, RDS for SQL Server instance, and AWS DMS replication instance reside
On the Amazon RDS console, choose Databases
Select the RDS for SQL Server instance and on the Actions menu, choose Delete
On the Amazon EC2 console, choose Instances
Select the EC2 instances used as source data and SSMA host
On the Instance state menu, choose Terminate instance
On the AWS DMS console, choose Database migration tasks
Select the migration task and on the Actions menu, choose Stop
Wait for the task to stop, then choose Delete
On the AWS DMS console, choose Endpoints
Select the source and target endpoints and on the Actions menu, choose Delete
On the AWS DMS console, choose Replication instances
Select the replication instance and on the Actions menu, choose Delete
Limitations
This solution has the following limitations:
AWS DMS doesn’t support clusters or using MSA (Multi-Site Availability) or warm standby as a source.
You can run only one AWS DMS task with ongoing replication or change data capture (CDC) for each SAP ASE database. For more information, see Limitations on using SAP ASE as a source for AWS DMS.
Review Limitations on using SQL Server as a target for AWS Database Migration Service.
Summary
In this post, we demonstrated how to create an AWS DMS replication instance, endpoints, and database migration tasks followed by data migration (continuous replication) from Sybase ASE to Amazon RDS for SQL Server using AWS DMS. Try out Amazon RDS for SQL Server and migrate your Sybase ASE database workload to AWS in near-real time.
If you have any comments or feedback, leave them in the comments section.
About the author
Rajib Sadhu is Senior Database Specialist Solutions Architect with over 15 years of experience in Microsoft SQL Server and other database technologies. He helps customers architect and migrate their database solutions to AWS. Prior to joining AWS, he supported production and mission-critical database implementation across the financial and travel and hospitality industry segments.
Read MoreAWS Database Blog