Amazon Relational Database Service (Amazon RDS) Custom is a managed database service for legacy, custom, and packaged applications that require access to the underlying operating system and database (DB) environment. Amazon RDS Custom is now available for the SQL Server database engine. Amazon RDS Custom for SQL Server automates setup, operation, and scaling of databases in the cloud while granting access to the database and underlying operating system to configure settings, install drivers, and enable native features to meet the dependent application’s requirements.
Always On Availability Groups (AGs) is a high availability (HA) feature that you can use as a disaster recovery solution to provide an enterprise-level alternative to database mirroring. An availability group supports a replicated environment for a discrete set of user databases, known as availability databases, that can fail over together.
In this post, I explain high availability configuration using Always On AGs on RDS Custom for SQL Server instances. We define HA as when the data from the primary DB instance is synchronously replicated to a secondary instance that resides in a different Availability Zone. Running a DB instance in the HA configuration enhances availability during planned system maintenance, and helps protect your databases against DB instance failure and Availability Zone disruption.
Prerequisites
Before you decide to set up HA for your instance, this post assumes that you have a good background knowledge of Always On setup, its various commit modes, and latency requirements. In this post, we setup a domain-independent availability group.
For additional information, refer to What is an Always On availability group and Create a domain-independent availability group. We strongly recommend that you set up Always On in a non-production instance and run end-to-end validations before you implement this solution in a production environment.
Solution overview
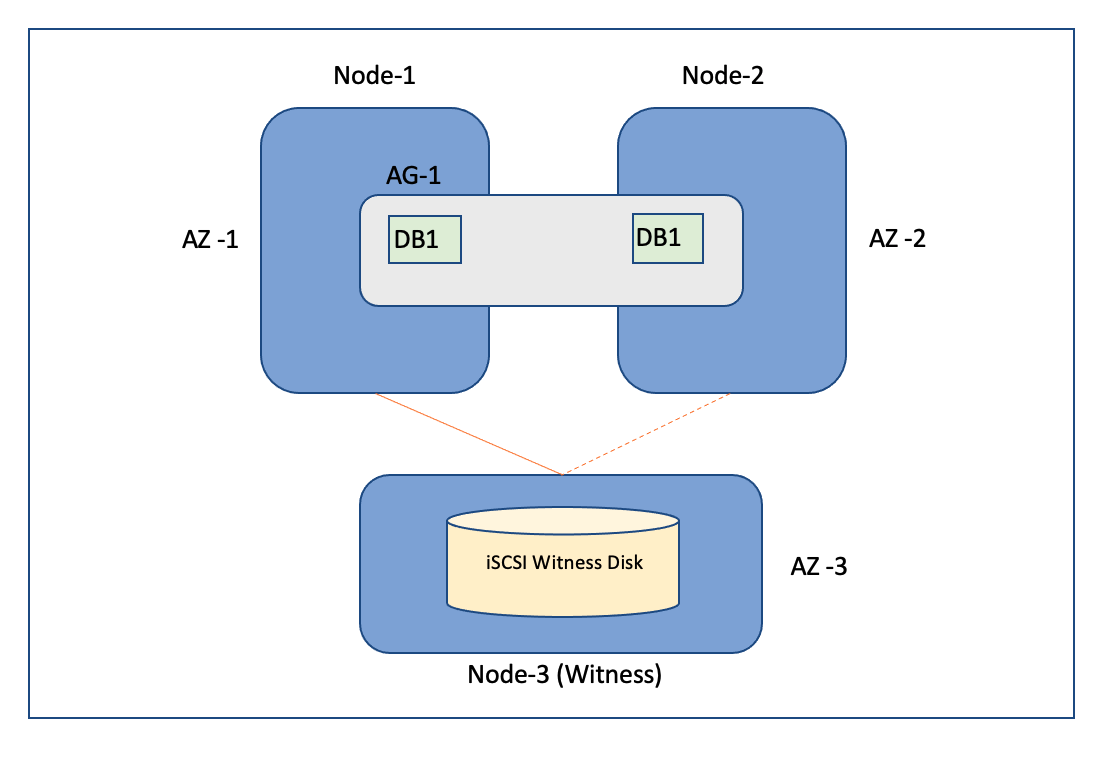
To setup an HA configuration, you need to create two RDS Custom for SQL Server DB instances that acts as the primary and secondary nodes, and one Amazon Elastic Compute Cloud (Amazon EC2) instance that acts as a witness node. We strongly recommend that you create these instances in different Availability Zones of the same Region.
The following diagram illustrates our HA setup using Always On AGs.
We implement the solution with the following high-level steps:
Create RDS Custom for SQL Server and EC2 instances.
Prepare the RDS Custom for SQL Server DB instances.
Set up the witness disk using iSCSI.
Set up a Windows cluster.
Set up an Always On AG.
Create a database and add it to the availability group.
Create RDS Custom for SQL Server and EC2 instances
The first step is to launch your RDS Custom for SQL Server instances. For more details about creating RDS Custom for SQL Server instances, refer to Creating and connecting to a DB instance for Amazon RDS Custom for SQL Server.
The following example demonstrates launching two RDS Custom for SQL Server instances within the same VPC and security group. You require two different DB subnet groups to make it available in different Availability Zones.
Launch Node-1, RDS-custom-sqlserver-1, in the us-west-2c Availability Zone:
aws rds create-db-instance
–engine custom-sqlserver-ee
–engine-version 15.00.4073.23.v1
–db-instance-identifier RDS-custom-sqlserver-1
–db-instance-class db.m5.4xlarge
–allocated-storage 1000 –storage-type io1 –iops 10000
–master-username admin
–master-user-password <XXXXX>
–kms-key-id <kms-key-id>
–custom-iam-instance-profile RDSCustomIAMProfile
–db-subnet-group-name RDS-custom-sng-1
–vpc-security-group-ids RDS-usw2-vpc-sg-1
–publicly-accessible
–region us-west-2
–profile RDS_Custom
Launch Node-2, RDS-custom-sqlserver-2, in the us-west-2a Availability Zone:
aws rds create-db-instance
–engine custom-sqlserver-ee
–engine-version 15.00.4073.23.v1
–db-instance-identifier RDS-custom-sqlserver-2
–db-instance-class db.m5.4xlarge
–allocated-storage 1000 –storage-type io1 –iops 10000
–master-username admin
–master-user-password <XXXXX>
–kms-key-id <kms-key-id>
–custom-iam-instance-profile RDSCustomIAMProfile
–db-subnet-group-name RDS-custom-sng-2
–vpc-security-group-ids RDS-usw2-vpc-sg-1
–publicly-accessible
–region us-west-2
–profile RDS_Custom
Next, we launch an EC2 instance that acts as a witness node.
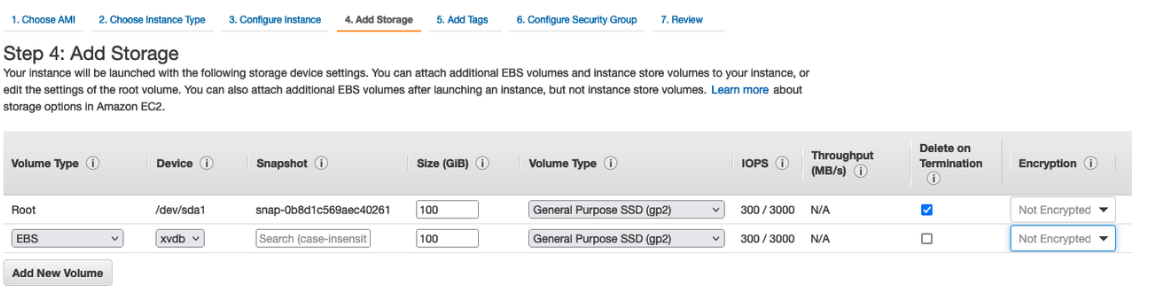
Choose an Amazon Machine Image (AMI). For this post, we use the AMI of Microsoft Windows Server 2019 Base.
Select an instance type. For this post, we use the db.t2.micro instance type.
Configure the instance details:
We use the same VPC network that is being used by the RDS Custom for SQL Server DB instance, but in a different Availability Zone (us-west-2b). In the previous steps, we launched RDS Custom for SQL Server DB instances in the us-west-2c and us-west-2a Availability Zones.
Set Auto-assign Public IP to Enable.
Add the new volume type of GP2 with a storage size of 100 GB.
Add tags.
Configure the VPC security group. For this post, we select the security group RDS-usw2-vpc-sg-1 (the same as what was specified for the preceding RDS Custom for SQL Server DB instances).
Review the instance launch and select a key pair.
You can specify an existing key pair or create a new key pair. In this example, we create a new key pair with the name RDS-Custom-Witness and download the keys.
Prepare the RDS Custom for SQL Server DB instances
To prepare your RDS Custom for SQL Server DB instances, complete the following steps:
Pause RDS Custom automation on both RDS Custom for SQL Server DB instances, so that RDS automation doesn’t interfere with the configuration tasks that we perform.
To connect RDS Custom for SQL Server instances, you must enable Remote Desktop Protocol (RDP).
Open Windows Power Shell and run the following commands on Node-1 and Node-2:
Start the MSiSCSI service:
net start MSiSCSI
Set-Service msiscsi –StartupType “Automatic”
Set a DNS suffix. The following example creates a DNS suffix for the domain called custom.com:
Set-ItemProperty “HKLM:SYSTEMCurrentControlSetServicesTcpipParameters” -Name “NV Domain” -Value custom.com
Install the failover clustering feature:
Install-WindowsFeature -Name Failover-Clustering –IncludeManagementTools
Make sure that the administrator password is the same for Node-1 and Node-2:
net user administrator XXXXXXXX
Restart-Computer
Set up the witness disk using iSCSI
To set up the witness disk, you run commands on Node-1, and Node-2, and the witness node.
Witness node:
Perform the following steps on witness node:
Start the MSiSCSI service:
net start MSiSCSI
Set-Service msiscsi -StartupType “Automatic”
Set up the disk for quorum:
PS C:UsersAdministrator> diskpart
Microsoft DiskPart version 10.0.17763.1911
Copyright (C) Microsoft Corporation.
On computer: EC2AMAZ-J6KCNMO
DISKPART> list disk
Disk ### Status Size Free Dyn Gpt
——– ————- ——- ——- — —
Disk 0 Online 100 GB 0 B
Disk 1 Online 100 GB 99 GB *
DISKPART> select disk 1
Disk 1 is now the selected disk.
DISKPART> online disk noerr
Virtual Disk Service error:
This disk is already online.
DISKPART> attribute disk clear readonly
Disk attributes cleared successfully.
DISKPART> convert gpt noerr
DISKPART> convert dynamic noerr
DiskPart successfully converted the selected disk to dynamic format.
DISKPART> create volume simple align=1024 disk=1
DiskPart successfully created the volume.
DISKPART> format fs=NTFS label=”rdsquorum01″ quick UNIT=65536
100 percent completed
DISKPART> list volume
Volume ### Ltr Label Fs Type Size Status Info
———- — ———– —– ———- ——- ——— ——–
Volume 0 rdsquorum01 NTFS Simple 99 GB Healthy
* Volume 1 C NTFS Partition 99 GB Healthy System
DISKPART> select volume=0
Volume 0 is the selected volume.
DISKPART> assign letter d noerr
DiskPart successfully assigned the drive letter or mount point.
DISKPART> exit
Install the iSCSI target server role:
PS C:UsersAdministrator> Add-WindowsFeature FS-iSCSITarget-Server
Success Restart Needed Exit Code Feature Result
——- ————– ——— ————–
True No Success {File and iSCSI Services, File Server, iSC…
Create an iSCSI Virtual Hard Disk (VHDX) object that has the specified file path and size:
PS C:UsersAdministrator> New-IscsiVirtualDisk D:rdsquorumrdscustomquorum01.vhdx -size 512MB -UseFixed
ClusterGroupName :
ComputerName : EC2AMAZ-J6KCNMO
Description :
DiskType : Fixed
HostVolumeId : {93745DAD-3CD4-11EC-8325-022CA4EAA875}
LocalMountDeviceId :
OriginalPath :
ParentPath :
Path : D:rdsquorumrdscustomquorum01.vhdx
SerialNumber : EA1369D3-3287-41E8-946F-13C18A33D01D
Size : 536870912
SnapshotIds :
Status : NotConnected
VirtualDiskIndex : 26184259
Create a new iSCSI target object named rdscustomquorum.
An InitiatorIds is the private IP address of an RDS Custom for SQL Server instances. You can get information about IP addresses on the Amazon EC2 console or by running Ipconfig on the command prompt of the RDS Custom for SQL Server instances.
We use the following private IP addresses:
Node-1 (RDS-custom-sqlserver-1) — 10.0.3.213
Node-2 (RDS-custom-sqlserver-2) — 10.0.1.174
Run the following code:
PS C:UsersAdministrator> New-IscsiServerTarget rdscustomquorum -InitiatorIds IPAddress:10.0.3.213,IPAddress:10.0.1.174
ChapUserName :
ClusterGroupName :
ComputerName : EC2AMAZ-J6KCNMO
Description :
EnableChap : False
EnableReverseChap : False
EnforceIdleTimeoutDetection : True
FirstBurstLength : 65536
IdleDuration : 00:00:00
InitiatorIds : {IPAddress:10.0.3.213, IPAddress:10.0.1.174}
LastLogin :
LunMappings : {}
MaxBurstLength : 262144
MaxReceiveDataSegmentLength : 65536
ReceiveBufferCount : 10
ReverseChapUserName :
Sessions : {}
Status : NotConnected
TargetIqn : iqn.1991-05.com.microsoft:ec2amaz-j6kcnmo-rdscustomquorum-target
TargetName : rdscustomquorum
Assign the virtual disk “D:rdsquorumrdscustomquorum01.vhdx” to the iSCSI target rdscustomquorum:
PS C:UsersAdministrator> Add-IscsiVirtualDiskTargetMapping rdscustomquorum D:rdsquorumrdscustomquorum01.vhdx
Node-1 and Node-2
Run the following command on Node-1 and Node-2 to add a new iSCSI target portal named rdscustomwitness:
PS C:UsersAdministrator> New-IscsiTargetPortal -TargetPortalAddress rdscustomwitness
InitiatorInstanceName :
InitiatorPortalAddress :
IsDataDigest : False
IsHeaderDigest : False
TargetPortalAddress : rdscustomwitness
TargetPortalPortNumber : 3260
PSComputerName :
PS C:UsersAdministrator> Get-IscsiTarget | Connect-IscsiTarget -isPersistent $True
AuthenticationType : NONE
InitiatorInstanceName : ROOTISCSIPRT000_0
InitiatorNodeAddress : iqn.1991-05.com.microsoft:rdsamaz-daebld3.custom.com
InitiatorPortalAddress : 0.0.0.0
InitiatorSideIdentifier : 400001370000
IsConnected : True
IsDataDigest : False
IsDiscovered : False
IsHeaderDigest : False
IsPersistent : True
NumberOfConnections : 1
SessionIdentifier : ffffd985357dd010-4000013700000002
TargetNodeAddress : iqn.1991-05.com.microsoft:ec2amaz-j6kcnmo-rdscustomquorum-target
TargetSideIdentifier : 0100
PSComputerName :
PS C:UsersAdministrator> Get-IscsiTarget
IsConnected NodeAddress PSComputerName
———– ———– ————–
True iqn.1991-05.com.microsoft:ec2amaz-j6kcnmo-rdscustomquorum-target
Node-1, Node-2, and witness node
These steps are performed on Node-1, Node-2 and the witness node:
Navigate to the folder path C:WindowsSystem32driversetc.
Edit the host file to include entries for Node-1, Node-2, and the witness node:
10.0.3.213 RDSAMAZ-DAEBLD3 RDSAMAZ-DAEBLD3.custom.com rdscustomnode01
10.0.1.174 RDSAMAZ-IJMJRH1 RDSAMAZ-IJMJRH1.custom.com rdscustomnode02
10.0.2.62 EC2AMAZ-J6KCNMO EC2AMAZ-J6KCNMO.custom.com rdscustomwitness
Make sure that the security groups for both Node-1, Node-2 and the witness node permit the inbound and outbound connections (type: All TCP, protocol: TCP, port range: <>, source: Custom, plus the security groups or IP addresses for all three instances).
With the ping command, verify that you can establish a connection between Node-1 and Node-2.
Similarly, verify a connection between the witness node to Node-1 and Node-2.
Set up a Windows cluster
To set up your Windows cluster, you run commands on Node-1 and Node-2. Complete the Steps 1–10 on Node-1:
Set up the cluster quorum disk:
PS C:UsersAdministrator> diskpart
Microsoft DiskPart version 10.0.17763.1911
Copyright (C) Microsoft Corporation.
On computer: RDSAMAZ-DAEBLD3
DISKPART> list disk
Disk ### Status Size Free Dyn Gpt
——– ————- ——- ——- — —
Disk 0 Online 40 GB 0 B
Disk 1 Online 1000 GB 126 MB *
Disk 2 Online 999 GB 0 B *
Disk 3 Offline 512 MB 512 MB
DISKPART> select disk 3
Disk 3 is now the selected disk.
DISKPART> online disk noerr
DiskPart successfully onlined the selected disk.
DISKPART> attribute disk clear readonly
Disk attributes cleared successfully.
DISKPART> convert basic noerr
DiskPart successfully converted the selected disk to basic format.
DISKPART> create partition primary
DiskPart succeeded in creating the specified partition.
DISKPART> format fs=NTFS label=”rdscustomquorum01″ quick UNIT=65536
100 percent completed
DiskPart successfully formatted the volume.
DISKPART> exit
Leaving DiskPart…
Create a new failover cluster and specify the IP address.
The following example creates a new a domain-independent Windows cluster called “rdscustomcluster”. To create a cluster, identify an unallocated IP address within the given subnet range that can be used as an IP address for the cluster. In the following example, we use 10.0.3.215 for the IP address:
PS C:UsersAdministrator> New-Cluster -Name rdscustomcluster -AdministrativeAccessPoint DNS -NoStorage -StaticAddress 10.0.3.215
Name
—————–
rdscustomcluster
Get the information about the iSCSI disk (witness):
PS C:UsersAdministrator> Get-ClusterAvailableDisk
Cluster : rdscustomcluster
Id : 0x6BB2C765
Name : Cluster Disk 1
Number : 3
Size : 536870912
Partitions : {\?GLOBALROOTDeviceHarddisk3Partition1}
Add the iSCSI disk to the cluster:
Get-ClusterAvailableDisk | Add-ClusterDisk
Name State OwnerGroup ResourceType
—- —– ———- ————
Cluster Disk 1 Online Available Storage Physical Disk
Set the cluster quorum to Node and Disk majority:
Set-ClusterQuorum -NodeAndDiskMajority “Cluster Disk 1”
Cluster QuorumResource
——- ————–
rdscustomcluster Cluster Disk 1
Add Node-2 to the cluster:
Add-ClusterNode RDSAMAZ-IJMJRH1
Rename the resource Cluster IP Address, because we add one more for the subnet on Node-2:
Get-ClusterResource “Cluster IP Address”| % { $_.Name=”IP Address 10.0.3.215”}
PS C:UsersAdministrator> Get-ClusterResource
Name State OwnerGroup ResourceType
—- —– ———- ————
Cluster Disk 1 Online Cluster Group Physical Disk
Cluster Name Online Cluster Group Network Name
IP Address 10.0.3.215 Online Cluster Group IP Address
Add a new cluster resource for the subnet of Node-2. In the following code, the private IP address of Node-2 is 10.0.1.174. We can choose any available IP address within the given subnet range, for example: 10.0.1.176.
PS C:UsersAdministrator> Add-ClusterResource -Name “IP Address 10.0.1.176” -ResourceType “IP Address” -Group “Cluster Group”
Name State OwnerGroup ResourceType
—- —– ———- ————
IP Address 10.0.1.176 Offline Cluster Group IP Address
Add the IP address of the Node-2 control subnet for the cluster resource:
$res = Get-ClusterResource “IP Address 10.0.1.176”
$param1 = New-Object Microsoft.FailoverClusters.PowerShell.ClusterParameter $res,Address,10.0.1.176
$param2 = New-Object Microsoft.FailoverClusters.PowerShell.ClusterParameter $res,SubnetMask,255.255.255.0
$params = $param1,$param2
$params | Set-ClusterParameter
Set the cluster dependency to either the Node-1 or Node-2 subnet cluster resource:
Set-ClusterResourceDependency ‘Cluster Name’ “[IP Address 10.0.1.176] or [IP Address 10.0.3.215]”
On Node-1 and Node-2, enable SQLAlways On and restart the computer:
Enable-SqlAlways On -Path SQLSERVER:SQL$env:computernameDEFAULT -Force
Restart-Computer
Set up an Always On AG
We configure an Always On AG on an RDS Custom for SQL Server instances by performing the following sequence of steps on Node-1 and Node-2:
On Node-1, create an end point and backup certificate:
USE master;
CREATE MASTER KEY ENCRYPTION BY PASSWORD = ‘XXXXX’;
CREATE CERTIFICATE HOST_A_cert WITH SUBJECT = ‘HOST_A certificate for database mirroring’, EXPIRY_DATE = ’11/30/2022′;
CREATE ENDPOINT Endpoint_Mirroring STATE = STARTED AS TCP ( LISTENER_PORT=1120 , LISTENER_IP = ALL) FOR DATABASE_MIRRORING ( AUTHENTICATION = CERTIFICATE HOST_A_cert , ENCRYPTION = REQUIRED ALGORITHM AES , ROLE = ALL);
BACKUP CERTIFICATE HOST_A_cert TO FILE = ‘D:rdsdbdataBACKUPHOST_A_cert.cer’;
On Node-2, create an end point and backup certificate:
CREATE MASTER KEY ENCRYPTION BY PASSWORD = ‘XXXXX’;
CREATE CERTIFICATE HOST_B_cert WITH SUBJECT = ‘HOST_B certificate for database mirroring’, EXPIRY_DATE = ’11/30/2022′;
CREATE ENDPOINT Endpoint_Mirroring STATE = STARTED AS TCP (LISTENER_PORT=1120 , LISTENER_IP = ALL) FOR DATABASE_MIRRORING (AUTHENTICATION = CERTIFICATE HOST_B_cert , ENCRYPTION = REQUIRED ALGORITHM AES , ROLE = ALL);
BACKUP CERTIFICATE HOST_B_cert TO FILE = ‘D:rdsdbdataBACKUPHOST_B_cert.cer’;
On Node-1, copy the certificates between the hosts:
Copy-Item -Path \RDSAMAZ-DAEBLD3d$rdsdbdataBACKUPHOST_A_cert.cer -Destination \RDSAMAZ-IJMJRH1d$rdsdbdataBACKUPHOST_A_cert.cer
Copy-Item -Path \RDSAMAZ-IJMJRH1d$rdsdbdataBACKUPHOST_B_cert.cer -Destination \RDSAMAZ-DAEBLD3d$rdsdbdataBACKUPHOST_B_cert.cer
On Node-1, create a certificate using the backup certificate of Node-2:
USE master;
CREATE LOGIN HOST_B_login WITH PASSWORD = ‘XXXXX’;
CREATE USER HOST_B_user FOR LOGIN HOST_B_login;
CREATE CERTIFICATE HOST_B_cert AUTHORIZATION HOST_B_user FROM FILE = ‘D:rdsdbdataBACKUPHOST_B_cert.cer’;
GRANT CONNECT ON ENDPOINT::Endpoint_Mirroring TO [HOST_B_login];
On Node-2, create a certificate using the backup certificate of Node-1:
USE master;
CREATE LOGIN HOST_A_login WITH PASSWORD = ‘XXXXX’;
CREATE USER HOST_A_user FOR LOGIN HOST_A_login;
CREATE CERTIFICATE HOST_A_cert AUTHORIZATION HOST_A_user FROM FILE = ‘D:rdsdbdataBACKUPHOST_A_cert.cer’;
GRANT CONNECT ON ENDPOINT::Endpoint_Mirroring TO [HOST_A_login];
On Node-1, create an availability group:
create availability group customag1
with
(
automated_backup_preference = primary,
db_failover = on,
dtc_support = none
)
for
replica on
‘RDSAMAZ-DAEBLD3’ with
(
endpoint_url = ‘tcp://RDSAMAZ-DAEBLD3:1120’,
failover_mode = automatic,
availability_mode = synchronous_commit,
seeding_mode = automatic,
secondary_role
(
allow_connections = all
)
),
‘RDSAMAZ-IJMJRH1’ with
(
endpoint_url = ‘tcp://RDSAMAZ-IJMJRH1:1120’,
failover_mode = automatic,
availability_mode = synchronous_commit,
seeding_mode = automatic,
secondary_role
(
allow_connections = all
)
)
go
Create a database and add it to the availability group
On Node-1, create a database:
create database test;
backup database test to disk =’D:rdsdbdatabackuptest.bak’;
alter availability group customag1 add database test;
On Node-2, join the availability group:
alter availability group customag1 join;
alter availability group customag1 grant create any database;
The Always On configuration looks like following screenshot from Node-1.
Summary
In this post, I explained how to configure HA on RDS Custom for SQL Server database instances using Always On AGs. I also shared some best practices and recommendations for achieving high availability by replicating data across different Availability Zones.
Try out the solution and if you have any comments or questions, leave them in the comments section.
About the Author
Srikanth Katakam is a Senior Database Engineer at Amazon Web Services. He works on the RDS team, focusing on commercial database engines, RDS Custom and SQL Server. He enjoys working on technical challenges in Amazon RDS and is passionate about learning from and sharing knowledge with his teammates and AWS customers.
AWS Database Blog

