

For many organizations, performance is a key priority for databases that need to handle a high load. Amazon Relational Database Service (Amazon RDS) is a managed service with a cost-efficient, reliable, and highly scalable database offering which makes it a suitable use case for such requirements.
In this post, I walk you through benchmarking Amazon RDS for SQL Server performance using HammerDB. HammerDB is an open-source database load testing and benchmarking tool, where you create test schema and simulate the transactional load using virtual users. You can analyze the test results in order to right-size your database instance so that it matches your workloads. Although HammerDB helps you simulate generic TPROC-C (derived from TPC-C), you should always benchmark your database based on your own workload to get accurate performance results.
Prerequisites
To get started, complete the following prerequisites:
Provision Amazon RDS for SQL Server to benchmark the performance testing. For instructions, see Creating a Microsoft SQL Server DB instance and connecting to it. Take a note of your username and password as you will use them later to connect to the database.
Launch Amazon EC2 Windows instance to install HammerDB and generate the load. I recommend running the instance in the same Virtual Private Cloud (Amazon VPC) next to your RDS DB instance, to eliminate network latency.
Solution overview
Running the RDS for SQL Server in a private subnet ensures that only resources provisioned within the Amazon VPC communicate with the RDS DB instance.
Make sure you add an inbound rule to allow port 1433 in the security group assigned to RDS to be accessible from the Windows Server EC2 instance. For more details about security groups, see Security groups for your VPC.
We walk you through the following high-level steps:
Install HammerDB.
Build your schema.
Run your performance test.
Install HammerDB
After connecting to the Amazon EC2 Windows instance, download and install the latest version of HammerDB. As of this writing, the latest version is 4.2.
Open hammerdb.bat located under C:Program FilesHammerDB-X.X.
Build the schema
To build your schema, complete the following steps:
On the Options menu, choose Benchmark.
Choose SQL Server and TPROC-C.
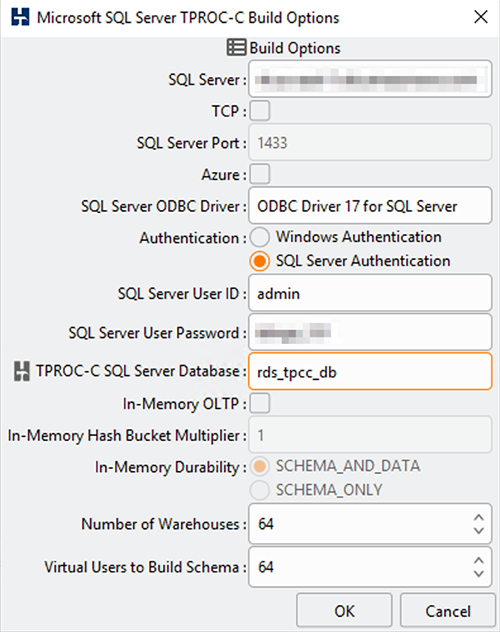
In the Benchmark panel, expand TPROC-C, Schema Build, and choose Options.
For SQL Server, enter the DNS name for your RDS DB instance. To find your RDS DB instance DNS open RDS console, select Databases and click on DB instance name, on the Connectivity tab copy the endpoint. The Endpoint looks something like this: sample-instance.123456789012.us-east-2.rds.amazonaws.com.
For SQL Server User ID, enter your SQL Server user ID (if you selected SQL Server Authentication).
For SQL Server User Password, enter your password.
For TPROC-C SQL Server Database, enter a name for the database that is created as part of the schema build.
For Number of Warehouses, choose how big you want your testing data to be.
For Virtual Users to Build Schema, enter your preferred number of virtual users. A higher number speeds up test data creation. We recommend a value closer to the total vCPU.
Choose OK.
Under Schema Build¸ choose Build.
Confirm by choosing Yes.
On the Virtual User Output tab, monitor the schema creation progress for each virtual user.
When the status of all virtual users changes to Complete, choose the red traffic light icon.
Run a performance test
We’re now ready to run our performance test.
Expand Driver Script and choose Options.
For SQL Server, enter the domain name for your RDS DB instance.
Select SQL Server Authentication and enter your user ID and password.
For TPROC-C SQL Server Database, enter a name for the database that is created.
For TPROC-C Driver Script, select Timed Driver Script.
Select Use All Warehouses.
Leave the other fields with the default value.
Choose OK.
Under Driver Script, choose Load.
Expand Autopilot and choose Options.
Make sure you select Autopilot Enabled.
For Minutes per Test in Virtual User Sequence, enter 8.
For Active Virtual User Sequence, enter 4 8 16 32 64 128 256.
Select Show Virtual User Output.
Choose OK.
Choose Autopilot to launch the simulation.
Autopilot is an easy-to-use automated mode to simulate the same test with a different number of virtual users. For more information, see Autopilot for Automated Testing.
When Autopilot is complete, you get a result similar to the following:
NOPM (new orders per minute) records how many new orders per minute the database can achieve. TPM (transactions per minute) records all transactions, both commits and rollbacks, during the measuring period on the database.
For further understanding of how your database instance is performing while under load testing, go to the Databases page on the Amazon for RDS console, and navigate to the Monitoring tab. This provides you with additional monitoring capabilities like memory consumption, read/write IOPS, network throughput, and more. These metrics allow you to determine key factors in database performance, which you can easily scale vertically or horizontally using Amazon RDS so you can keep up with the increasing demand of your application.
Amazon RDS offers Performance Insights, a powerful, easy-to-use, built-in tool with which you can visualize database load and filter by different criteria. For more information, see Monitoring DB load with Performance Insights on Amazon RDS.
Amazon RDS also offers great integration with Amazon CloudWatch, allowing you to monitor near real-time metrics and take automated actions accordingly using alarms. As an example you can monitor high CPU or RAM consumption using CPUUtilization, FreeableMemory and change the instance class of your DB instance, or you might need to change the number of DB instances and read replicas. For a complete list of available metrics, see Overview of monitoring Amazon RDS.
Clean up
When you’re done with your performance testing, clean up your resources by deleting the RDS instance and stopping your EC2 instance.
Conclusion
In this post, I showed you how to run performance testing on Amazon RDS for SQL Server using HammerDB. This benchmark tells you how well your database performs, and allows you to compare different instance types. If you have any comments or questions, leave them in the comments section.
About the Author
Ramy Zbeidy is an App Migrations Consultant at Amazon Web Services. He is experienced in helping clients migrate to AWS using compute, database, storage, migration, and DevOps services. With a strong development and architectural background, he has helped a broad range of verticals achieve a successful cloud journey.
Read MoreAWS Database Blog